

Rheinberg illumination
Savile Bradbury has contributed this easy way into the fascinating Rheinberg illumination
 Rheinberg illumination has three advantages:
• It’s informative
• It’s attractive
• It’s cheap!
Read below on how this picture was made.
Related to dark-ground illumination, which was described on a previous Club web page, is the technique of illumination which was invented by Julius Rheinberg and first published in the Journal of the Royal Microscopical Society in 1896. In its simplest form, all the direct light entering the objective is of one colour whilst the light diffracted or scattered by the object itself has a different, contrasting colour. This gives very dramatic and colourful effects, and is equally easy to set up for almost any microscope. It works well with objectives up to about a magnification of ×40 and a numerical aperture of c. 0.65. With more effort, the technique can be made to work with even higher aperture objectives. In its simplest form, Rheinberg uses a stop of two different colours which is fitted into the front focal plane of the condenser. Usually, the filter holder is located sufficiently close to this plane to serve well. The coloured stop has a central disc of the dark colour, say blue or very deep red, which is intended to form the background. This disc should be truly centred and of such a size that it colours all the direct light which enters the objective. Its size may be found by focusing the objective on a slide with the substage condenser diaphragm wide open. Remove the microscope eyepiece and look at the back focal plane of the objective, which will be entirely filled with light. Close the condenser iris diaphragm until its edge can just be seen encroaching at the edge of the objective.
A phase-contrast centring telescope helps greatly with this, as it magnifies the image of the objective’s back focal plane. Alternatively, the image of the back focal plane of the objective may be observed in the exit pupil (Ramsden circle) of the eyepiece. To see it clearly here, however, a magnifier is essential. When the condenser diaphragm has been adjusted, remove the condenser and measure the diameter of the opening in the condenser diaphragm.
 This dimension (plus a little extra to allow for errors in the making and fixing of the stop) is the diameter required for the central coloured stop. A disc of this size may be cut out of coloured gelatine and stuck centrally onto a disc of glass or plastic cut to fit in the filter holder. If you are lucky enough to obtain a book of little samples of coloured gelatins as supplied by firms such as Lee Filters, who specialise in making gelatins for theatrical lighting, you are fortunate indeed!
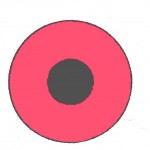
Having fixed the central disc, the remainder of the outer part may be filled in with the secondary, lighter colour. The appearance of such a disc is shown in on the left
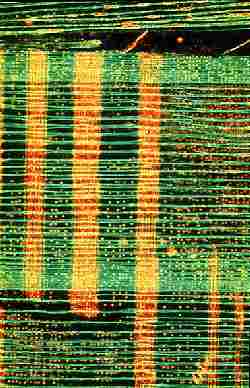
 If you intend examining objects which have a pronounced structure at right angles (as, for example, in a longitudinal section of wood, as shown above) then a very pleasing result is obtained with an alternative type of stop, which I call a ‘quadrant stop’.
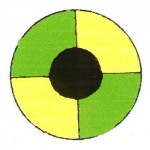
This is made as follows. Find the diameter of the circle which would supply all the direct light for objective you wish to use (using a phase telescope as described above) but instead of using a colour for this make it absolutely opaque with stuck-on black paper or by spinning a disc of black enamel onto the base disc.
After this is hard or has dried then divide the outer part of the disc into four quadrants and fix two colours of gelatine to these. Opposite segments are of the same colour and lighter colours serve best here. Yellow or orange and green or light blue make good pairings. When completed, the disc should look like Fig 2.
A fuller description of Rheinberg illumination and the effects which it can give will be found in the RMS Handbook No. 34 – Contrast Techniques in Light Microscopy by S. Bradbury & P. J. Evennett (1996) BIOS Scientific Publishers.
Please try it – the results are often most impressive and beautiful.
Savile Bradbury
Want to learn more?
We have a more recent article that explains how to use a colour printer and free software to make Rheinberg discs:
Julius Rheinberg read 2 papers to the Club, on Friday 18th December 1896 and Friday 15th October 1897:
- Rheinberg, J. (1897a), Note on Coloured Illumination, Journal of the Quekett Microscopical Club, Series 2, Volume VI, pp. 346-7
- Rheinberg, J. (1897b), Note on a New Modification of Double Colour Illumination, Journal of the Quekett Microscopical Club, Series 2, Volume VI, p. 438