

1. The stand
The mechanics of the stand, basic care of the microscope
The microscope is an optical bench designed to hold a series of lenses in a precise relationship to one another, all on a common optical axis. During the seventeenth and eighteenth centuries, the single lens or “simple” microscope – as epitomised by Leeuwenhoek – with its single objective lens was superior to a compound microscope which magnified the image in two stages using an objective as the first stage and eyepiece as the second. In the early compound microscopes the aberrations, or optical errors, of the two sets of lenses provided an image of poorer quality than the single lens microscope.
By the early nineteenth century lenses were sufficiently well made to permit the commercial development of the compound microscope, and it this type of instrument with which we are chiefly concerned. Later a third lens system, the condenser, was added to provide high-quality illumination for transmitted light, and the microscope as we know it, came into being. By the end of the nineteenth century, the light microscope had attained the height of its development, and the performance of the instrument was limited only by the laws of physics.
The distance between the objective lens and the eyepiece is determined by the mechanical tube length (see part 2 and part 7). Various standardised lengths have been adopted by different manufacturers. Since the twentieth century, manufacturers have tended to standardise on one size, 160 mm. This has led to the basic design of stand seen in Figure 1. (Note that in this picture one of the stage clips has been inadvertently moved to protrude into the stage aperture!)
Modern research stands will be ‘infinity-corrected’ (part 7), where the tube length is theoretically infinite. The specimen is viewed at the front focal plane of the objective, so that the image-forming rays emanating from the objective are parallel. They are then brought to a focus at the primary image plane, situated at the front focal plane of the eyepiece, by a single lens element – the ‘tube lens’. This then allows the designer extra space between the objective and eyepiece in which to put extra equipment without having to incorporate many extra lens elements to maintain the primary image at its proper location.
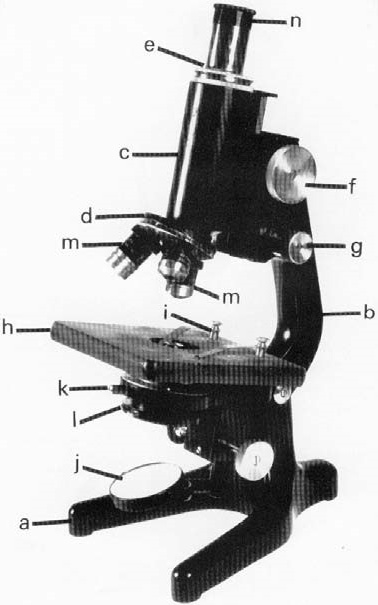 |
(a) Foot
(b) Limb (c) Body tube (d) Revolving nosepiece (e) Draw tube (f) Coarse focus (g) Fine focus (h) Stage (i) Stage clips (j) Mirror (k) Substage assembly, often with centring mechanism (l) Filter tray (m) Objectives (n) Eyepiece |
Figure 1. The basic microscope stand. This type uses an external light source.
This kind of design, prevalent until after the Second World War, has generally been superseded by the binocular microscope such as that shown in Figure 2.
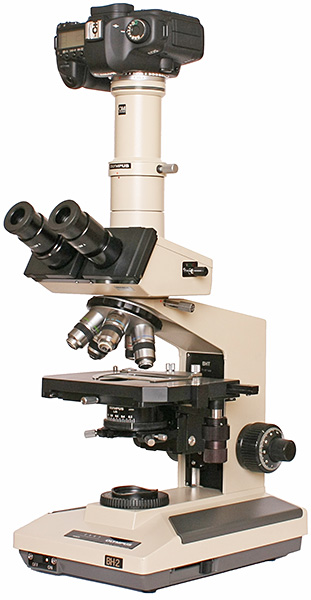
Figure 2. A modern modular design of stand, with integral light source. The transformer for the light may be built into the base, or an external transformer may be required.
The main differences are the provision of internal illumination, co-axial mechanical stage controls, a modular construction and stage focusing. There is a binocular head which may be replaced by a trinocular head for a camera system.
The eyepieces have dioptre controls, and there is provision for an optional intermediate tube. The focusing controls are co-axial and a camera attachment is provided with a focusing eyepiece.
The advantage of the modular design allows intermediate tubes for contrast enhancement attachments, a magnification changer or a drawing tube to be inserted. Furthermore, a binocular head is much more comfortable to use and imposes less strain on the eyes.
A considerable advantage of the older design, however, and one for which many serious microscopists retain a monocular stand is the fact that the monocular stand has a draw tube (which allows the mechanical tube length to be varied) and so permits the user to correct for spherical aberration in the image. This cannot be done easily with a binocular microscope. This will be explained further in part 4.
Modern stands tend to be much heavier than the older monocular designs; this is an advantage in to reducing vibration when photographic equipment is added to the microscope. Because the limb of a modern instrument is cast integrally as part of the foot, there is no limb locking pin to allow inclination of the microscope for comfortable use by a seated user. As a result, the eyepieces are now usually inclined in the binocular head. Such inclined eyepieces allow the stage to be kept level.
Location of dirt
When carrying out photomicrography (see part 9), it is frustrating to find that an otherwise perfect image on film is ruined by dirt or marks which have gone unnoticed whilst taking the picture. The eye-brain system is quite good at ‘filtering’ these discrepancies out of the field of view. The procedure for locating dirt in the microscope is simple: rotate or move each optical surface in turn, working methodically from one end of the instrument to the other. It is possible to unscrew the lenses of the eyepiece (do this separately) to clean them, but do not be tempted to do the same for the objectives or the condenser.
The two surfaces which collect the most dirt and dust are the condenser top and bottom lenses, and top lens of the eyepiece(s). Heat from an integral bulb in the microscope base tends to draw dust up onto the lower lens of the condenser. Dirt and immersion oil (the function of immersion oil is explained in part 4) can fall onto the condenser top lens from the slide on the stage above them. Dirt on or in the eyepieces and condenser will cause out-of-focus patches in the image which are disturbing, but dirt and dust on the objective will reduce the sharpness and contrast of the image. Common sources of contamination on the objective front lens are immersion oil and fingerprints.
Basic care of the microscope
Store your microscope in a box or, if it is left out on the bench, use a plastic or nylon cover to protect it from dust. Dust is the great enemy of moving parts, precision guides and optical surfaces; it will form an abrasive when mixed with optical grease or graphite (used to lubricate working parts) and will impair image quality.
Since optical glass, and especially the special anti-reflection coatings on its surface, is relatively soft, no lens is improved by cleaning: it is very much a case of cleaning with very soft optical tissues when needs must, and reducing dust penetration wherever possible. Advice on maintaining your microscope is given in part 11.
© Jeremy Sanderson, Oxford, 2010