

10. Digital imaging
This article on digital imaging will consider some very basic theory of how an electronic image is formed and stored for later manipulation. I will also discuss how a digital camera may be coupled to a microscope. Because of the simplicity and ease of use with which digital images may be collected when compared to classical film-based technology, it is easy to amass a considerable number of images very quickly indeed. I have, therefore, included some information on image display and archival systems that may be acquired freely on the Internet.
What advantages are there to using electronic means of acquiring images, and how does this new technology differ from using traditional silver-based film? Film is exposed in the camera, processed in a developer chosen according to the subject and intended method of reproduction, and then (for negative film) printed. With digital imaging, the corollary is image capture, digital processing, manipulation on the computer, and image output in either digital, paper or film format. The two systems overlap and complement to some extent, and both have their own unique advantages.
Advantages of digital imaging
- Convenience & immediacy of results, also as a check for film exposure
- No film or processing costs
- No wasted exposures or loss through wrong development
- Selective erasure and manipulation of images is easy
- Ease of copying and instantaneous transmission worldwide
- No loss of image quality on successive duplication of images
- Reproduction into various output formats
- Flexibility to alter images reversibly after exposure (e.g. ‘before & after’ shots)
- Different images may be combined as one in a series of removable layers
Disadvantages of digital imaging
- Higher initial cost of equipment at startup
- A power supply is required, either long-life batteries, or hard-wired domestic
- Silver-based film still gives superior resolving power at relatively low cost
- The ‘film speed’ of the CCD is fixed
- CCD sensors may be adversely affected by heat from the light source
- The limit to the final image output is determined by the image initially captured
- Electronic data is transient, and can be very easily lost unless saved
- Some software programmes do not permit actions to be ‘undone’
- Some professional-grade software can be very complex and expensive
- Some knowledge of reprographics required for producing hard copy images
Digital images can be copied exactly without loss – cloning – since they are comprised of sequences of numbers. Optical duplication of an image always results in a sequential loss of information from one step to another, be it from the object to the camera image, or from the film to the print, or from the original print to a duplicated copy. Digital images can be transported much more easily than physical film-based images or paper-based prints. Within seconds of creation they can be sent worldwide via telephone and satellite links. The single most significant area in which digital imaging has had an impact is in manipulation and presentation of the image. Operations that were once the preserve of skilled medical artists or graphics designers can now be performed using powerful software on a home computer at the touch of a button. While the ordinary photomicrographer now has to know a little about prepress output and reprographics, there is also responsibility to acknowledge digitally manipulated images, when such alteration from the original is both easy and often indistinguishable. Digital imaging is certainly not going to render traditional film-based photography obsolete overnight, but the advantages and responsibilities that it brings to both photography and photomicrography are considerable.
The power of digital imaging lies in the way in which the data comprising the picture that we eventually see is encoded. Humans calculate in the base of ten, because we have ten fingers and thumbs on our hands. Computers use the base of two, called binary, because they are comprised of switches which are either ‘on’ or ‘off’. Each ‘on/off’ state is represented by a ‘one’ or a ‘zero’ respectively, and is the smallest, irreducible, piece of digital data called a bit. Since computers can process a sequence of numbers extremely fast (several million operations a second), it becomes irrelevant that a simple instruction requires many ‘1s’ or ‘0s’ as a string of numbers to represent a computer command, text or pictorial image component. All of this processing requires powerful computers and software. Computer technology changes rapidly, but the following list is the minimum required for successful image processing, and can generally be found in a PC clone costing under £500.
- Minimum 32 MB RAM memory
- Pentium processor PI, II or higher
- Clock speed of CPU chip = 166 MHz minimum
- 15″ Monitor with dot pitch of 0.28 mm dpi
- Graphics card with 4Mb RAM minimum
- Hard disk capacity of 1 Gigabyte minimum
These values are current for 2000. Those readers who wish to know more about recommended computer requirements are referred to Davies & Fennessy (1998) or the latest monthly periodical press, for technological advances proceed according to Moore’s law.
The heart of any digital camera is the CCD (charge-coupled-device). This mimics the retina of the human eye, containing as it does millions of rods and red, green and blue cones, rather than silver-halide film emulsion. The CCD is composed of a matrix of sensors overlaid by a series of red, green and blue filters. The tri-colour filters are required to achieve additive colour reproduction, with twice as many green filtered sensors in order to closely approximate the human eye. Each of these sensors will encode one pixel in the image. The term pixel is short for ‘picture element’.
The object seen down the microscope modulates the light with which it is illuminated, and this light is converted into electrical energy which is proportional to the brightness of the various parts of the image. The electrical charge converted by the sensors of the CCD are read out as a stream of electrical signals which are converted by an analogue-to-digital (A/D) converter into a vast stream of binary (digital) data which the computer can reassemble into the image.
The number of pixels in an image is derived by multiplying the number of pixels formed horizontally in the CCD by those formed vertically. The greater the number of pixels in the CCD matrix, the greater the detail resolved in the final image. It is possible to throw away data, and so reduce the size of the image for easier manipulation, storage and transmission, but it not possible to accurately increase the number of pixels from data that was never captured in the first place. Therefore, buy a camera with the best possible CCD that you can afford.
The size of the image is dependent upon whether it is a two tone (black and white) line art image (like lith film), a greyscale or a colour image. The number of shades of grey or colours (which affect contrast) associated with each pixel in the image is termed the ‘bit-depth’ of that image. In computing the smallest piece of data is the bit, represented either by a single ‘0’ or a ‘1’. This translates to black or white at each pixel in the image. If two bits are associated with each pixel, then four (22) different combinations are possible: 00, 01, 10, and 11. These will code for black, white and two shades of grey per pixel. For monochrome imaging, 8-bit depth (28 = 256 grey levels) are used, with 0 representing pure black and 255 representing pure white. There are 254 shades of grey in between the black and white limits. The maximum number of different shades of grey that humans can see range from 20 to 40, with the average being 30, and the best values around 60 shades. Our eyes are therefore have 5-bit detectors.

| 0 = black | 255 = white |
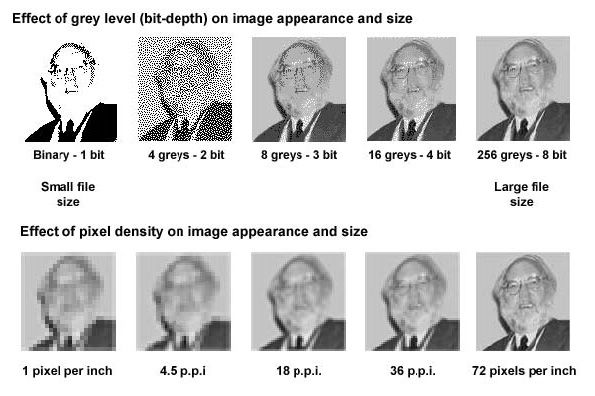
Figure 1. (A) The effect of grey-level (bit-depth) on image appearance and file size. (B) The effect of pixel density on image appearance and file size. In both cases, the file size increases from left to right. Image of Savile Bradbury used with permission.
The smallest bit-depth that encompasses all discriminated shades of grey is therefore 8-bit depth. Eight bits are grouped as a byte in computer memory; therefore each pixel of a monochrome image has one byte associated with it. Colour images use one byte per primary colour, hence there are 256 different shades each of red, green and blue. Thus a colour image has 24-bit depth (28×3 = 224), giving rise to 16,777,216 or 16.7 million possible different shades. The amount of data required to encode even a simple colour image is vast, and image files of upwards of five to fifty megabytes (MB) are not unheard of. An extremely fast and memory-powerful computer, with plenty of RAM, is required to handle such images. Large images can be compressed to ease storage and manipulation without compromising computer performance, or risking a crash with consequent data loss. This is discussed below under image format.
There are the two main types of computer graphics. Vector images are made up of mathematically defined lines and curves called vectors. These images produce clear crisp lines no matter to what size they are scaled, and are useful for type (especially small fonts), logos and bold graphics. Raster images are composed of a grid of pixels, which are usually unseen by the eye unless magnified greatly. Editing is performed upon related groups of pixels. Raster images are best suited to continuous tone images, such as paintings or imported photographs. Raster images are resolution dependent; they will lose detail if they are scanned in or created at low resolution, and subsequently printed, or imaged, at high resolution. Because computer screens are composed of grids of pixels, both types of images are displayed as pixellated images. Vector-based products render their shapes into pixels for display.
The word resolution is associated with how much detail is perceived in an image, and yet in the field of digital imaging can be used in several different contexts.
Lines per inch (LPI)
LPI is the resolution used in printing. When documents that include photographs or shades or tints of a colour are printed, they are “screened”. This used to be done by laying a piece of film with dots printed on it over the film before exposing it. The dots are arranged in rows, or lines. LPI referred to the number of lines of dots per inch. The higher the LPI, the smoother the shades look. Some typical LPI are 50 LPI for laser printers, 85 LPI for newsprint, 175–200 LPI for colour magazines.
DPI or Dots Per Inch
Dots per inch also describe printer resolution. Not only do we refer to the number of lines per inch, we also refer to the actual number of dots that can be printed per inch. The higher the DPI, once again, the smoother both photographs and line art will appear. LPI has no effect on line art, since line art isn’t screened. Line art is art made up of shapes like rectangles and ellipses, and lines. Line art can only be one colour, so it doesn’t have any shading.
PPI or Pixels Per Inch
Your monitor displays everything in pixels per inch (PPI), usually 72 PPI. Therefore, if your image is 72 pixels × 72 pixels, it is displayed at a one inch by one inch size. If you change the resolution of the graphic to 36 PPI, the image will be displayed at two inches by two inches (36 × 2 = 72). Conversely, change the resolution of your image to 144 PPI, and it will shrink down to be displayed at half an inch by half an inch. With printers, however, if you increase the DPI of an image, it will remain the same size, but it will look smoother, because more dots are being used to create it. On the other hand, increase the PPI that a graphic will be displayed on a monitor and you’ll actually decrease the size of the graphic.
For printers, a 4″ × 5″ image always remains 4″ × 5″. Increase the resolution of the image, and you’ll be able to display more shades of grey, but the physical size remains the same. For display, the size of the image is dependent on the resolution of your display device. The higher the resolution of your display device, the smaller your image appears. The resolution of the image itself doesn’t matter to your monitor.
Resizing bitmap images usually doesn’t work very well. Tell the program to make the bitmap 150% larger, and your image will be very pixellated. Make it 50% smaller, and it will look blurred and indistinct. When you resize an image, you instruct the program to change the size of the graphic, but do nothing to the resolution. When resampling, you ask the software to change the size of the graphic and the resolution, which makes all the difference in the world. It gets very confusing in Photoshop, because you do both resizing and resampling via the Image/Image Size dialog box. The key to resampling in Photoshop is to make sure the file size box is checked.
Whether images are created digitally using a camera and software coupled to your microscope, or digitised using a scanner, they must be stored as a particular type of file.
After the name of the file (which you choose) there is its extension which determines its format, this is encoded by the last three letters, which are separated from the file name by a dot. For example, diatom.tif and diatom.jpg will be exactly the same file, but encoded in two different formats. Many different files have evolved; some are ubiquitous, others have been created by the developers of specific, branded, software. It is useful to know the more common formats, to ensure that files can be transferred from one programme to another or sent in the correct form to a printer or other output device.
- BMP
- (.bmp) is native to Windows operating systems.
- GIF
- (.gif) Compuserve graphic image format, developed for sending images down telephone lines and over the Internet. Programmers pay royalties to Compuserve to use it.
- JPEG
- (.jpg) Joint photographic experts group, can compress images up to 20:1, but data is lost (lossy compression). At high compression ratios, this can be seen as jagged ‘steps’, especially at the edges of diagonal features in the image. The colour fidelity of JPEG images is often better than GIF images, so the general rule is to use the JPEG format for photographic images and GIF for illustrations. Photographs have a full range of colours which tend to blend into each other. Illustrations have a limited number of colours, or areas of solid colour, and these do not withstand lossy compression as well as photographs.
- PICT
- (.pic) is native to Apple Macintosh computers.
- PNG
- (.png) portable network graphic is supported by Adobe Photoshop, designed to replace the GIF, and it is royalty-free. GIFs and JPEGs don’t always look the same when run on different operating systems. With PNG, this is not the case. PNG, like GIF, uses loss-less compression.
- PSD
- (.psd) is native to Adobe Photoshop, and allows images to be saved retaining several layers, this allows versatility, but the image files can be extremely large.
- TIFF
- (.tif) tagged image format does not lose data upon compression. Use it for storing archived images, store large valuable files on removable storage media and have a systematic means of archiving files.
Since this article deals with static images rather than movie clips or video, formats such as mpeg.avi (Video for Windows) or Quicktime.mov (for Apple Macs), are not dealt with here. There are lists of all the different file formats (which can be changed in DOS) on the Internet. Try, for example WhatIs.com, Wotsit.org or What Is…every file format in the world.
There is a general trend for imaging professionals in education and industry to choose Apple Macintosh computers over PC clones, but whatever computer you use is down to your preference. Most modern Apple Mac computers will also run the Windows operating system for PCs. What really matters is that you incorporate enough RAM memory to process the extremely complex operations needed to acquire and manipulate images, a fast enough processor, and a large enough hard-drive to store the final images. Of the software needed, Adobe Systems has created an almost universally-accepted image manipulation system with Adobe Photoshop, and this is available in both Mac and PC versions. There are cheaper, simpler cut down versions, such as Adobe Photoshop Elements available. PCs running Windows come with basic image display programmes, such as Imaging and Paint, but these are unable to perform complex manipulation algorithms. For those with Apple Macs, Linux or Windows, a freeware image manipulation programme called ImageJ (formerly NIH-Image) or Fiji is available, and a paper dealing with the use of this programme for amateur microscopy has been written by Strange (1996), or see the on-line manual written by Tony Collins.
Attaching a digital camera to the microscope
Previously, before the affordability of point-and-shoot digital cameras, members of the club have built CCD cameras from electronic starter kits and linked these to the trinocular port or eyepiece of their microscope. For details of how to do this, see Dutton (1997) and Scott (2000). The original CCD camera offered by Maplin Electronics has been supplanted by a choice of more sophisticated models (catalogue April-Aug 2000, page 697), but the principles remain the same. Essentially, the lens supplied with the camera is removed, and the CCD arranged above the microscope at the primary image plane to pick up the image from the objective. The signal is fed through a modulator, or frequency converter, and the TV signal tuned into the computer monitor. A graphics card, and a TV-tuner card (both with the associated software drivers) are required in the computer. The images can be processed either with Video for Windows (incorporated within Windows 95 and later operating systems), Photoshop or similar software. The image at the primary image plane usually overfills the CCD sensor. Dutton used a reducing lens to fit the primary image onto the CCD; Scott opted to reduce the tube-length of the microscope. At TV resolution, the spherical aberration and lack of contrast are probably of less importance than the fact that the objective will no longer be parfocal with others on the nosepiece, and that it is not easy to reduce the tube-length of the microscope.
For those who wish to use a proprietary consumer digital camera for connection to the microscope, there are two principal models to consider. Nikon has been extremely successful with its Coolpix 950 and 990 series. These cameras have a 28 mm female thread on the front lens assembly which allow them to be screwed either into a modified eyepiece, or coupled directly to a Leitz (Wetzlar) Periplan high-eyepoint eyepiece (Evennett, 2000). The Coolpix swivels in the centre to permit the LCD screen to be viewed at a convenient angle whilst on the microscope. The recently introduced Olympus 3030 Zoom uses its own proprietary phototube to connect to a trinocular port via a C-mount. It is slightly less versatile than the Coolpix, but has the advantage of using a remote hand-held control to view its images on a remote monitor. Most other consumer digital cameras do not have the facility to connect to a microscope. It is worth referring to Steve’s Digicams for detailed reviews and specifications about digital cameras currently on the market.
A great many image readers and archive systems can be bought or downloaded from the Internet either as shareware or freeware. A good all-round freeware package that permits archiving and viewing of all the commonly-used image formats is IrfanView, or try FastStone Image Viewer.
Until the resolving power of digital images begins to equal that of conventional film, the only way of creating digital images with highly-resolved detail is to take a conventional photograph, preferably onto transparency film, and to digitize this in a custom-built slide scanner. If negative film is used to produce a print, it is still possible to produce a high-quality digital image using a desktop flat-bed scanner. There is not space here to cover these topics. Manufacturers of scanners, such as Agfa, besides having much information on preparing images for pre-press or desk-top publishing, also make information available on digital scanning (e.g. Agfa 1994). From time to time it is helpful to be able to transfer digital images onto reversal (positive) slide film for projection. This is generally beyond the means of the amateur, requiring a specialist digital-analogue slide writing machine, although it is possible to find photographic bureaux which offer the service. Members are advised to look in the classified pages of Amateur Photographer or similar publications.
Finally, however the image is recorded it is strongly recommended that a notebook is kept to avoid forgetting details and falling into error later. For any meaningful evaluation of your photomicrographs, include a scale bar to indicate the size of the subject (see part 5). For this an extra exposure of a micrometer scale bar substituted for the specimen on the microscope stage at the same magnification as the photomicrograph is well worth the trouble for calibrating the scale bar, since it can be enlarged to the same degree when making the final print, or used to calculate the overall magnification of a projected slide. However, if the original image is cropped smaller, and then resized to match a defined space within text, or is included within a panel of images, do not neglect to resize the image scale.
One final word of warning: submit everything that you download from the Internet to a reputable and up-to-date virus-checking programme. Also, have your most valuable data backed up as copies on CDs, Zip or floppy discs.
References
Agfa-Gevaert (1994) An Introduction to Digital Scanning, Digital Colour Prepress volume 4, Agfa Educational Publishing.
Davies, A. & Fennessy, P. (1998) Digital Imaging for Photographers 3rd Edn. Focal Press, Oxford. ISBN 0-240-51538-2.
Dutton, J. A. (1997) Constructing and adapting sub-miniature CCD TV cameras to the microscope. Bulletin of the Quekett Microscopical Club, 30: 21–22.
Evennett, P. J. (2000) The new photomicrography Proc. Royal Microscopical Society, 35/4: 253–256.
Scott, B. (2000) Digital Imaging and the Microscope. Quekett Journal of Microscopy 38/7: 505-509.
Strange, A. (1996) Image analysis and enhancement in video-microscopy using a Macintosh computer. Quekett Journal of Microscopy, 37/7: 580–592.
Useful links
Basic digital imaging tutorials
Digital Imaging Tutorial
Digital Photography Tutorials
Accurate image & desktop publishing, and monitor calibration.
Calibrate Your Monitor for Accurate On-Screen Color Display – How and Why
Visual Monitor Calibration Tests and Instructions
© Jeremy Sanderson, Oxford, 2010