

Stacking
Enhancing depth of field by combining image stacks
Introduction
Stacking is the process of combining a series of digital images of the same subject area, taken at different focal planes, into a single image with great depth of field, using a computer program.
Stacking in photomicrography
Many of the subjects that we enjoy examining through our microscope have significant depth. To appreciate them, we use the fine-focus control to bring various parts into sharp focus in sequence. That way, we get a much better impression of the 3D structure we are seeing. What if we took a new picture each time we made an adjustment to the fine focus, and then combined each of these ‘slices’ together to reconstruct the full depth of the subject? In fact we can do exactly this and use software to select the sharply-focused parts of each slice and combine them into a single composite image showing greatly extended apparent depth of field.
The practicalities of stacking
Stacking inevitably has its limitations, and there are a few general rules that will help you to make better stacked images.
- Practise your stacking technique on subjects that don’t move! Live subjects like water fleas and mosquito larvae make attractive subjects for stacking, but you need to learn how to confine or anaesthetise them first. Start with a nice simple prepared slide, choosing a subject with significant depth.
- Make sure your fine focus operates smoothly. Note the settings of the fine focus at the top and bottom focal plane of the subject.
- Stacking software needs images to be acquired in a logical sequence, i.e. bottom → top or top → bottom, not randomly.
- Stacking works best with a series of approximately equal focus steps between top and bottom settings.
- Check visually that the size of focus step you have chosen is appropriate to the subject and magnification.
- If you have good parfocality between your visual eyepieces and your camera, and your trinocular head permits simultaneous viewing and photography, then it is possible to judge steps by eye, otherwise use the tick marks on your fine focus and be careful not to loose concentration and forget which direction you are turning the focus wheel!
- Allow plenty of overlap between steps; the idea is to move smoothly though the depth of the subject just as though you were focusing normally. This is important for the stacking software to work properly. Failure to allow enough overlap causes banding to appear in the stacked output.
- Make sure your camera sensor is as clean as possible before you start. Dust spots on the camera sensor create irritating trails during the operation of the stacking software, which appear on the final output and can give some tedious and tricky cleanup tasks in post processing if they are numerous. Best to minimise them by having a clean sensor to start with.
- Start with a subject that is suitable for a moderate magnification objective, ×10 – ×25 is ideal. Stacking with objectives above ×40 requires a precise fine focus and a steady hand.
- Certain kinds of structure cause problems to all stacking software. A notorious example is fine overlapping hairs, when the software finds it difficult to decide what is above and what below. The result can be loss of detail and semi-transparent hairs instead of solid ones. There is no substitute for retouching in this case, and Zerene Stacker’s ability to retouch the output from single frames from the stack is a powerful help. In principle any semi-transparent structures which lie above or below other similar structures, can create headaches in stacking.
Stacking in macrophotography
Before moving to consideration of the choice of stacking software, it is worthwhile to mention stacking in high magnification macrophotography. This site is primarily for those interested in all aspects of the microscope and microscopy rather than the world of macrophotography, but increasingly these two interests are overlapping and coalescing as macrophotographers tackle smaller subjects and higher magnifications.
Let us suppose we wish to take a highly detailed picture of the head and eyes of a dead fly. This subject is small so magnifications above 1:1 will be needed to reveal its detail, but it is significantly thick and three dimensional so we cannot simply put it on a slide, squash it with a coverslip and examine it with the microscope. We want to use magnification in the microscope objective range, ×5 and above, so our ability to use conventional macro lenses is limited. There is the famous and highly regarded Canon MP-E 65 mm manual focus macro lens which gives superb results up to its design magnification of ×5, but this lens is expensive and a steep learning curve for those used to a conventional macro lens with more modest magnification. For more information on the MP-E 65 used as a macro lens view this tutorial: Macro with the Canon MP-E 65mm by John Devries and look at the advice of Brian Valentine, the foremost exponent of this lens in the field: Macrophotography by LordV.
To use this lens at home on the workbench with our fly will require a method of accurately and evenly stepping the distance between lens and subject so that we can collect an overlapping set of images for our stacking software. This can be achieved with a variety of accessories, such as screw-driven focus sliders, linear stages and microscope focussing blocks removed from a conventional compound microscope. There is also a commercially-available computer-controlled motorised stacking rail called the Stackshot which enables automation of the entire stack collection process. A search of photomacrography.net will reveal that, if it is within your budget, the Stackshot is now a very popular choice with keen photomacrographers.
A cheaper and quite effective alternative to the MP-E 65 is to use a high quality enlarger lens, reversed and mounted on bellows. Lenses with a focal length less than 80 mm work best. The EL-Nikkor 50 mm F2.8 is readily available second-hand at a reasonable price and is very useful in the range ×1 to ×4 up to ×6 at a pinch. For more information on this lens reversed see the thread called 50mm El-Nikkor vs 40mm Apo-Compon on www.photomacrography.net. This lens would be a good choice to produce an impressive image of our fly.
Another alternative which appeals to the microscopist, is to use a microscope objective as a high power macro lens. After all these lenses can be of high quality and are designed for higher magnifications. Much innovative work and experimentation lead by Rik Littlefield and others at www.photomacrography.net has shown that this is a practicable proposition and can produce stunning images. Only certain objectives are suitable for this use. They come into their own at magnifications around ×10 and above and, they require specific mounting, careful lighting, and a precision focusing system, ideally a microscope focusing block.
Many objectives designed for finite tube length microscopes require correction of chromatic aberration in a compensating eyepiece. Since there is no eyepiece in this application, objectives must be used that are fully corrected in themselves. The best known, and highly sought after are the Nikon CF series of objectives. For more information see Microscope Objectives on Camera Bellows by Charles Krebs on the use of microscope objectives in extreme macro photography. These Nikon CF objectives are available both as finite CFN and infinity corrected CFI versions. The infinity-corrected versions require some type of tube lens to bring the image to a finite focus. A short telephoto lens ~ 200 mm has been found to serve well for this purpose. The whole subject, including focusing methods, is covered in detail by Rik Littlefield, the pioneer of the technique, in this thread: FAQ: How can I hook a microscope objective to my camera? on www.photomacrography.net. This article by John Hallmen gives additional detail on the use of Microscope objectives in macrophotography.
Well diffused lighting is an essential part of all high magnification photomacrography. Both continuous lighting and flash may be successfully used, flash having the advantage that it can assist with overcoming any problems of vibration. If the camera has a Live View mode with electronic first shutter curtain (EFSC), it should be used as this will also significantly reduce vibration, as explained and demonstrated in Canon “Live-View” with an electronic first shutter curtain by Charles Krebs. This mode should also be used, where available, for photography through the microscope, where vibration can also be a problem.
Stacking software
There are three pieces of stand alone software commonly used to create composite stacked images. In addition stacking is possible using tools included within Photoshop CS from CS4 onwards.
- Combine ZP. This program is free and can give good results. It has not been updated since 2010, as of January 2013. It is only guaranteed to work with Windows XP and Windows Vista. It requires work from the user to get the best from it and some might not find its interface sufficiently intuitive. Download the installer.
- Helicon Focus. This is a slick commercial package, with a very user friendly interface. It can give very good results, but is relatively expensive, ($115 for a lifetime licence of the standard version and $30 for a 1 year ‘trial’ license, November 2016 prices). A ‘Pro’ version is available at $200 for a lifetime licence that adds some powerful 3D reconstruction and retouching tools. http://www.heliconsoft.com/video.html
- Zerene Stacker. This has become the most popular choice for macrophotography stackers and also works well for stacking images taken through the microscope. It is currently $89 for a personal license, but a student license is available for $39 and a free 30-day trial license is available. There are excellent tutorials for this software (including tables for determining step size) and these should be consulted to get the best from the package. For the complete novice, Zerene may not be quite as intuitive or user-friendly as Helicon, but it has a superb retouching facility included at no extra cost and also an impressive ability to create synthetic stereo images from stacks.
Examples of stacking
This video clip shows a frame by frame animation of a stack of images of a stained crocus pollen grain taken using a ×40 objective and ×3.3 photo eyepiece. It is possible to see how the view changes as the focal plane moves through the pollen grain.
Click the arrow at bottom left to watch the video (8 seconds), click the symbol to the left of “vimeo” for full screen
Stacking with Helicon Focus
These two images of crocus pollen show a single slice from this stack of 18 images, and the result of stacking the images with Helicon Focus.
 Crocus pollen (single image)
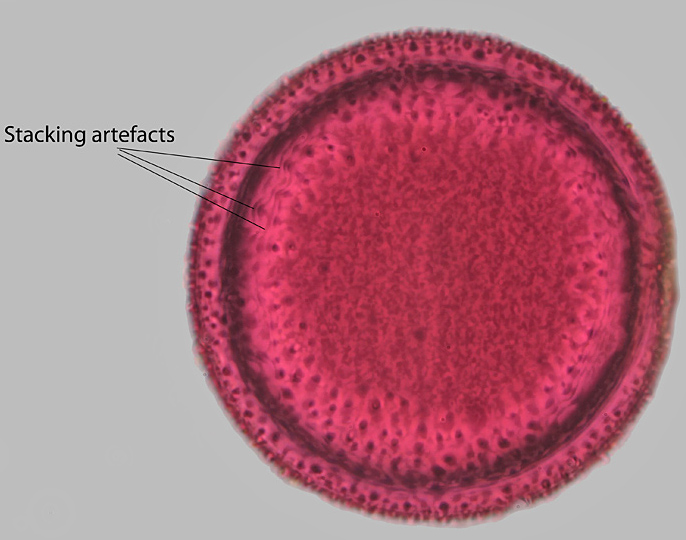 Crocus pollen (stacked image)
The greater detail in the stacked image can easily be seen. The wavy lines marked in the stacked image are stacking artefacts.
This video clip shows the progress of a stacking run in Helicon Focus. The subject is part of the head of a large bird louse from a species of Indian vulture. The images comprising the stack were taken using a ×10 DIC (differential interference contrast) objective and a Nikon LWD phase/DIC condenser on a Nikon Diaphot microscope.
Click the arrow at bottom left to watch the video (75 seconds), click the symbol to the left of “vimeo” for full screen
An image from the middle of the stack and the final output from the Helicon stack of 27 images are shown here:
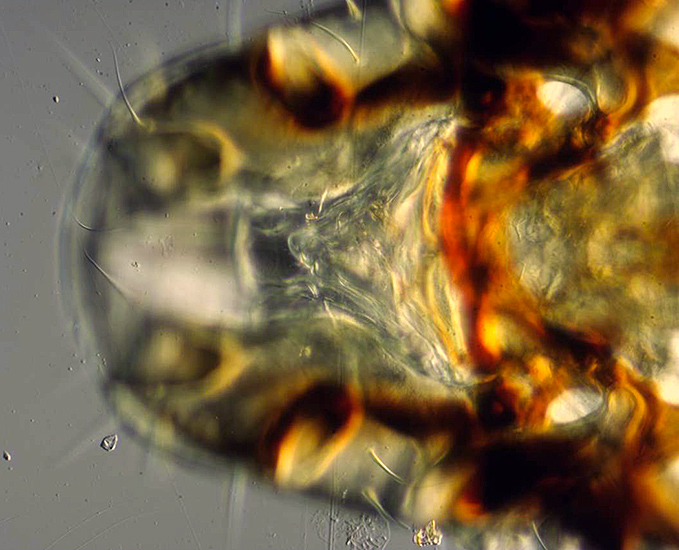 Vulture louse (single image)
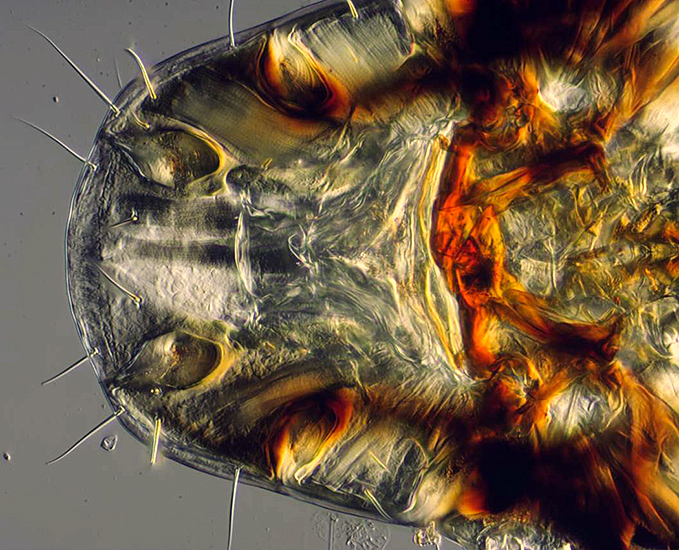 Vulture louse (stacked image)
This stacked image will be combined with many others to create a stacked and stitched composite image of the entire vulture louse in the next section on stitching.
Stacking with Zerene Stacker
This video clips shows Zerene in action stacking one section from a larger stack and stitch project on a human flea made by Graham Matthews, which will be shown again in the stitching section.
Click the arrow at bottom left to watch the video (74 seconds), click the symbol to the left of “vimeo” for full screen
The next two pictures show a single frame from, and the output of a 20 image Zerene stack of a partridge feather taken with a ×6.3 objective and polarised light. The Zerene Pmax stacking option was selected. This type of subject particularly illustrates the benefits of stacking.
 Partridge feather (single image)
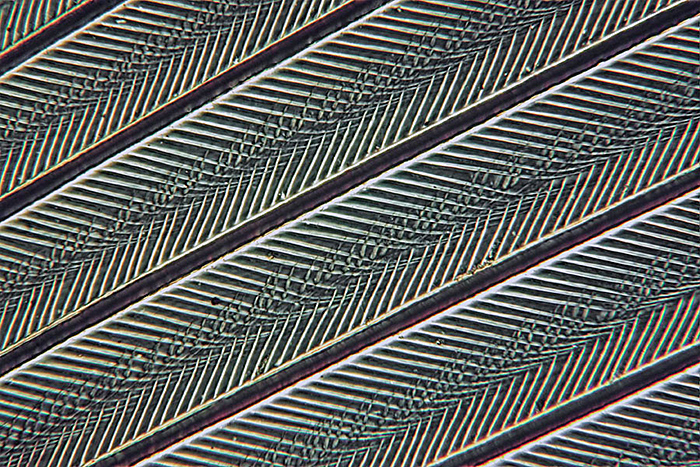 Partridge feather (stacked image)
Stacking artefacts
This image of a Biddulphia diatom taken with a ×50 fluorite objective and stacked with Helicon Focus, shows the consequence for stacking of dirt on the sensor. The left-hand image is the output directly from the stacking program. Dust trails are obvious over the background, and a characteristic ‘stacking halo’ artefact is visible around the subject. This kind of artefact becomes more noticeable at higher magnification. The right-hand picture shows the results of post processing the initial output to produce the best possible image from the stack.
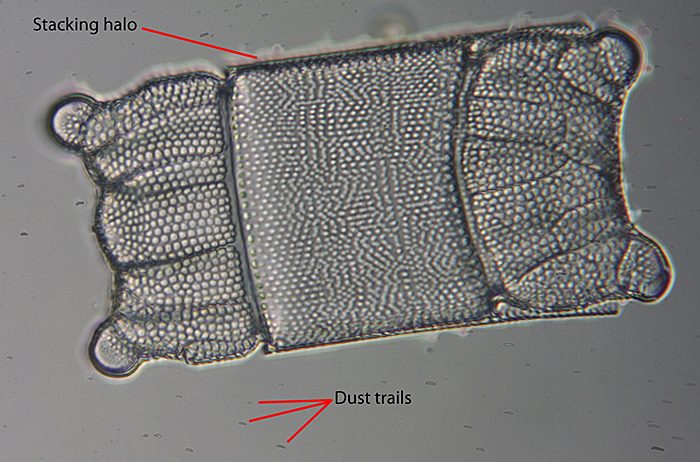 Biddulphia sp. (with artefacts)
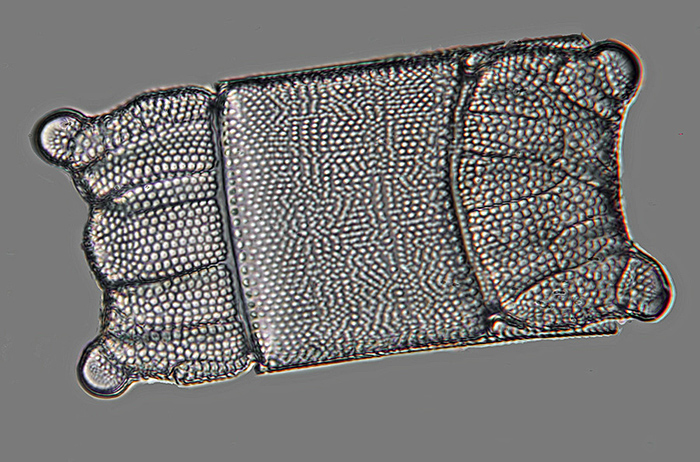 Biddulphia sp. (after editing)
Summary
Stacking and stitching, together and separately, can be valuable techniques to maximise the appearance and information value of photomicrographs.
Modern DSLR cameras with Live View, computer control, and perhaps now mirrorless cameras such as the Sony NEX-5N, make stacking and stitching much easier.
Very good and easy to use software is available to the amateur and has made the subject much more accessible.
David Linstead