

Stitching
Making photomicrographic panoramas
Introduction
Stitching is the process of combining a series of digital images of different parts of a subject into a panoramic view of the whole subject that retains good definition, using a computer program.
Stitching
If we think of stacking as moving through the focal planes of an object with the fine focus, taking pictures as we go, then stitching is the equivalent of moving around the object with the stage X, Y controls, taking pictures as we go. Stitching may be used alone to create a large overview of a fairly flat object, or combined with stacking to give a detailed image of a larger subject with significant thickness. When viewed with low power objectives, many prepared subjects are flat enough to give an acceptable result with stitching alone. At higher magnification, typically ×10 objectives and above, stacking may need to be added to avoid significant loss of detail and areas of blurring in the final stitch where there is a significant change in focal plane between adjacent ‘tiles’ in the stitch.
Practical tips for stitching
- Plan in your mind the area you are going to cover. Go over it by eye so you know the ‘landmarks’.
- Don’t be over ambitious to start with. Try a stitch of just a few images first to familiarise your self with the technique.
- Adopt a systematic approach and don’t stop for a break halfway through! This is especially important when acquiring images for a stack and stitch project on a large object like a flea. There is nothing worse than getting halfway into a 1000 image project and realising you are not sure what you have already covered and what you haven’t! Collect images in a predictable pattern e.g. right → left → up → left → right → up and so on. This will help you remember where you are and will help the stitching software.
- Leave the slide under the microscope until you are sure you have acquired all the images you need. If possible run a stitch straight away to check you have complete coverage of the area that you are interested in. If you find an embarrassing ‘grey hole’ in your stitch, there’s still time to do something about it if you still have the slide set up identically.
- Give more overlap than you think you will possibly need. This means more pictures, but a better chance of a flawless stitch. This is especially important for difficult to stitch subjects – see below.
- There are two things that give the stitching software particular trouble and may prevent a successful stitch. Firstly, avoid abrupt changes in focal plane in non-stacked stitches. If adjacent edges are focussed at significantly different planes, the stitch will fail or an area of blurring will appear in the stitch. Secondly, beware of highly-repetitive small detail. A classic example is rows and rows of nearly-identical dots on a diatom. The software image matching algorithm cannot cope with this situation and may well fail.
Stitching software
Searching the internet will reveal a number of different stitching software offerings, several of them free. However, most of these are aimed towards creating landscape and architectural panoramas. The best software for stitching ‘micro-panoramas’ is the Microsoft Research Image Composite Editor (ICE). This software is free and has proved very robust at stitching images taken through the microscope. It allows output in tiff and jpeg formats. Stitching and compositing is fast, but saving multi-megapixel panoramas can be quite slow, depending on your machine.
The following video shows a composite being created by Microsoft ICE from 49 individual stack outputs of a large bird louse from a vulture (~ 4 mm). This is the same subject the head of which was used to illustrate stacking. In total 1529 images were used to create this stack and stitch project. More information on the project can be found in the thread called A really big (and lousy) louse on www.photomacrography.net. The process has been speeded up for the purpose of the video clip.
The stack outputs are shown here together with the final stacked, stitched and processed image.
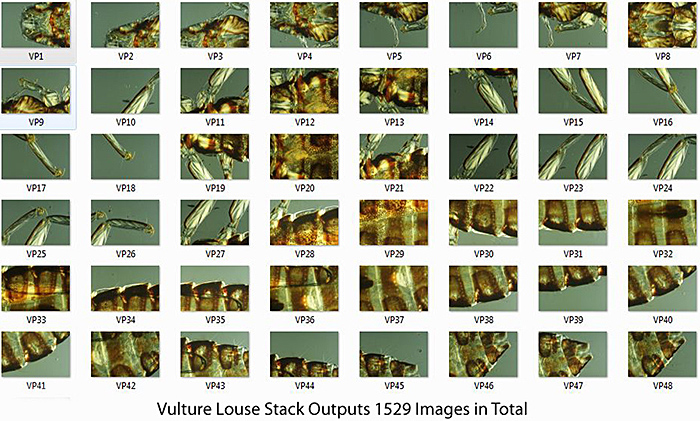 Vulture louse (images to be stitched)
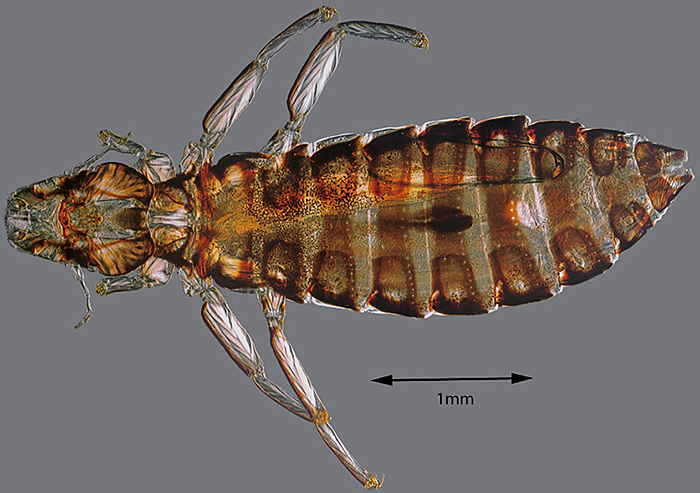 Vulture louse (stitched image)
A video clip ‘tour’ of a 183 megapixel version of this image is here:
Pan and zoom this large image on the Photosynth website
(this link has been withdrawn)
The Microsoft Photosynth website was a free hosting service for storing, viewing and sharing large panoramas such as this. It was withdrawn in 2017.
In the section on stacking an example was shown of stacking part of a large image of a flea created by Graham Matthews. This video clip shows a tour around the finished stack and stitch project.
Summary
Stacking and stitching, together and separately, can be valuable techniques to maximise the appearance and information value of photomicrographs.
Modern DSLR cameras with Live View, computer control, and perhaps now mirrorless cameras such as the Sony NEX-5N, make stacking and stitching much easier.
Very good and easy to use software is available to the amateur and has made the subject much more accessible.
Finally, this is a large non-stacked stitch comprising 130 separate images of a blowfly tongue, taken from a slide by Amos Topping:
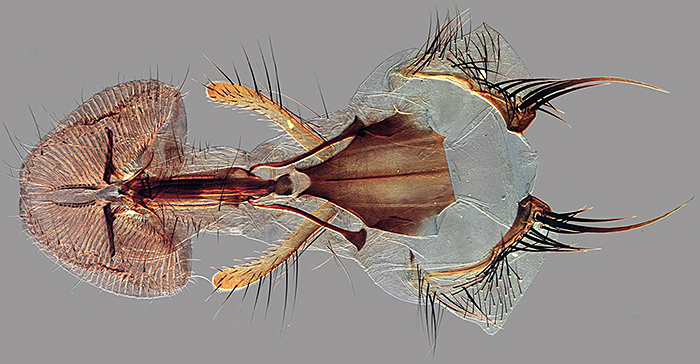
Pan and zoom this image on the Photosynth website
(link withdrawn)
David Linstead