

Stacking in macrophotography
The image stacking capability and potential of Panasonic / Lumix cameras for field use
By David Smith
Introduction
In the last few years there have been significant advances in digital image capture and processing. This has been of particular value in the fields of macro and micro photography where extremely shallow depth of field can be a major concern. The use of a computerised control rail moving the camera to produce a stack of images, for example with Stackshot, and the subsequent stacking of these images with programs such as Helicon Focus and Zerene Stacker produces stunning pictures with greater depth of focus.
It is perhaps not surprising that many camera manufacturers are now embracing this technology. Amongst the most widely available with this facility at the time of writing is the Panasonic/Lumix range. The author had been using a Lumix TZ70 camera for a number of years, but a friend had recently bought a later model, the TZ90 and its Post Focus capability was impressive – this camera uses its more general 4K ability to take a number of photos in a short burst and, either then or later on when back at home, presents the user with an array of 49 potential focus points over the image to choose from – a case of “snap now and worry about the focusing later”. The camera also uses its 4K processor, in a different menu option, to stack the images. These functions can be used in both the normal and the macro focus modes. The urge to upgrade to the more powerful TZ200 which then offered the same possibilities as the TZ90 was irresistible!
The TZ80 – TZ200 (“Travel Zoom”) range of cameras are extremely light and portable and can literally be slipped into your pocket. Although the top end of the price range approaches that of a good DSLR, at the bottom end of the range the price is comparable with other similar models without this capability. It was immediately obvious that there was great potential for the use of this portable facility for stacking in the field. Normally, to create a stack in the field, one would have to provide a power source for the Stackshot rail or take a manual stack of images with a DSLR on a tripod which is rather time-consuming and fiddly. Either way one would also be limited to subjects which are completely sedentary. Panasonic has announced its intention to make this feature available on all its new models and retrospectively on existing models whose firmware will allow such updating. Other manufacturers are experimenting with stacking but at present only the Lumix camera technology is addressed in this paper.
Focus Stacking technology used in the Lumix Cameras
Conventional contrast-detect autofocus involves a process of “hunting” to find the point of best focus and this is normally fairly time consuming. Panasonic’s new “Distance From Defocus” method quickly calculates the amount and direction of misfocus and moves the lens close to the final focus setting very quickly through the use of an inbuilt database of lens performance characteristics. In the 4K video mode the camera stores all the individual frames and the user can scroll through them on the camera or after exporting them to choose any particular photo.
Panasonic obviously assumes that the user will often choose the focus position or carry out the stacking in-camera. This can be done either in its automatic mode when all focus positions located by the camera are said to be used or by using the “range” option when two or more of the 49 selectable regions displayed on the camera rear screen can be chosen. However, they also provide the free “PHOTOfunSTUDIO” suite of software which allows the user to export all the component still images produced by the camera in the form of a special MP4 file for use on a computer. This file can be copied back onto the camera later if necessary to allow new “range” stacks to be carried out as long as they are copied into the same image folder from which they originally came.
On the first occasion an MP4 file containing the images from the camera was downloaded onto the computer and a stack was attempted with Helicon Focus it immediately flagged up a warning – the stacked image produced was poor. It might have been expected that the image set exported from this video would be in a form suitable for immediate input into this computer stacking package. However, it soon became apparent that this was not the case since the images are not saved in monotonically increasing or decreasing and equal step focus order. Moreover, it was also found that there were often more than 49 images stored in the files – in some cases there have been 90 images in this file and it is possible this may not be the maximum possible. So, despite what Panasonic claims it seems likely that the camera may only be able choose up to 49 of these images in the stacking process. It has also become apparent that in selecting these images from a larger set the camera generally gives preference to the nearest focus points in the image.
Having always been interested in the structure of computer data files the author set out to find what extra information was being stored inside these image files, hoping perhaps even to find the focus point which would then allow the sorting of the images appropriately. The images could be divided into three groups. In the first short group of images the camera is rapidly changing its focus position attempting to locate the closest point of the subject to the camera. The next group of images generally shows a stepping of the point of focus through the subject plane until a point at or beyond the furthest point of the subject from the camera is reached. What the camera is doing in the final group of images is not entirely clear but it seems likely that it is refining what it considers to be the main focal point of the scene.
An actual focus position was not located and indeed is probably not recorded, but a two-byte number was found in each image file which varies with the distance from the camera to the point of focus in that image. This appears to be some measure of the proportion of the image which is in focus at that particular camera position and so has been called “Focus Density”. As the focal plane moves through the subject this number changes and whilst it does not uniquely define the distance to the focus point the middle group has been found to be the most suitable for choosing images for external stacking since it seems to comprise images of monotonically increasing focus depth.
Doing this discrimination process manually was extremely time consuming so the author commissioned a friend with extensive specialist computer expertise to produce a computer program, called “StackSel”, to help. This program analyses the images exported from the MP4 file by PHOTOfunSTUDIO and attempts to differentiate between the three different groups. The middle group is provisionally marked in green while the other two groups are marked in red. The images can be selected for viewing and their initial designation can be altered by the user. The green selection finally chosen can then be exported for use with a PC stacking program. StackSel is extremely simple to use and is being made available to anyone using a Lumix camera with this stacking ability – details are given at the end of this paper.
Assessing the effectiveness of the Lumix in-camera stacking technology and its limitations
Whilst this in-camera stacking ability will undoubtedly be useful in the field for landscapes, the larger flora and fauna and animals, the research described in this paper focuses on its use with the macro facility with smaller subjects such as butterflies and beetles up to a maximum size of about 10cm. All the images of the test subjects shown in this paper were taken with the Lumix TZ200. The quality of any stacked image from this camera will of course be limited not only by its basic optical quality and image capture capability but also by the performance of the in-built stacking software.
The first experiment carried out examined its most basic image quality under strictly controlled conditions. A highly structured test subject was chosen consisting of a sheet of 1mm squared graph paper set at an angle of 45º in good lighting and using the smallest aperture possible. The camera was mounted on a tripod and the timed shutter release was used. As normal when using a tripod, the internal image stabilisation was turned off. The “zoom macro” setting was used at its closest distance subject to ensuring that all parts of the oblique test image would still be within the camera’s focal range for this mode. (The zoom macro mode is simply an extension of the camera’s normal autofocus macro mode where an extra x3 digital magnification is used.) Photos were taken at 1/250 sec at f8 and ISO 1800. At this most extreme close up point, when viewed on a 21” monitor, the zone of acceptable sharpness by the camera in this image is probably about 0.5mm. (Figure 1) [Clicking on any image in this article will generate a larger version.]
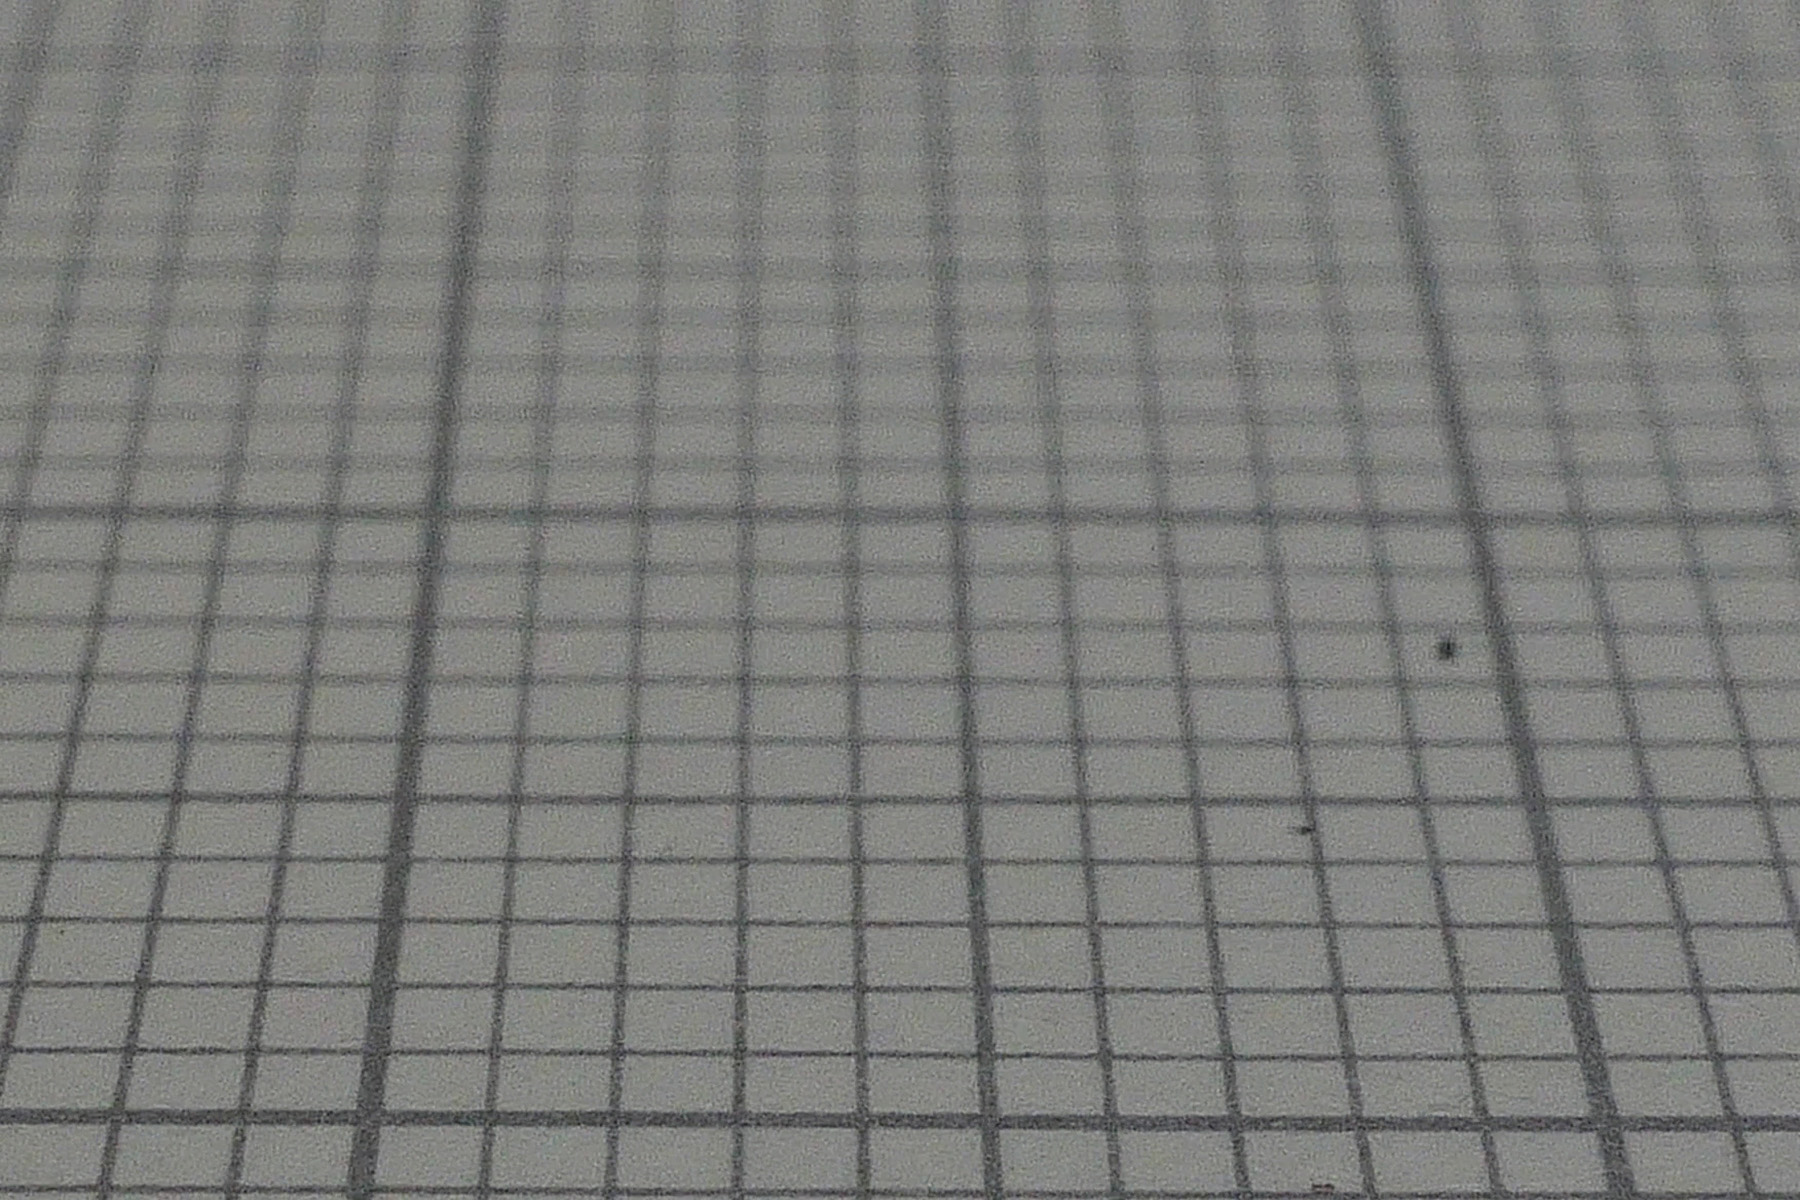 Fig 1: Single image for the graph paper subject
In its stacking mode, the camera offers an option to stack all the acquired focal points or to select a range of points to cover a particular focal depth range. Using the latter option to form the stack for this subject it was found that the camera acquired a focus point within every one of the 49 selectable regions on its screen. (Figure 2).
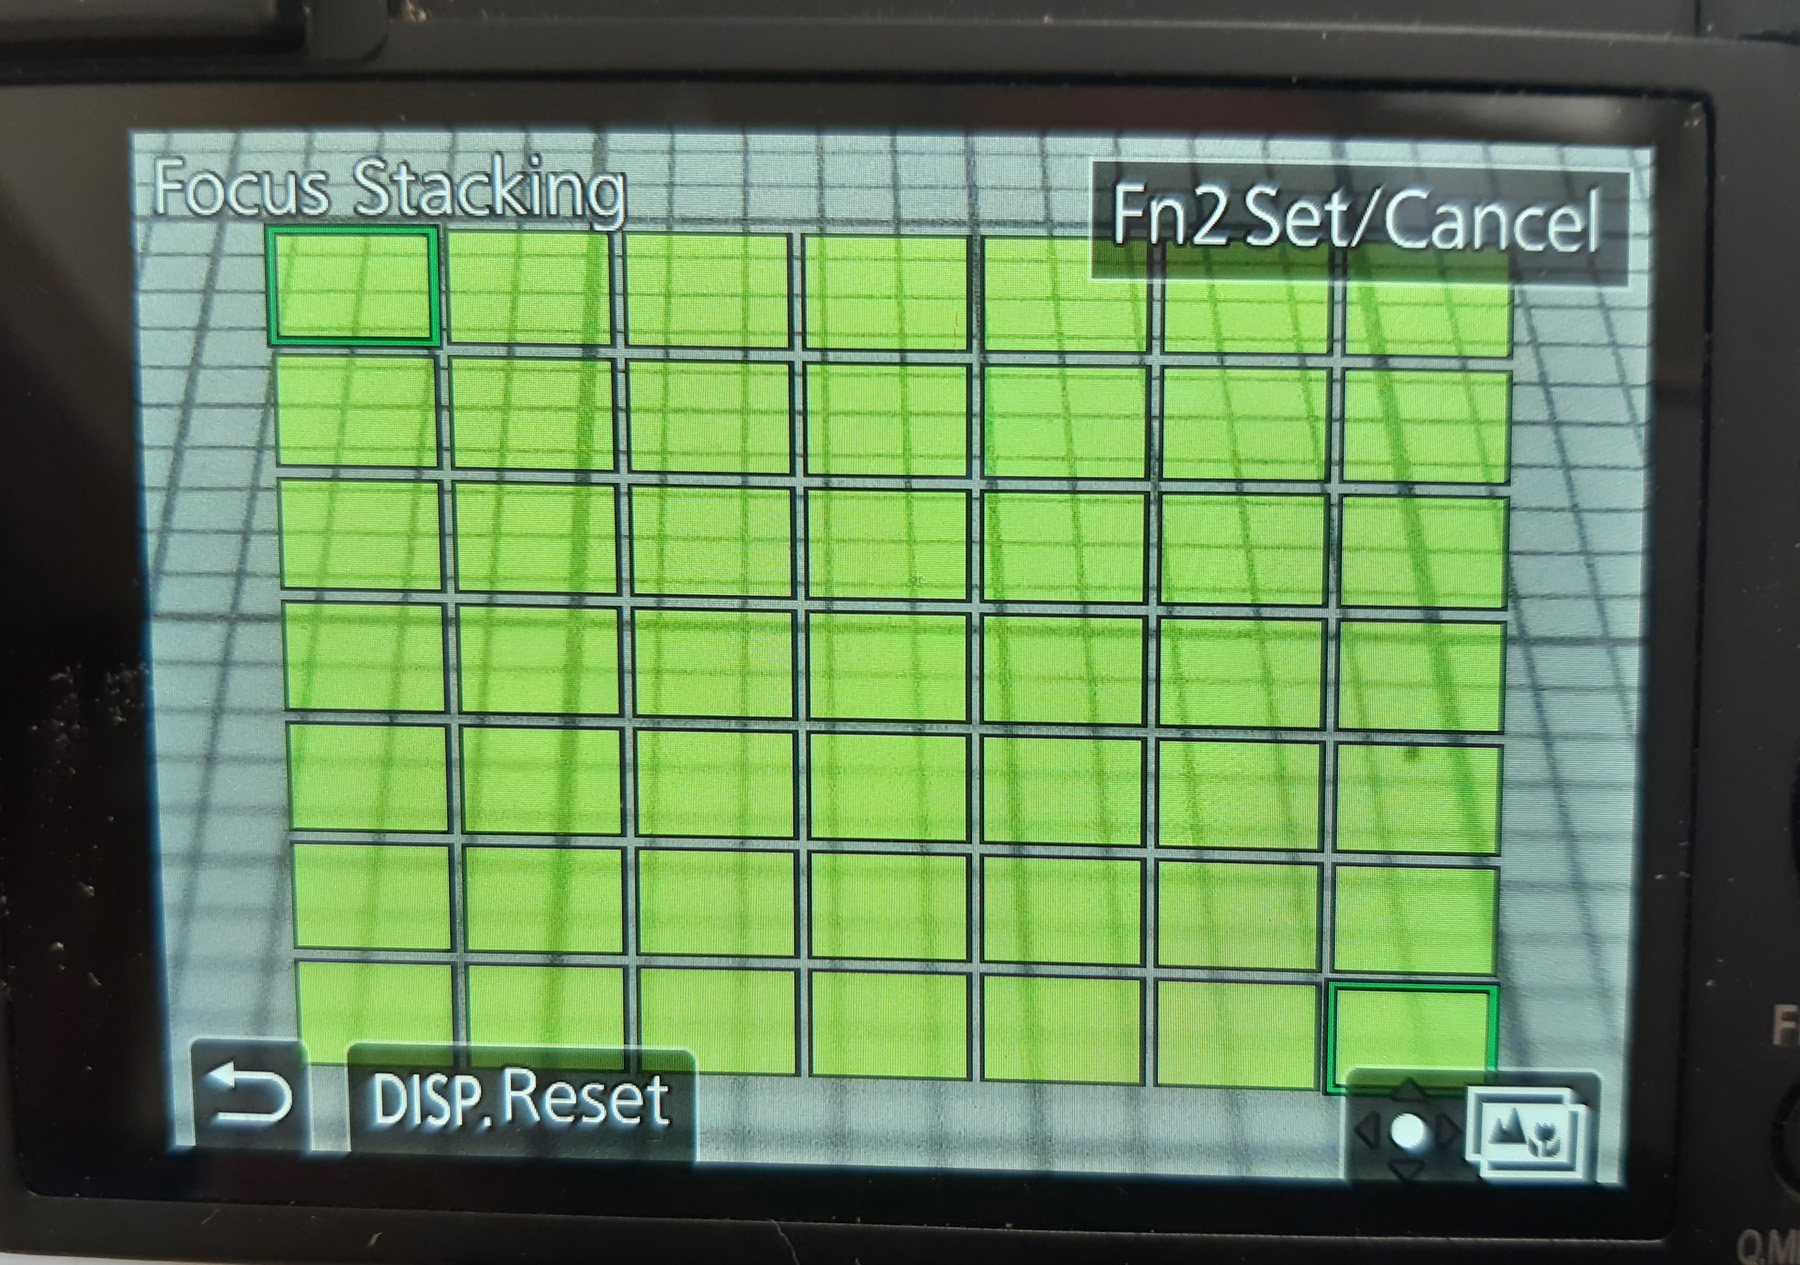 Fig 2: Camera rear screen focus point selection
Figure 3 shows a screen-shot of the StackSel program analysis of the images captured by the camera for this subject. The middle group of images form a smooth peaked curve of Focus Density plotted against the number of the image in the MP4 file.
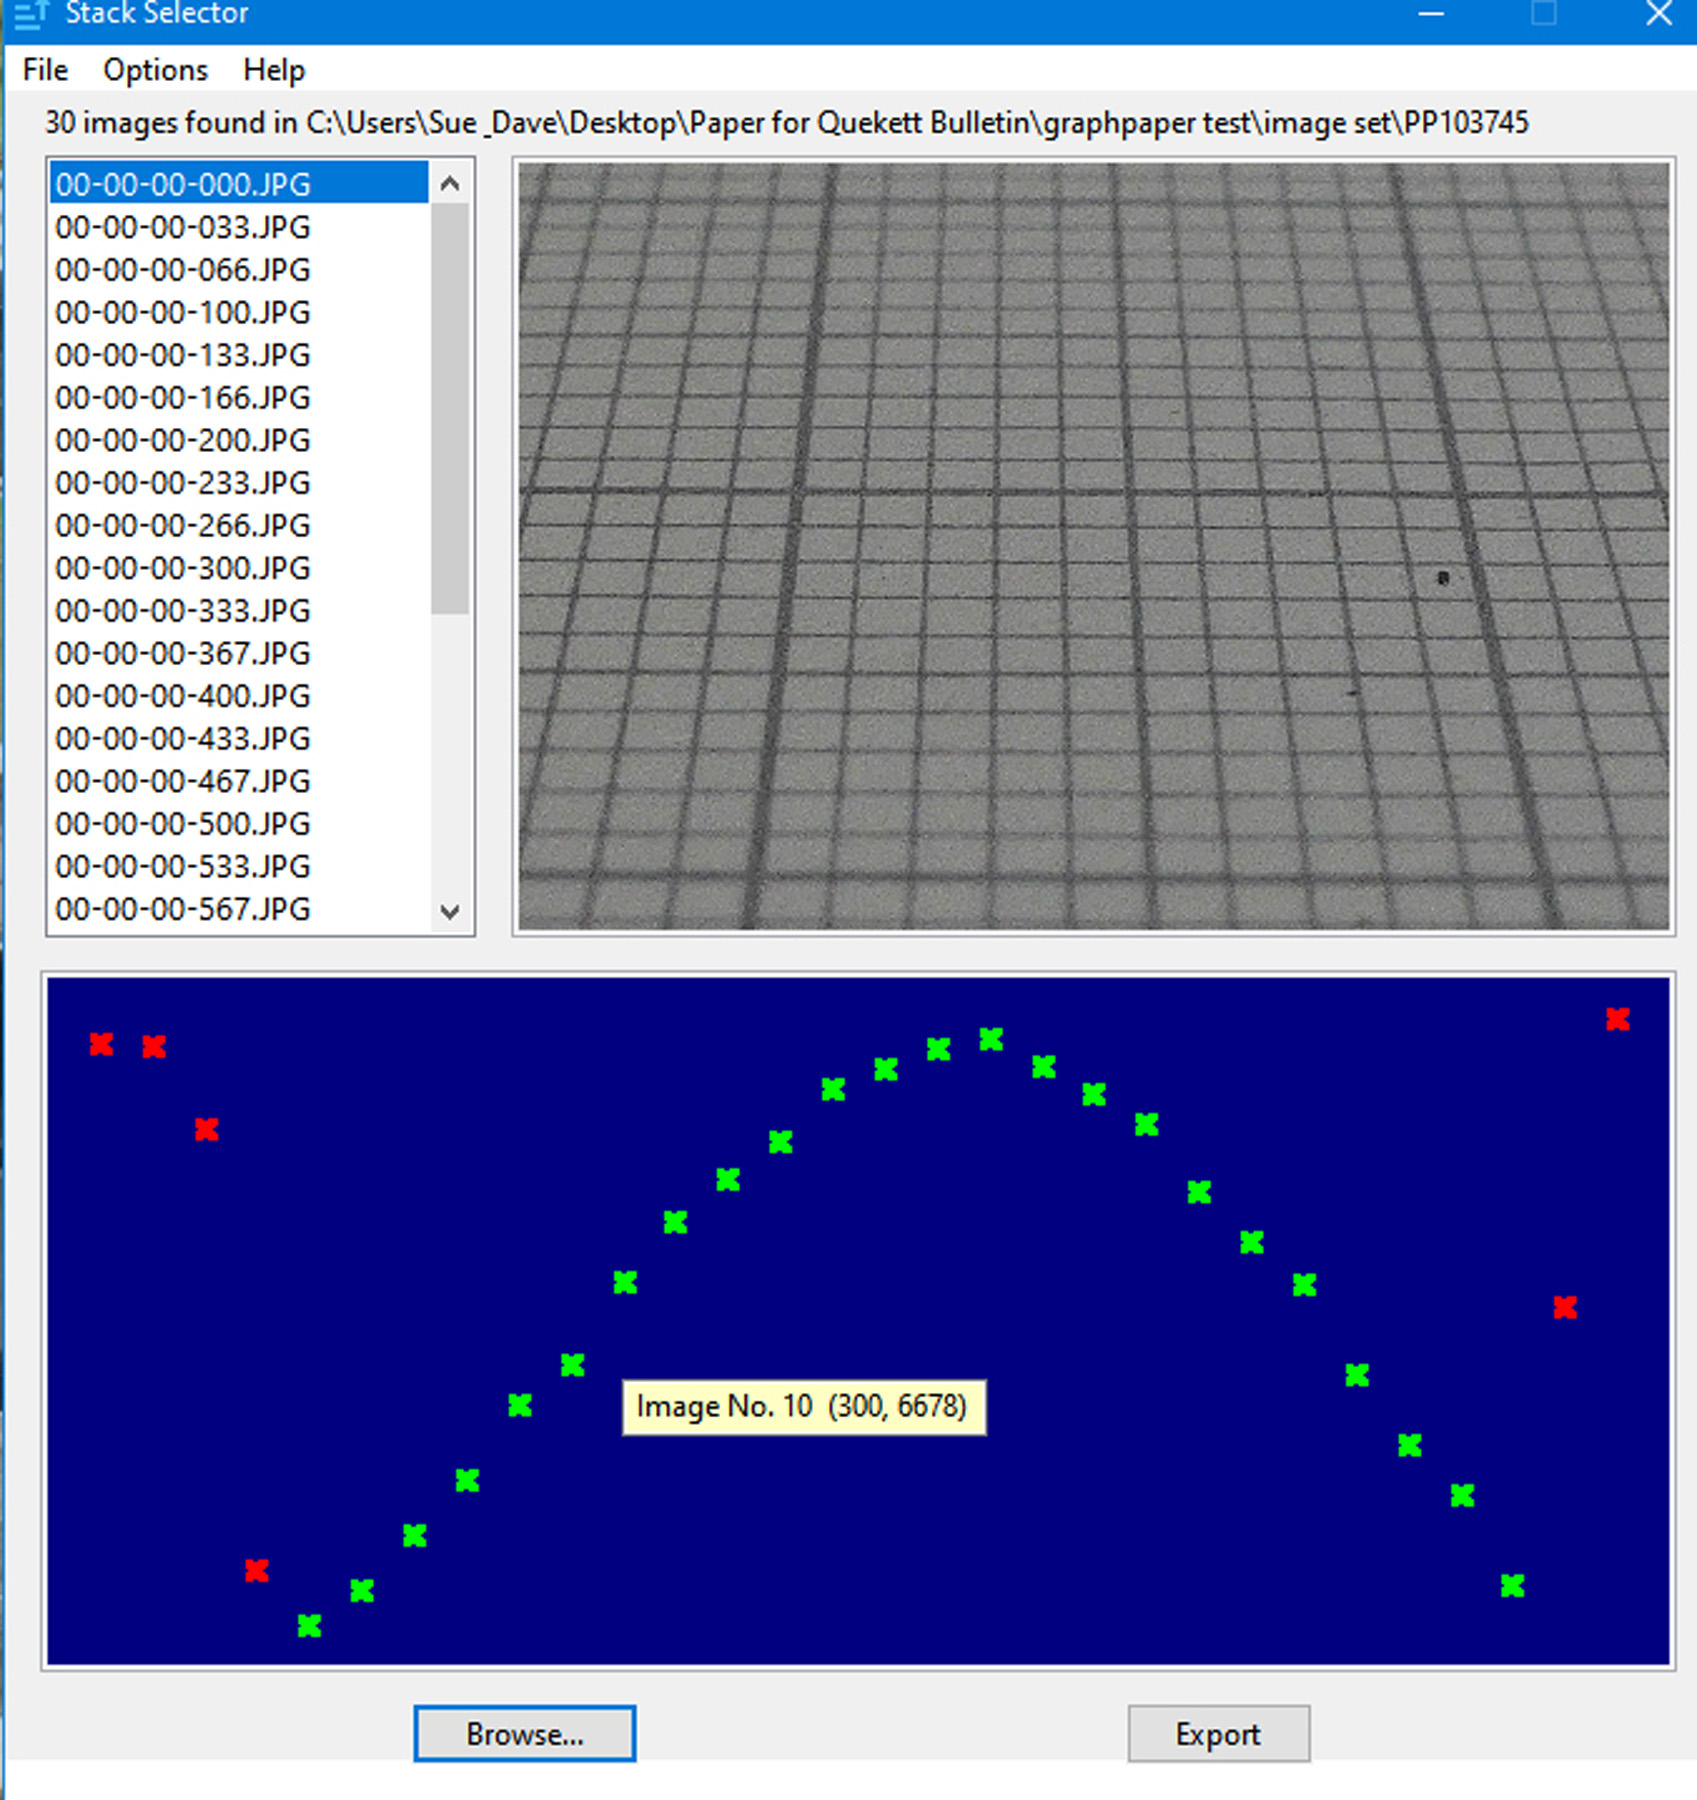 Fig 3: Screenshot of the StackSel analysis for the graph paper image
In order to investigate the camera’s performance with a more realistic test subject a small conifer cone about 2cm long with a maximum diameter of about 1cm was chosen. Figure 4 shows the experimental setup used in this case. The supplementary illumination was a home made light ring of LEDs using a commercial “angel eye” but the images were taken in daylight in a brightly lit room. As far as possible all the images were taken with the camera settings at aperture f8 and shutter speed 1/30 sec. ISO was set at “automatic”. Whole screen exposure metering was selected. A sheet of black drawing paper formed the background. With these settings a single photo clearly cannot capture the full visible depth of field of this subject.
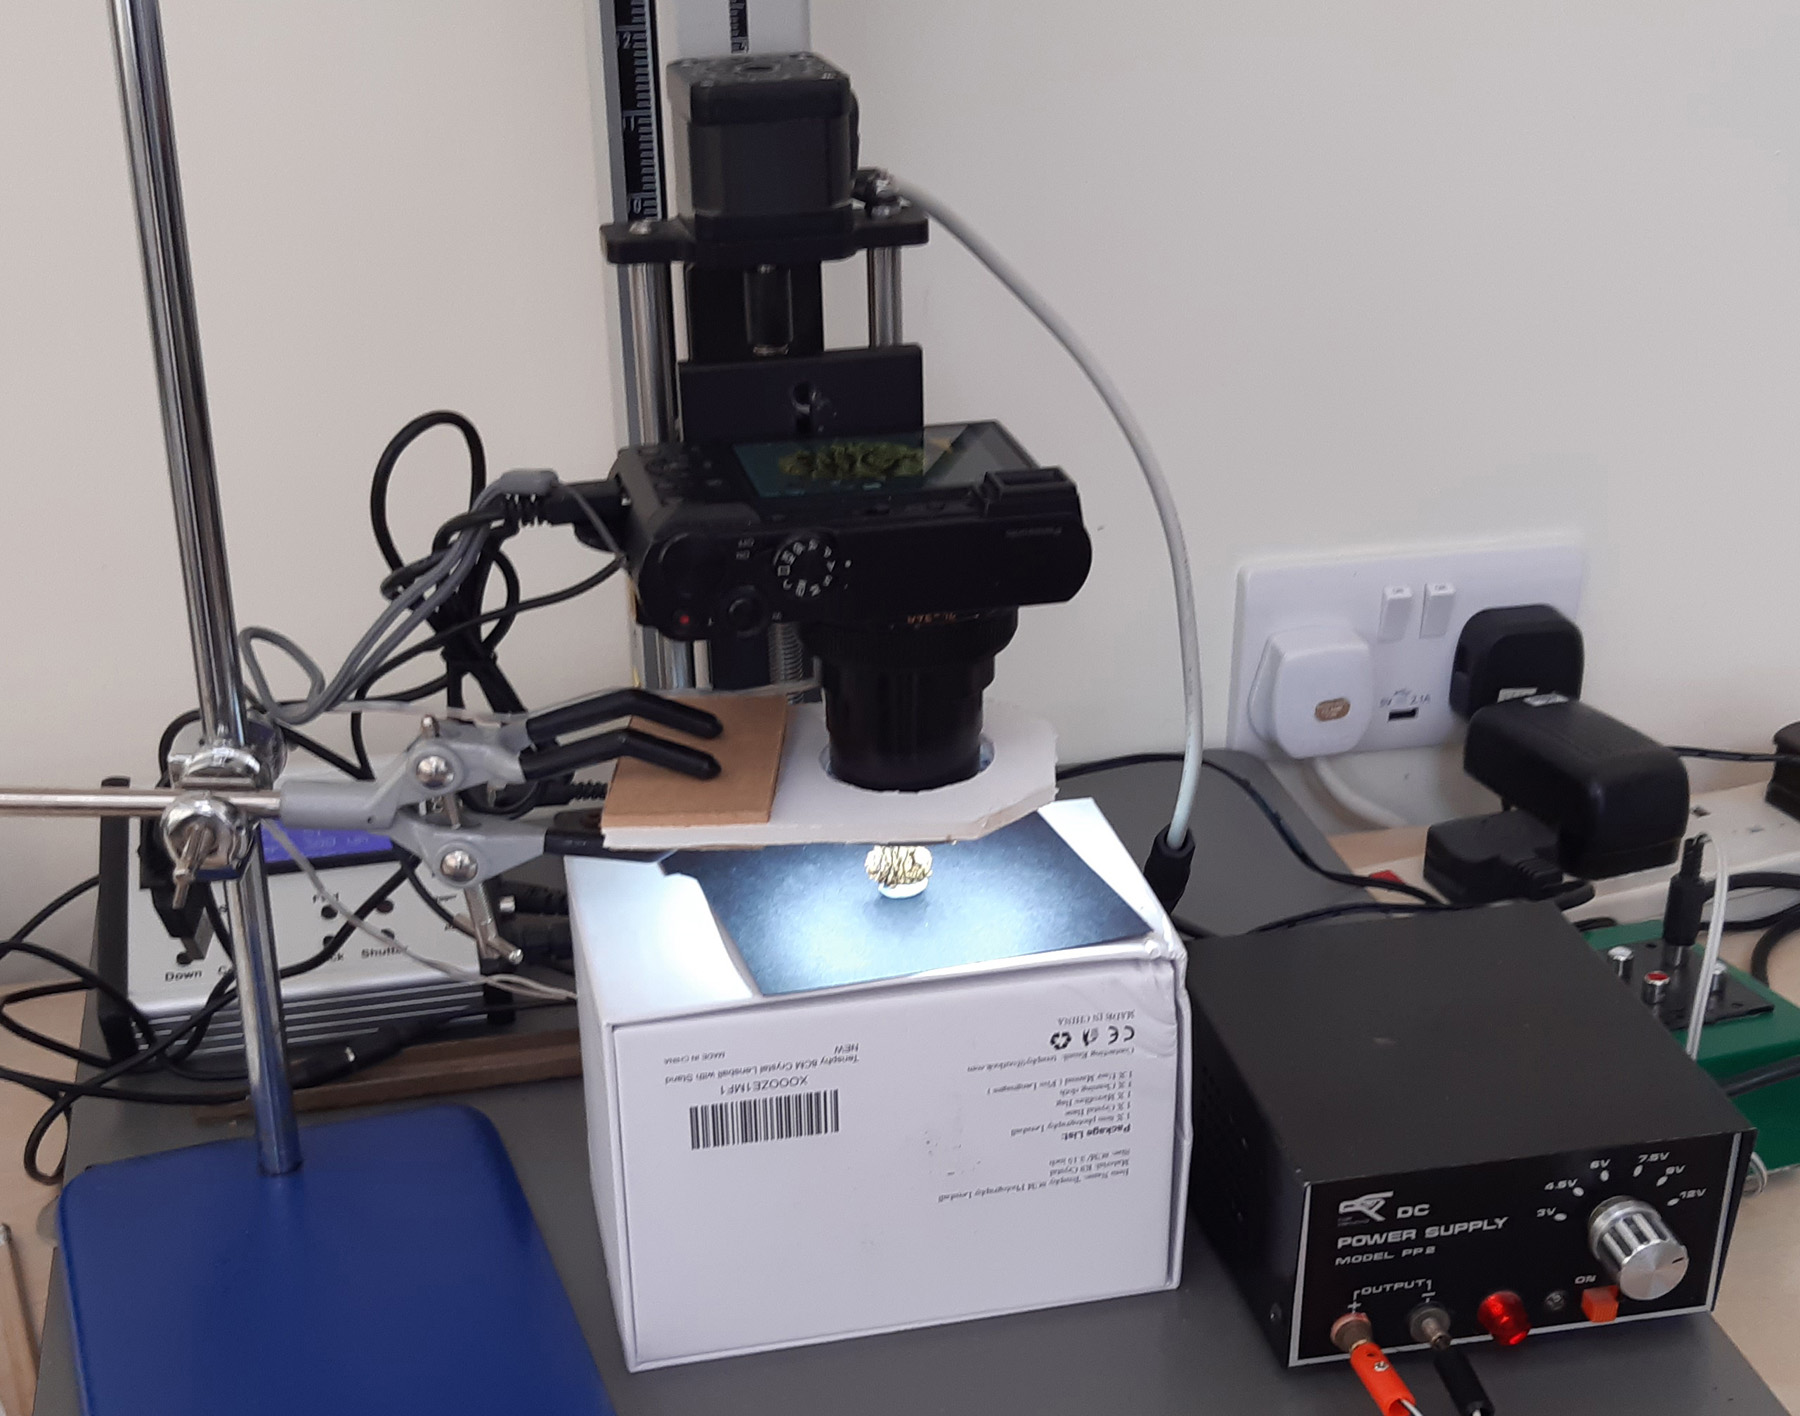 Fig 4: Experimental setup
Four kinds of image stacks can be produced with this experimental configuration:
1. An in-camera stack.
2. A stack produced on the PC using the images exported from the camera from stack 1.
3. A stack produced on the PC with the camera in a fixed position and using the camera’s manual focussing ring to refocus manually.
4. A stack on the PC using a Stackshot rail and Helicon Focus automatic control.
Dealing with the first two stack types, for this particular subject the in-camera stack generated 30 exportable images. Those at the beginning and end groups of the sequence were omitted. Of those in the middle group, which in the case of this subject were roughly evenly spaced covering the entire focal depth in monotonically, 19 were stacked, omitting those focussed well beyond the visible parts of the subject.
For the third stack type, by making small changes with the camera’s manual focussing ring to refocus on a number of intermediate positions between the far and near points it was possible to generate 12 useable images. The fourth stack type which used the Stackshot rail in the normal way (i.e. where the focus point is fixed and the camera is moved) the images changed in size according to how close to the camera was to the focus point due to the differing perspective. When this results in a large range of image sizes stacking software often struggles to process such images causing artefacts and aberrations. For this set of images a total of 85 images was taken to ensure that they covered the entire focal range using a step size of 0.3mm. These images were examined carefully to determine a smaller set which adequately covered the focal depth of the subject whilst keeping the image size variation to a minimum, resulting in 56 images.
Results
The stacking carried out for cases 2, 3 and 4 used Helicon Focus in its default mode and was initially performed for each of the 3 stacking methods offered being A (weighted average), B (depth map) and C (pyramid). The images from these sets of stacks were examined on the PC first. As a general rule Helicon Focus Option C often produces the most striking image, but in doing so is also the most affected by the variation in image size when the camera position changes in relation to the subject. This was certainly so in the case of the pine cone whereas there was little difference between options A and B. The stacks produced using Option B were arbitrarily chosen therefore for the further comparisons. A5 prints of the images for the four stacks described above were produced on a Canon MG5750 printer using genuine Canon Inks and Canon Photo Paper Plus Glossy II. Figures 5-8 show the results.
The test subject was covered with small spots, probably insect eggs, and also accidentally had a small hair adhering to it. These features were used in the comparison of the stacked images. Apart from slight differences in colour there appear no significant differences in resolution or depth of image between any of them. Variations in the background and overall image colouring may be explained either by the differences in camera to image distance, so changing the ratio of ambient to LED light or possibly because the camera applies some internal corrections when it operates in the Post Focus function. The image file information showed that because the ISO had been set to “automatic” the images for stacks 1 and 2 were taken with ISO at 400, while for those from stacks 3 and 4 were taken with ISO 640.
 Fig 5: In-camera stack
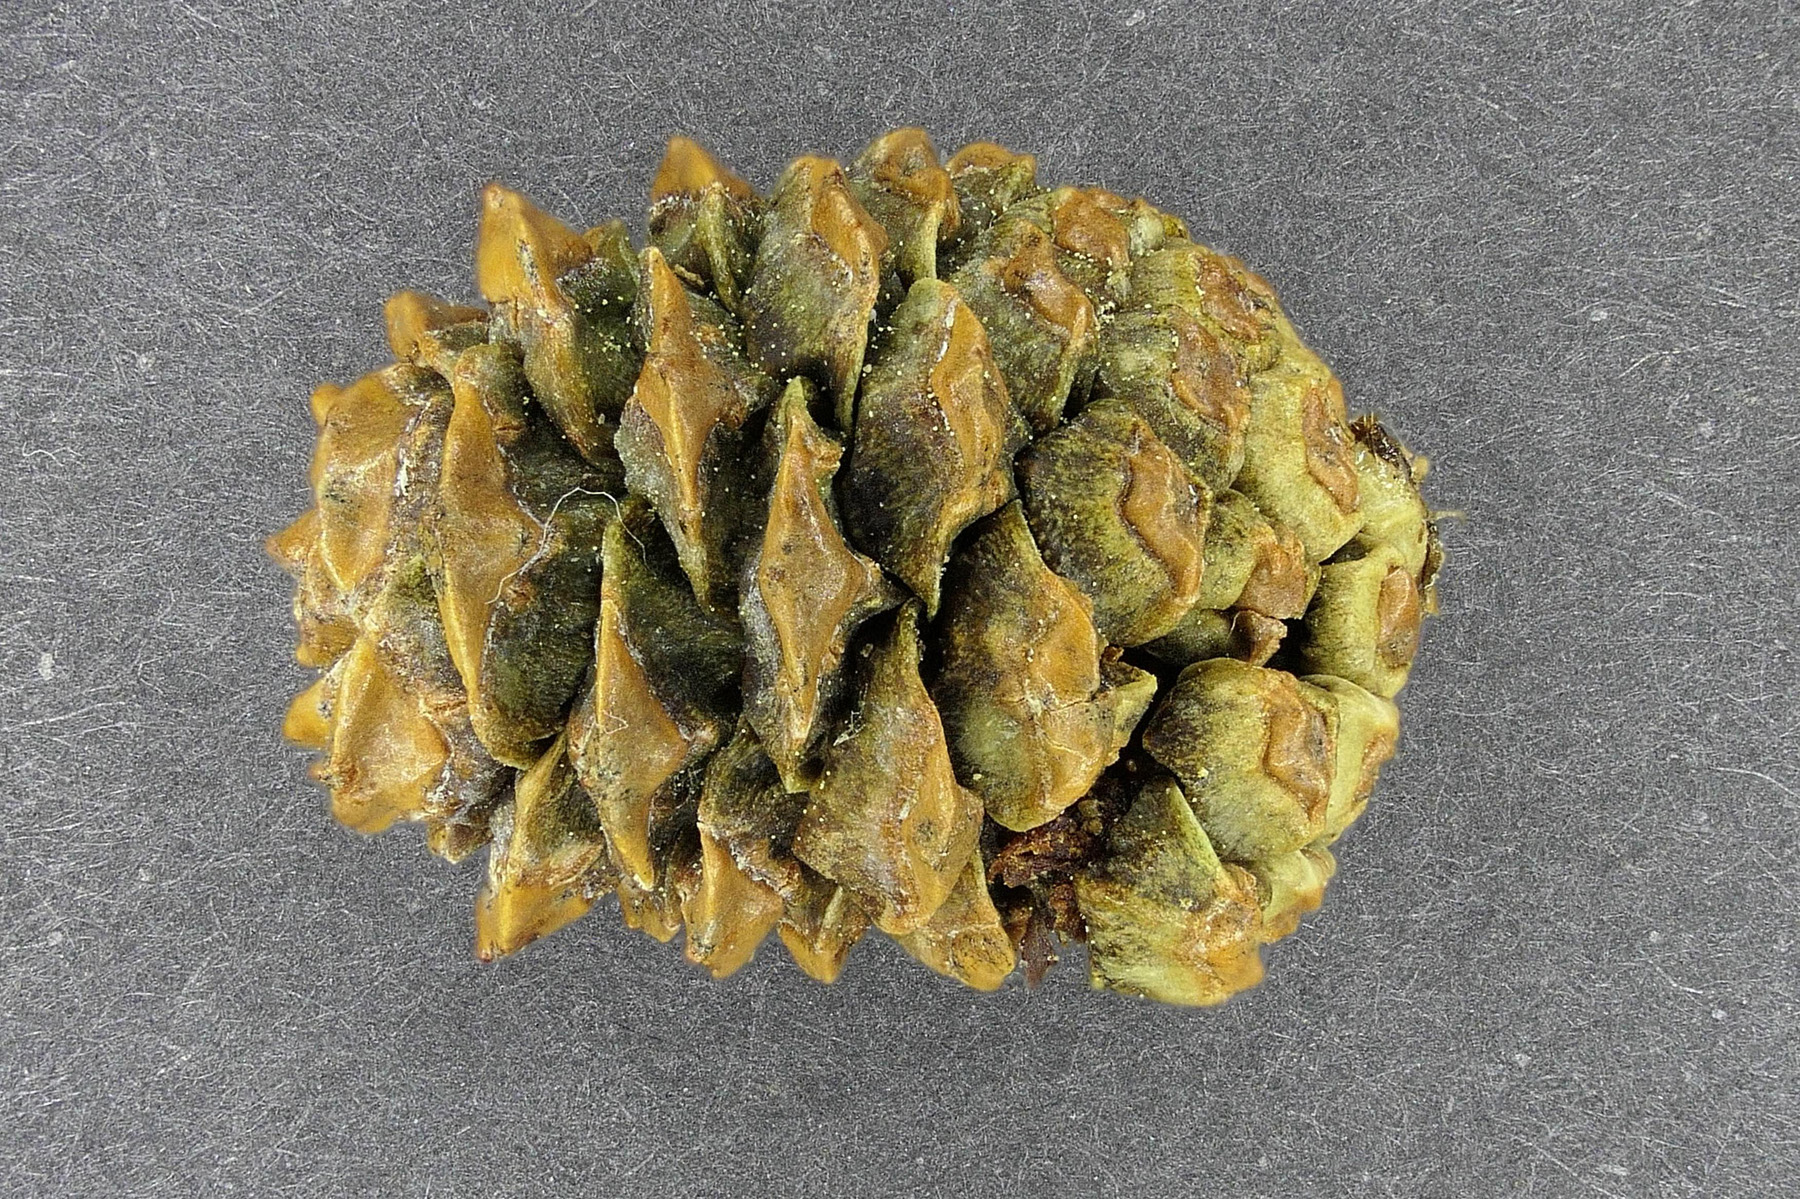 Fig 6: Stack of 19 exported images
 Fig 7: Stack of 12 manually focussed
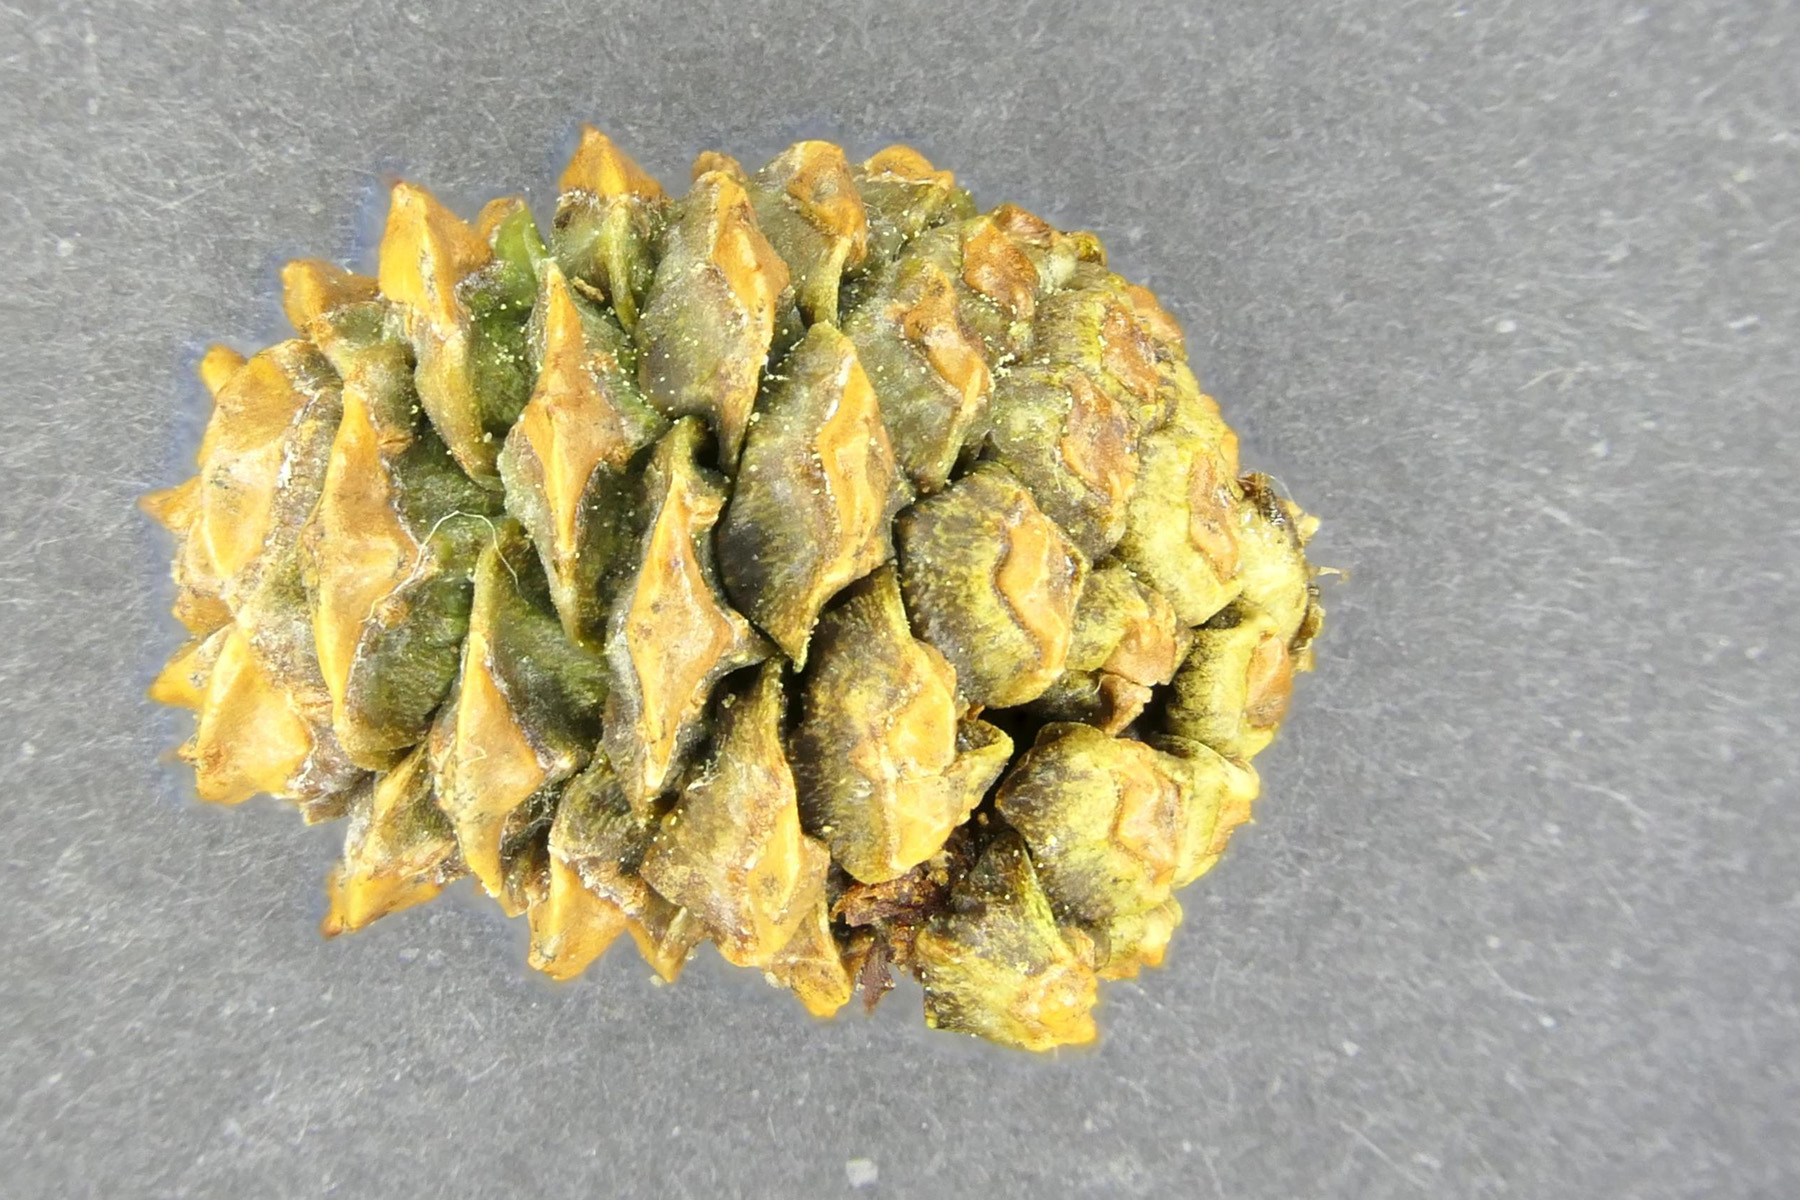 Fig 8: Rail stack of 56 images
These results suggest that in most cases under carefully controlled conditions there will probably be little or no difference in stacked image quality between those produced using the in-camera stacking facility while the camera is held steady and those produced using a commercial stacking program in its default mode to process images taken with the same camera. It may of course have been possible to improve the image quality in the case of the in-camera stacking by using the range option to select a different subset of images and for stacks of types 2-4 by trying different Helicon Focus parameter settings, but these possibilities were not investigated.
Discussion
Obviously using the Lumix camera in the field introduces other problems. The post-focus image capture process, although fast, still takes significantly longer than for a single image. From the time of pressing the shutter to the end of the image capture is of the order of about 2 or 3 seconds. This possibly risks initial camera movement when pressing the shutter since it is not possible to use the time delay facility when using the Post Focus function. There is also the possibility of moving the camera after the shutter button has been pressed while the focusing and capture process is occurring. Progress in this phase is displayed on the camera in the form of waves of little green rectangles passing over the screen. The subject, if live, may also move slightly and its environment may be disturbed by wind movement or other vibration. It is not uncommon, when the camera has had difficulty in capturing an image set for stacking, for the camera to report “Stacking Failure” for some reason. A “range” stack, where the user chooses from the set of images the camera did succeed in capturing is sometimes still possible. Any images successfully recorded by the camera can also be exported and may be useable with conventional PC stacking software.
Camera shake can be mitigated by using a tripod, a monopod or by resting the camera on a rigid surface, as recommended by Panasonic when using the Post-Focus mode, although this may introduce delays while acquiring and framing the subject. Shielding the subject from wind or restraining movement of its immediate environment (such as a branch) by holding it still may also be possible. If a live subject is not completely sedentary and moves this may also cause problems, but these may be mitigated to some extent by judicious image selection or editing.
The extra benefit from the using the in-camera stacking option will be also limited by the precise physiology of the subject since the camera is deciding and selecting the precise focal positions. Subjects with small bodies and thin legs such as harvester spiders may gain little or nothing from the technology whereas butterflies, beetles, flowers and subjects of a similar size, with good surface texture contrast and greater depth of field will probably yield good results.
Some in-field examples
Two subjects taken in the field were selected to illustrate the quality of the images which can be produced using the TZ200. Figure 9 shows the in-camera stacked image of a Longhorn Beetle on Sweet Chestnut blossom. The camera was hand-held and there was a light breeze. Close examination of the image shows that the insect moved slightly. Stacking a selection of the exported images using Helicon Focus Option B freezes this movement and results in the very acceptable overall image shown in Figure 10.
 Fig 9: In-camera stack
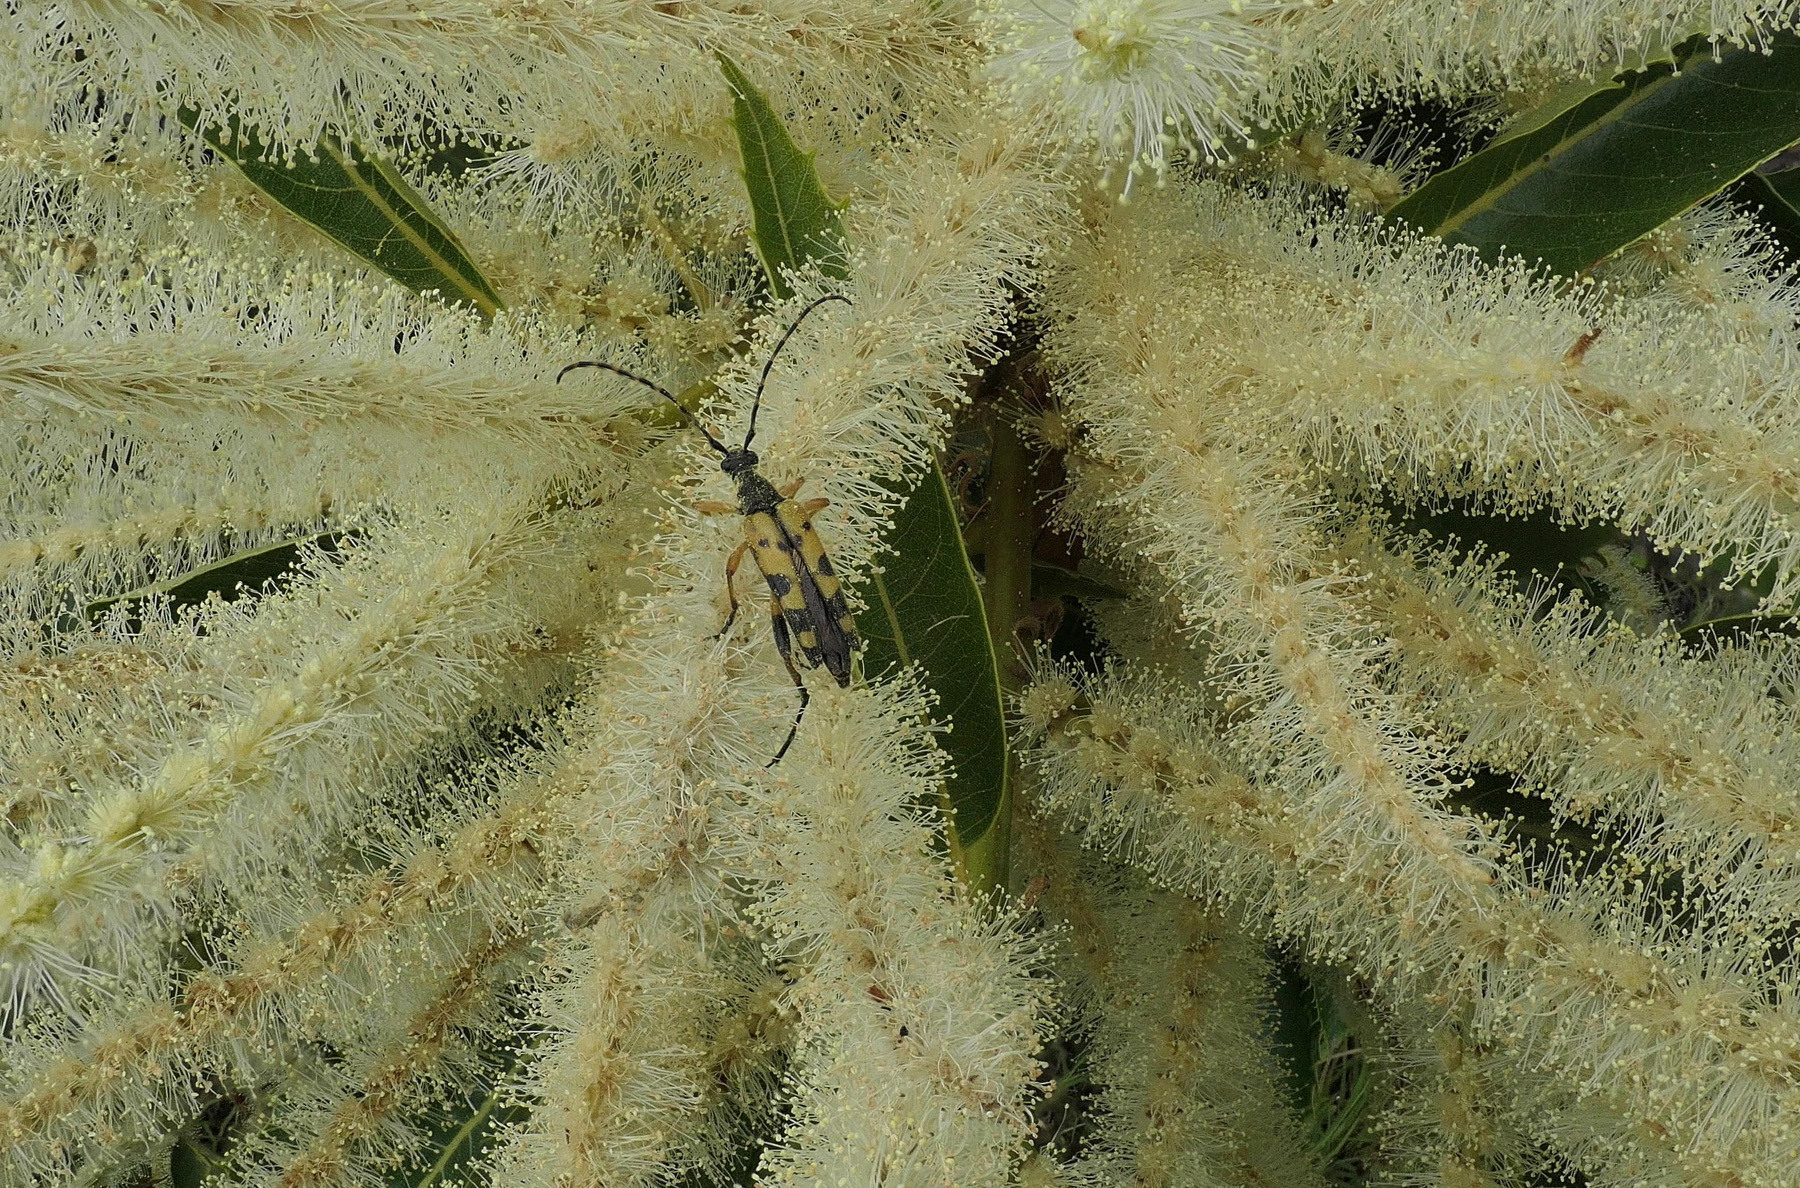 Fig 10: Helicon Focus (B) selected image stack
The considerable depth of field achievable with this camera technique is even better illustrated in Figures 11 and 12. This shows a Shield Bug on a sloe branch. Again, the camera was hand-held and there was a light breeze. Figure 11 is the in-camera stack produced using the default mode in which all the focused images are supposed to be included. The camera has “decided” however that it will concentrate on the nearest and most prominent parts of the image – this is a common feature in the automatic mode of modern digital cameras! It may not be very clear from this small image but there are a few tiny specks visible just below the insect – here the camera had also picked up a cobweb confocal with the insect which was not noticed at the time!
Figure 12 was produced by choosing the “range” option of in-camera stacking and deliberately included specific areas of the background which were actually in focus. The depth of field resulting is impressive but at the expense of a number of artefacts and distortions, the most obvious of which are the blurring around the insect and the hexagonal shaped “hole” in the leaf near the top of the image. In generating such a wide range of focal depth the camera has also omitted to include the very important image plane containing the finer detail of the eye/mouth of the insect and cobweb detail – this suggests that there is some built-in limit to the number of images which the camera is able to stack to achieve an acceptable processing time. It is possible that choosing a different set of images to stack with the “range” option may have corrected this omission. It is seems likely that although the camera may take up to 90 or more images initially it may only be selecting a maximum of 49 for the stacking process.
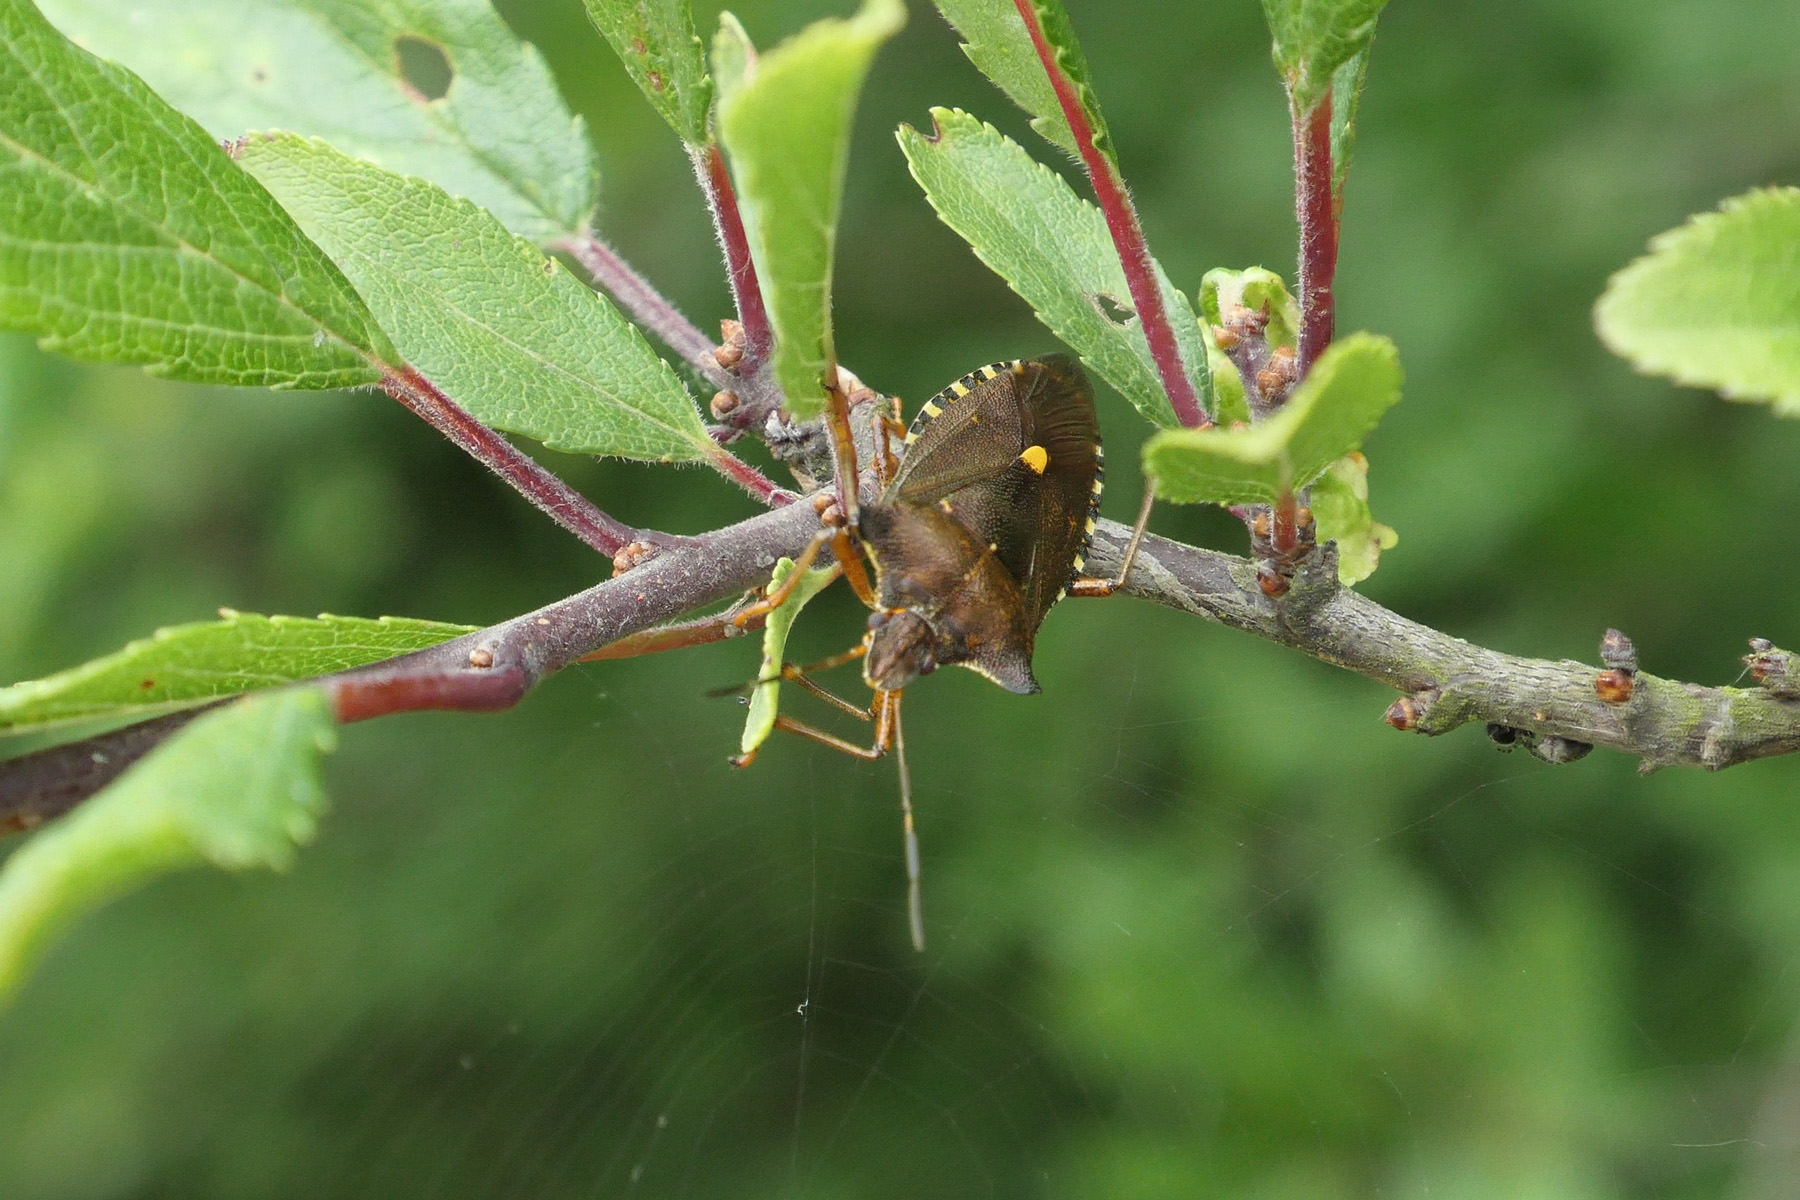 Fig 11: Automatic in-camera stack
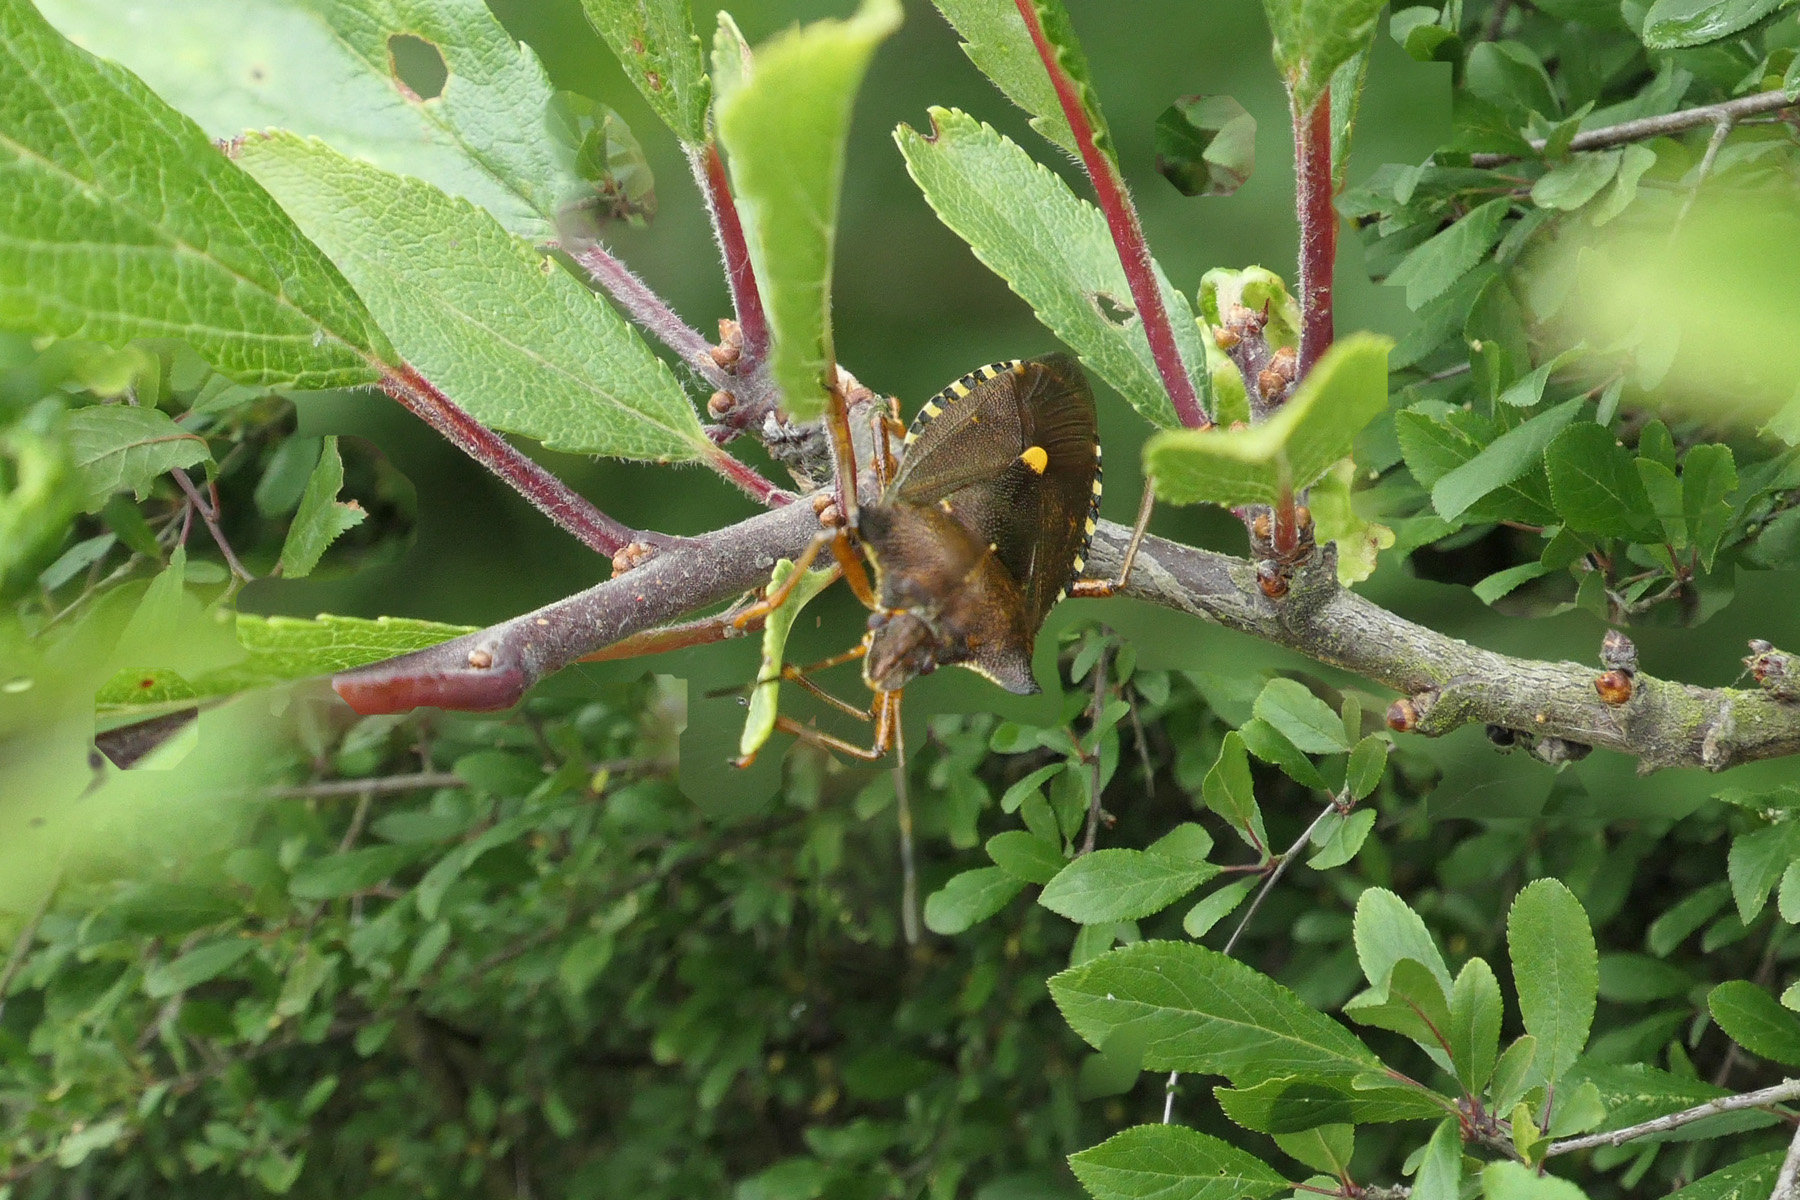 Fig 12: Range stack to include the background
For comparison, Figure 13 shows a single still image exported from the camera where the focus was on the eye/mouth region. The cobweb is more prominent in this image. Comparing Figure 13 with Figures 11 and 12 illustrates the extra benefit which can be obtained with the camera’s in-built stacking option. The extra value gained by exporting the full image set from the camera and stacking it with Helicon Focus (C) is shown in Figure 14. The more powerful processing ability of this program yields an excellent result which has fewer distortions and artefacts and it has also picked up the eye/mouth and cobweb detail better.
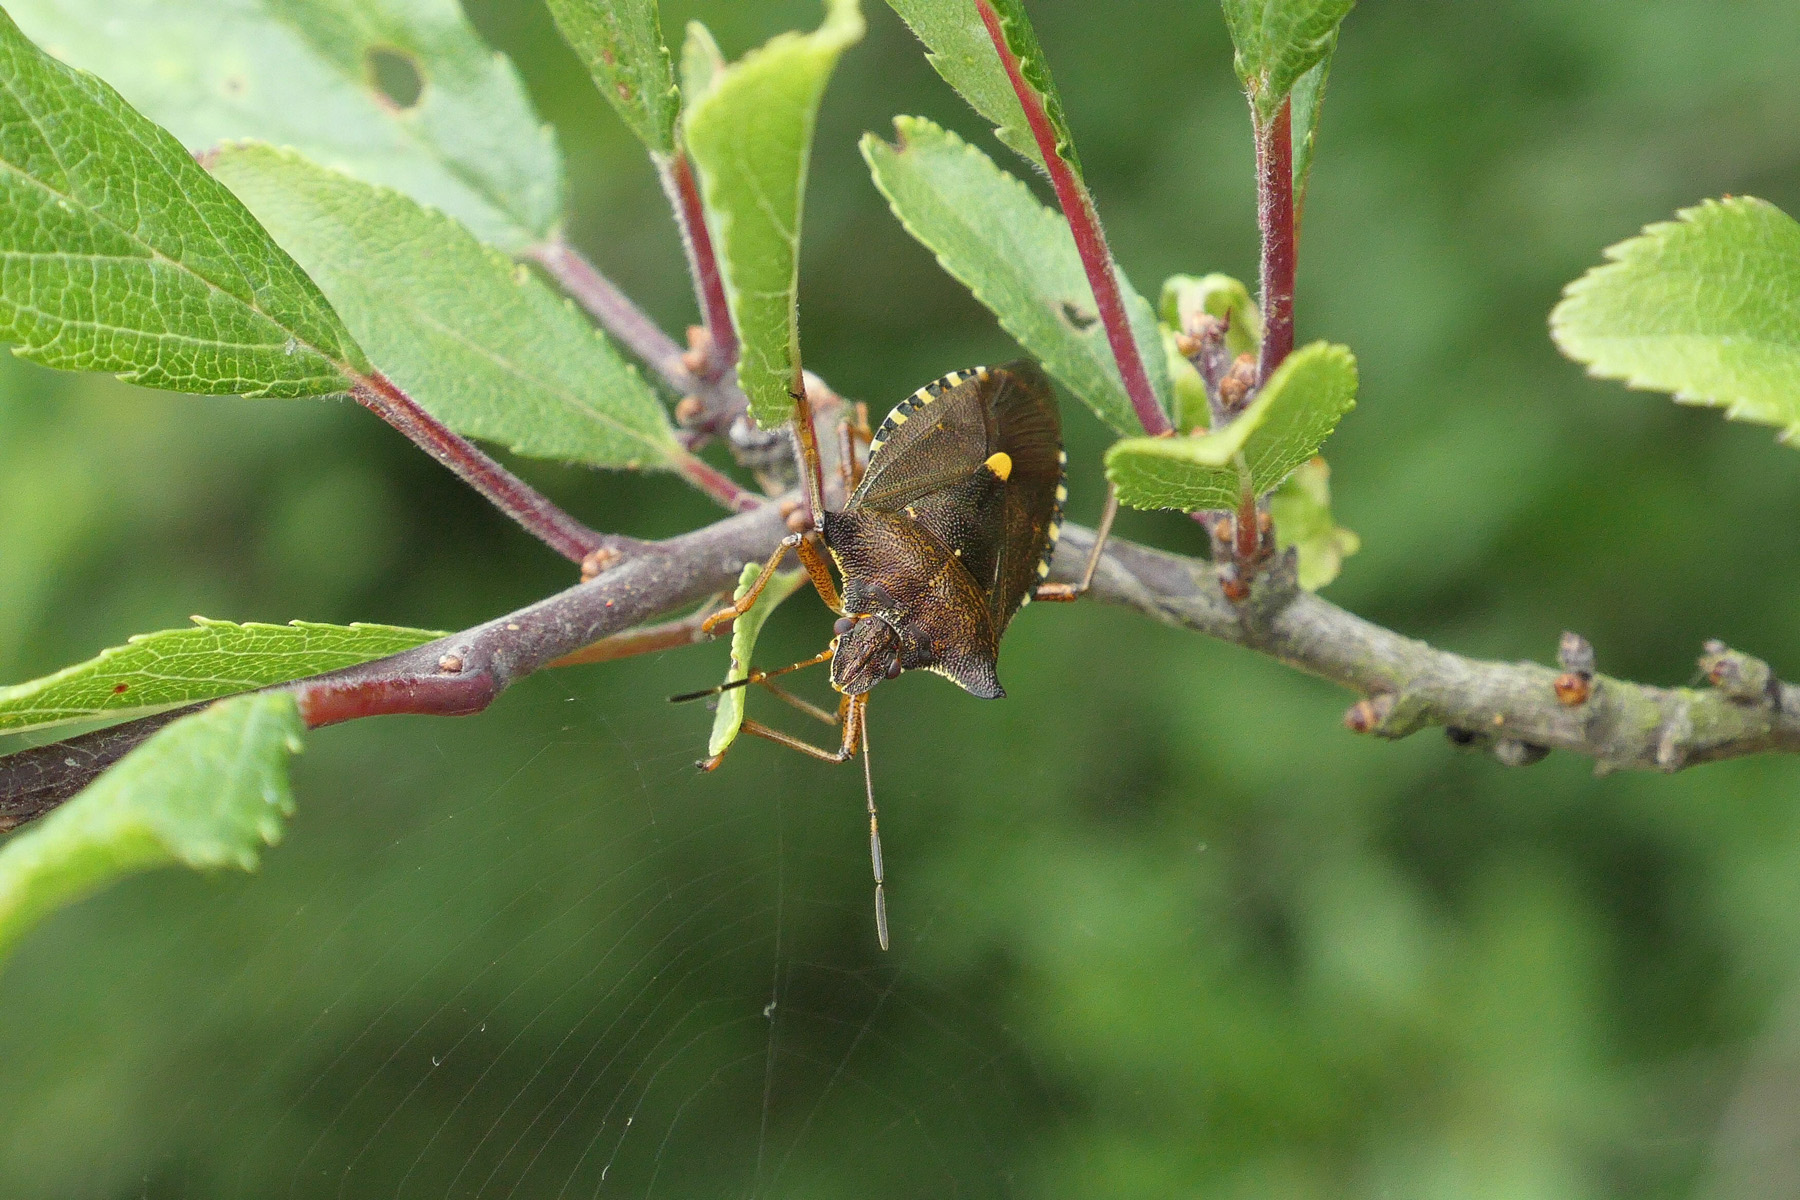 Fig 13: Single image
 Fig 14: Helicon Focus (C) stacked set
Choosing the subset of images exported from the camera for use in Helicon Focus in the creation of Figure 14 was made using the StackSel program. A screen image of the initial analysis of these by that program is given in Figure 15. The program has correctly determined the distinction between the first group of images where the camera is identifying the nearest point of focus and the second group but the algorithm used has not managed to determine the distinction between the second and third groups since the pattern of points in this graph is more complex.
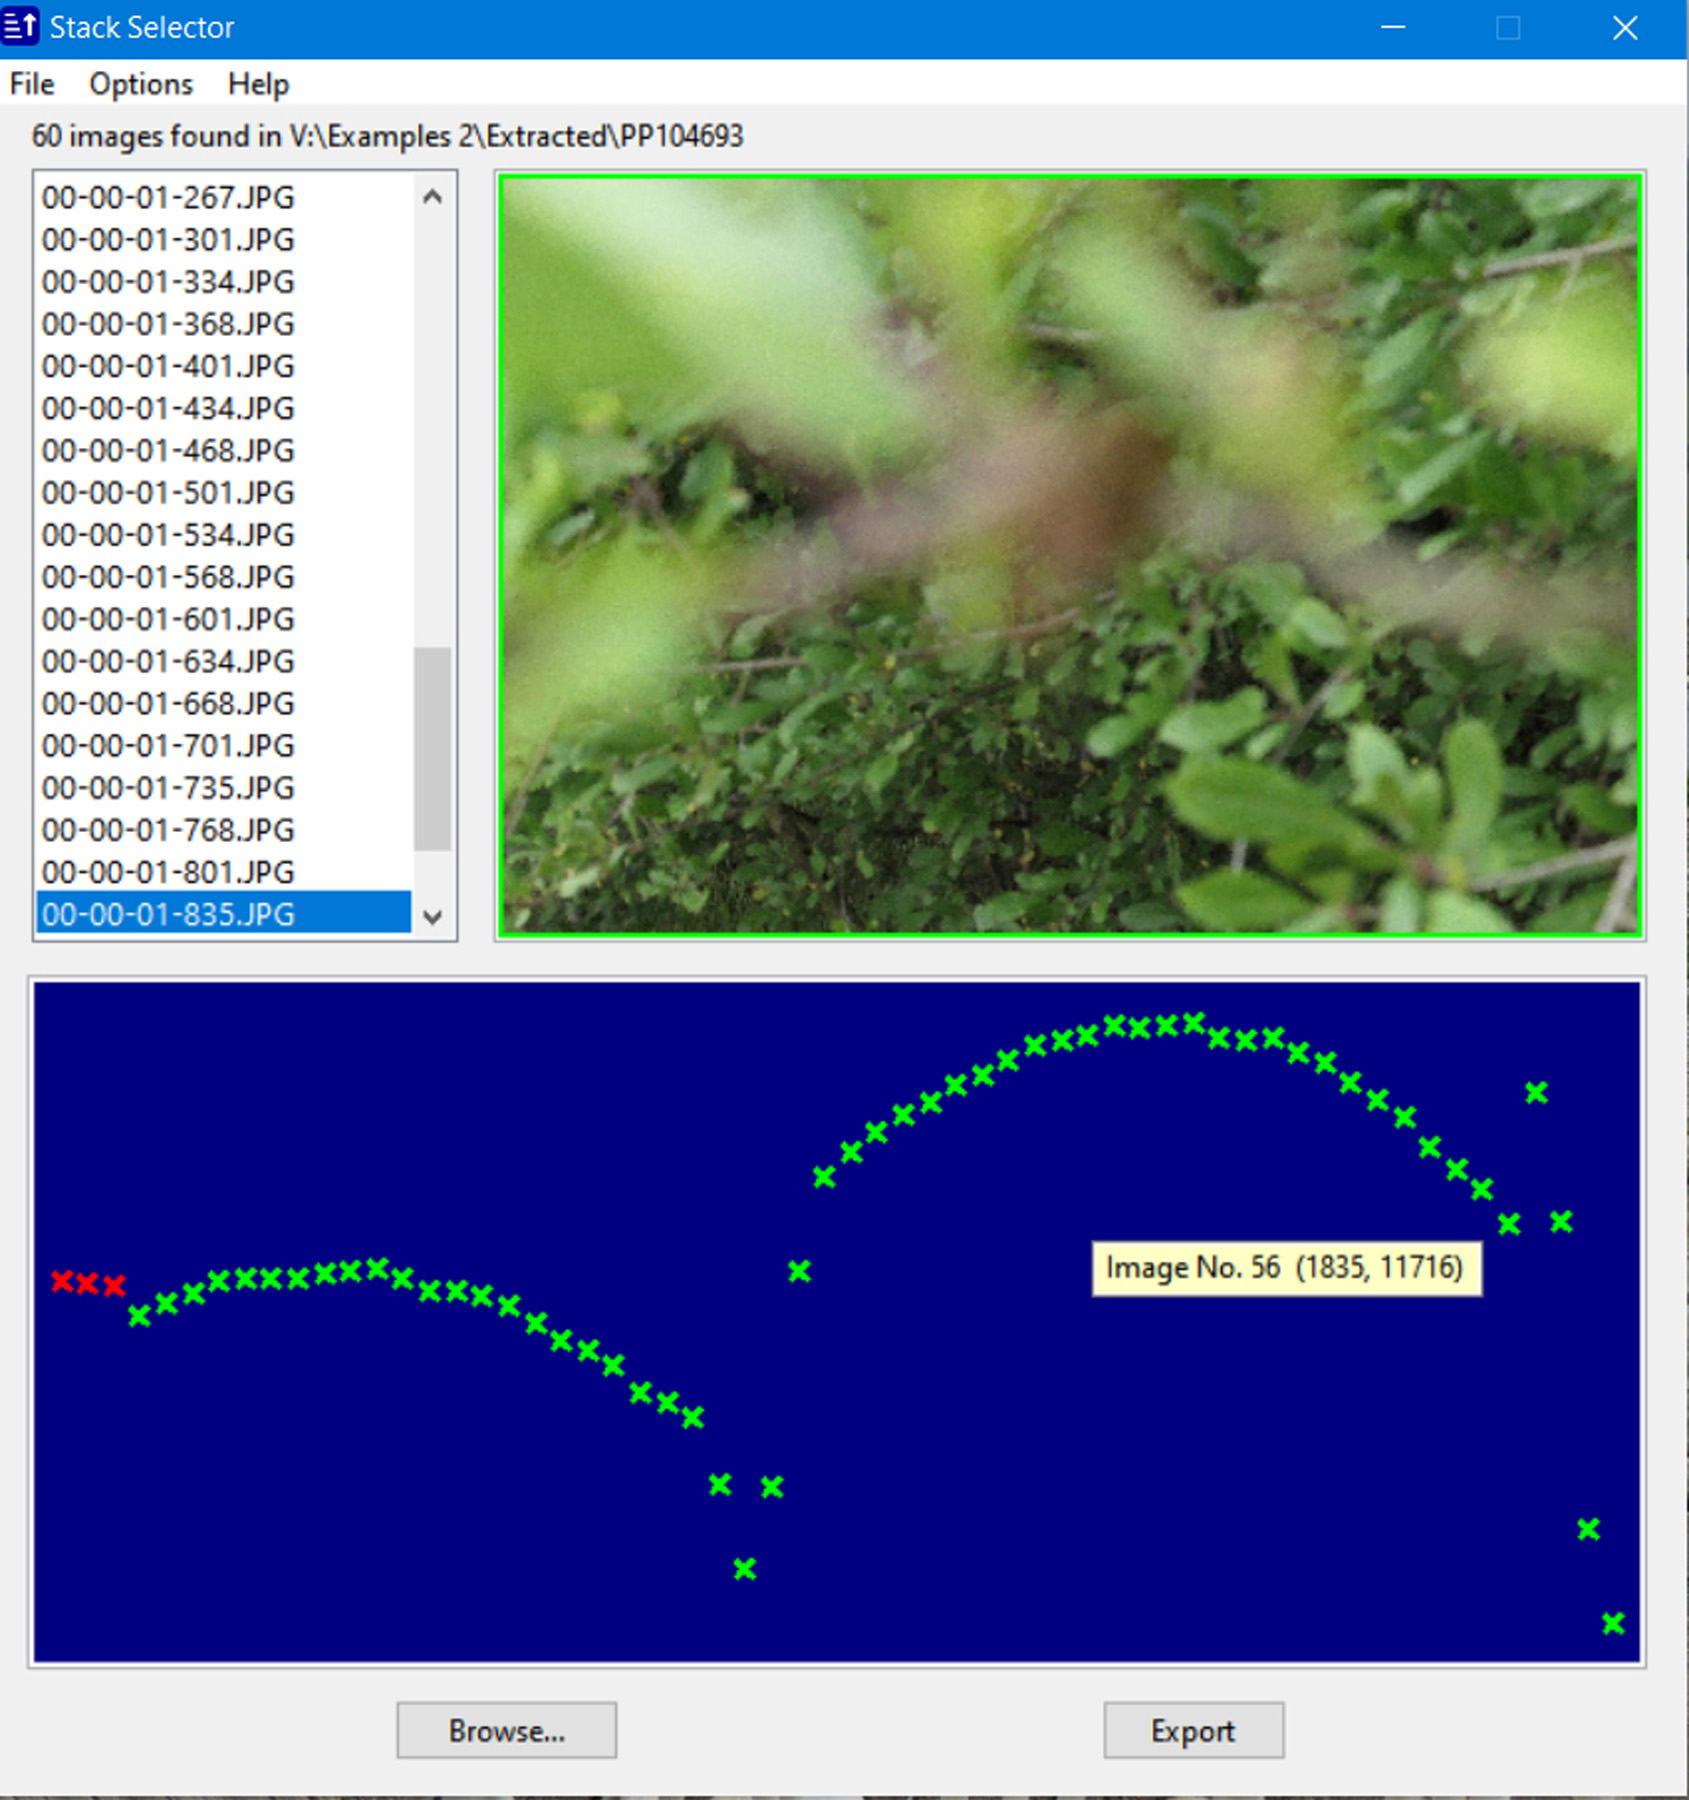 Fig 15: Helicon Focus (C) stacked set
The graph shows that the camera has identified two distinct regions in the scene where the density of focus in the images peaks – in this case the branch on which the bug was sitting and the rest of the sloe bush, some distance behind. Image number 56 of the 60 images generated is almost certainly the last image of the middle group (shown selected, but mouse cursor is not shown). Right mouse clicking on this point allows it to be designated as the end of the middle group and the colour of the remaining points beyond then changes to red from green.
The points in the separate focus areas each form a fairly smooth peaked curve in this case. In some subjects, for example when there is movement of the subject while the image gathering process is occurring or if there are wildly different focus depths between one small region of the image and another neighbouring one, this curve can be much more irregular with what may possibly be an attempt by the camera to recheck the focus. It is virtually impossible to determine where the precise focus position is by inspection for any particular image and so whether this is in fact occurring, although if it were possible to compute an image depth map this might help.
In general it seems highly likely that, within this middle group, changes in focus density simply represent a real change in the proportion of the image in focus and experience shows that in most cases the whole of the middle group designated in green by StackSel can be saved and then used directly by a PC stacking program – it has been found rare for this program then to signal an error on the grounds of non-monotonic sequence. If there is any doubt in the mind of the user as to what is going on at these points the individual images can be viewed and it is possible for the user to deselect any of them out of choice. One reason where it might in any case be worthwhile doing so is the case where the subject moved slightly. The selection or deselection of specific images can be done with Stacksel, in the stacking program itself, or by using that program’s editing options. Another reason for deselection might be deliberately to remove images focussed in front of or behind the subject to give the resulting image more emphasis.
Conclusions
The image quality of the built in stacking function in the TZ200 is comparable to that of commercial PC stacking programs used in their default mode, albeit choosing and restacking alternative range options in-camera is a bit fiddly with the small rear screen. At present it seems that the number of images the camera can stack may be limited either to achieve a reasonable stacking time or simply because the number of selectable on-screen areas is limited to 49. The ability to export the image set and to select alternative subsets of these images for stacking on a PC with commercial software further enhances the camera’s potential. Apart from having a much faster and greater processing power, enabling more images to be used in the stacking process, these programs also have a powerful editing facility to select and recombine small sections from various images to improve the overall result. They also allow the user to avoid the bias towards images closer to the camera which seems to be built-in to the camera’s stacking algorithm.
This camera technology seems likely to assist greatly in both opportunistic and planned collection of good quality, high depth of field, images in the field for the size of subjects studied here and may even begin to replace the need for expensive and cumbersome equipment normally required for stacking. The speed with which the image stack is captured means that it is certainly usable both in-laboratory and in-field for live subjects which are sedentary or are slow moving. At present, the practical issues of camera shake and the image capture time still pose some challenges with in-field use. The reader is encouraged to embrace and explore the potential of this new technology.
Acknowledgements
The author is extremely grateful to John Vale-Taylor for his continued help, support and encouragement during the conduct of this research and particularly to John Dean for the time and effort in developing and producing the Stack Selector program. Without this elegant and flexible program this research and the production of this paper would have been very difficult and time-consuming. It will also now make it so much simpler and quicker for users to choose and export the appropriate group of images from the camera for use with stacking software than it would otherwise have been. For anyone using a suitable Lumix camera a copy of this program, with instructions for its installation and use, may be obtained, free-of-charge, by sending an e-mail request to [email protected].