

Dark-ground illumination
By Savile Bradbury
Dark-ground illumination is the technique of not allowing direct light to enter the objective. This gives what photographers call ‘backlighting’ or ‘rim lighting’. This shows objects as bright against a black or dark background. Its one of the cheapest and most effective types of illumination techniques. You do need some sort of substage condenser to use dark ground.
Basically what you need to do is to place an opaque disk or ‘stop’ below the condenser, normally in the filter holder, so that the direct light is blocked out, but the indirect gets through. Here’s an easy way to start:
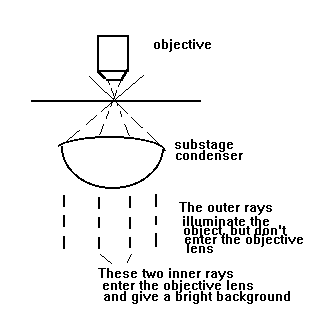
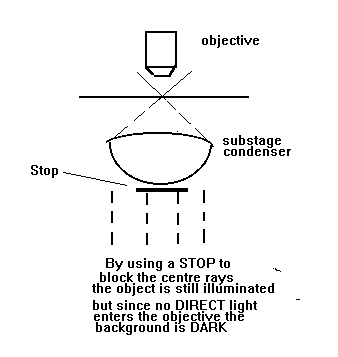
The diagrams above should make this clear.
Cut a disk of transparent plastic to fit the substage condenser filter holder; I find an empty Ferrero Rocher box is good raw material.
Now you need to place a dark disk on this plastic. Unfortunately most filter holders are not concentric with the condenser lenses. So use a 5p coin or something similar with a bit of Blutack to hold it on the underside of the plastic.
Put the disk in place.
Make sure the condenser iris is WIDE OPEN, then take the eyepiece out and look down, and you should be able to see if the disk is badly off centre. If it is, push it gently to centre it.
Replace the eyepiece and off you go!
If it all looks o.k. then you can either fix the coin permanently or paint a black disk of the same size on the plastic.
Ideally you should use a different size disk for each objective. Together with the dramatic Rheinberg illumination, we’ll come back to this later.