

Setting up Köhler illumination
By Don Thomson & David Gompertz
Introduction
Köhler illumination is a way of using the optics of the compound microscope to correctly focus the lamp to achieve a uniform level of brightness in the field of view – this makes viewing more relaxing and is essential for photography with the microscope which will easily detect any variation in light levels across the image. Use these simple steps to make the correct adjustments to achieve Köhler illumination with either a separate microscope lamp, or one that is built-in.
Köhler with a separate lamp
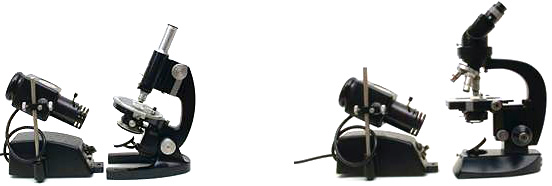
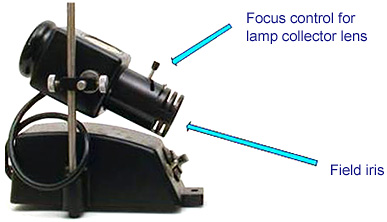
With older, possibly antique, microscopes the illumination is set up using an external lamp. The lamp uses a compact filament bulb, and is fitted with a focussing lamp collector lens, in front of which is an iris diaphragm to control the size of the illuminated area of the specimen.
Important controls
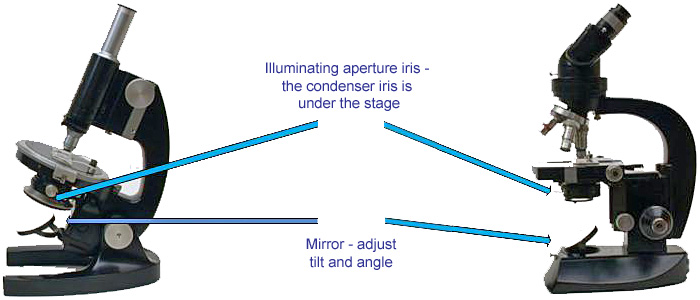
Step one
Set the condenser height so that the top lens of the condenser is nearly touching the underside of the slide, using the condenser focus control. Adjust focus of lamp collector lens to produce a sharp image of the lamp filament on the underside of the closed aperture iris at the bottom of the condenser, via the microscope mirror. The front of the lamp should be about 6 inches from the mirror. It is convenient to use a small handheld mirror to view the underside of the condenser. If the aperture iris cannot be seen due to the design of the condenser, the filament image can be focussed on a white card placed on the microscope mirror, or in the filter holder, for the purpose.
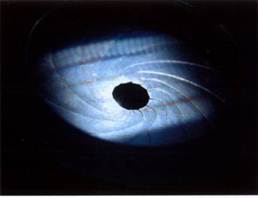 Image of filament on iris diaphragm
Step two
Open the condenser iris, place a specimen on the stage, and focus the microscope on the specimen, using a 10× objective; a stained tissue section is very suitable for this.
Step three
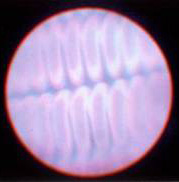
Close the field iris diaphragm on the lamp, and focus the microscope condenser to produce a sharp circular image of the field iris superimposed on the specimen, about half the diameter of the field of view.
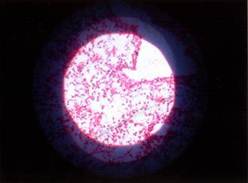 Image of field iris
Step four
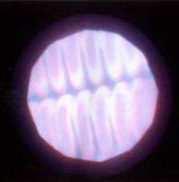
By adjusting the mirror and lamp alignment, move the image of the field iris into the centre of the field of view, and then open the field iris far enough to fill the whole field of view.
 Whole field of view
Step five
Carefully close the condenser iris, until the image begins to show a reduction in brightness. This is due to the reduction of glare, and the image should now show improved contrast.
Step six
When changing to a higher power objective, the field iris will need to be closed down, as the field of view will be smaller, and the image of the field iris may need some centring adjustment. The aperture iris, in the condenser, will now need to be opened to match the higher power objective. Open the aperture iris fully and then slowly close it until the image brightness starts to diminish.
Step seven
The function of the aperture iris is to vary the numerical aperture of the condenser system. To achieve maximum resolution of fine detail in the specimen, the numerical aperture of the condenser should equal that of the objective, but in most microscopes a slightly reduced aperture has to be used in order to eliminate glare in the image. The use of too small an illuminating aperture in the condenser will prevent the resolution of fine detail and introduce artefacts into the image.
Step eight
By removing the microscope eyepiece one can see the back focal plane of the objective, where there should be an image of the lamp filament, which completely fills the back focal plane, with the aperture iris fully open. Slight adjustment of the lamp collector lens focus may be required to produce a sharp image of the filament. The aperture iris is also imaged in the back focal plane of the objective, when it is closed down. A setting of the aperture iris to about 75% of diameter of the back focal plane is usually the optimum setting for most specimens.
Aperture iris open (left) and partly closed (right)
Köhler with a built-in lamp
These vary in design details between different manufacturers, so only broad guidelines can be given. In the absence of original instructions the user has to explore the instrument to find the appropriate controls for setting up Köhler illumination.
The observations will be the same as those seen when using an external lamp. With the possible exception of the presence of the filament image in the objective back focal plane, which is sometimes lost due to the presence of a fixed diffuser in the optical train.
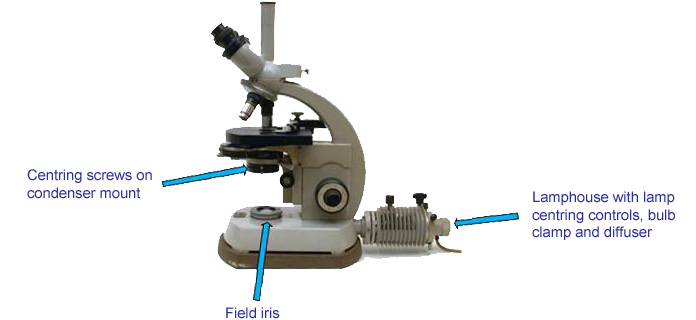
The illuminating field iris diaphragm control is frequently found on the base of the instrument, either as a rolling wheel protruding through a slot or as a milled edge rim surrounding the light port. In other designs this can be found as part of the lamp house where the lamp is fitted to the base, at the back or side of the instrument base together with the lamp collector focus control. The centring of the image of the field iris in the field of view is most commonly achieved by the operation of centring screws adjusting the position of the condenser, though microscopes with field iris centring controls are sometimes encountered.
Lamp centring adjustments are sometimes provided. If these involve the use of Allen keys to adjust the position of a halogen bulb and a concave mirror in the lamp house, the setting up of these systems requires considerable experience to ensure even illumination of the field of view, as there can be 6 adjustments to make and they all need to be correct, even when a diffuser is in place.
- For more information on Köhler illumination, see Practical control of contrast in the microscope by Jeremy Sanderson