

Advanced digital photomicrography
Abstract
The availability of high quality digital ‘consumer’ cameras at relatively low prices has made photography with the microscope significantly easier than with traditional film. Coupled with recent developments in software aimed at the amateur, digital imaging now offers the photomicrographer capabilities for images that were not possible only a few years ago. This article provides guidance on suitable types of digital camera, including webcams, compact fixed-lens cameras and digital SLRs and how to couple these cameras to a microscope. Software is discussed for both basic image capture and processing, and for the advanced operations of image focus stacking, time-lapse photography and High Dynamic Range imaging.
Introduction
In March 2000, Bruce Scott delivered his Presidential Address to the Quekett Microscopical Club on Digital Imaging and the Microscope. The period since then has seen significant development in how photographic images are obtained with the microscope and a revolution in how those images can be used and enhanced. Whilst the basic processes have not changed, the universal availability of digital cameras has made the recording of high-quality images available to all microscopists, independent of skill or experience, and the instant viewing of results allows errors to be quickly corrected and a new image captured for all but the most active of subjects. Furthermore, the digital photomicrograph can now be processed by consumer-level software to create or analyse images that previously were the preserve of expert professionals, or simply were not possible at all.
Despite these changes in the way photomicrographs are recorded and processed by digital means, there has been surprisingly little published on the subject; what has been published is primarily on the Internet and is at best diffuse. It is therefore the intent of this article to review the current capabilities and provide practical recommendations for recording digital images with the microscope.
The digital image sensor
Whilst it is not essential to have an understanding of how digital cameras work, a basic knowledge can be beneficial in making informed decisions regarding selection of a camera, and also in understanding why some post-capture image processing is necessary in photomicrography. For a fuller treatment on the digital image process, the reader is referred to Michael Freeman’s book [see Further Reading] as one of the clearest introductions to the subject.
At the heart of digital imaging is the image sensor. This consists of an array of light-sensitive receptors, embedded into a microchip containing the wiring and circuitry necessary to record light levels captured from each receptor. The receptors, termed pixels (an abbreviation of picture elements) generally consist of photodiodes embedded in a well. The photodiodes convert photons of light striking the sensor into electrons in a proportional relationship (the more photons striking, the more electrons generated). The charge generated is measured by the microchip circuitry, converted to a digital signal and processed by in-camera software. The photodiodes are only responsive to the intensity of light, and not its colour. Colour information is introduced into the digital signal in one of two ways. In conventional digital cameras, a transparent filter mask (termed a Bayer mask, after its inventor) is located immediately in front of the sensor; this mask has a matrix of red, green and blue filters, with one colour located above each individual pixel (Figure 1).
 Figure 1: Bayer filter mask showing red, green and blue filters corresponding to individual pixel sites of a camera sensor (photograph courtesy of Mr Don Thomson)
Each pixel therefore records light intensity, and its location under the Bayer mask is used by camera software to determine the colour of light at that position in the image. The Bayer mask is generally not an even distribution of red, green and blue filters; green locations are predominant to produce an image that more closely approximates human vision and ‘typical’ subjects such as landscapes. In dedicated photomicrographic cameras, a colour filter wheel is often provided in front of the sensor. Three separate images are recorded with the red, green and blue filters rotated in place in succession; the three images are then combined to produce the final colour image. This provides better colour fidelity, but cannot be used for motile or dynamic subjects.
There are a number of different sensor types. The first generally available, and best known, is the Charge Coupled Device (CCD). The CCD is still the most common type of sensor in professional photomicrographic cameras, but has largely been replaced in consumer cameras by the Complementary Metal Oxide Sensor (CMOS). The CMOS sensor is a greater range of consumer devices; mass production means that the CMOS sensor is significantly cheaper than the equivalent CCD sensor. Although the CMOS sensor requires more processing by the camera software to reduce noise in the image, the image quality from the current generation of CMOS sensors cannot be distinguished from images created by CCD sensors.
Resolution and image quality
Camera manufacturers can vary both the number of pixels on a sensor, and their individual (physical) size; more pixels can be accommodated into a sensor chip of given size by reducing the dimensions of each pixel. Resolution – the ability to see two adjacent points in the image as separate – is determined by both the number of pixels and their size. For the two adjacent points in the specimen to be recorded as individual elements in the image, the microscope must first of all be able to resolve the points. The objective must be of sufficiently high numerical aperture to resolve the structure, and the microscope must be correctly set up; the highest resolution digital camera cannot record information that is not present in the optical image. Secondly, the two adjacent points in the image must fall onto separate pixels, and these pixels must be separated from each other to show a ‘gap’ between the two structures.
Larger pixels have the advantage that they can capture more light before becoming saturated and have a higher signal to noise ratio; they are thus more appropriate for recording images of low light intensity where long exposures are necessary such as fluorescence microscopy. Smaller pixels capture less light before becoming saturated and have a higher signal to noise ratio, but provide greater image resolution. Smaller pixels require more software processing to reduce electronic (background) noise in the sensor signal. Thus the microscopist is presented with a compromise decision; larger pixels for light sensitivity or smaller pixels for resolution. The correct answer depends on the types of images to be recorded; larger pixels for fluorescent or confocal images or smaller pixels for brightfield, phase and interference contrast images. For the recreational photomicrographer, much of this is academic; the choice of camera will be based on cost, and sensor resolution in terms of the number of pixels.
Quality of the image depends on the output device – computer screen, projector, or print. The relationship between image resolution and output device is perhaps the most misunderstood aspect of digital photography with the terms ‘PPI’ and ‘DPI’ used interchangeably. PPI stands for ‘Pixels Per Inch’ and determines the size of the image on the output device. The number of pixels used to record the digital image file is fixed by the camera sensor; this cannot be changed. However, these can be displayed or printed at a variable number of pixels (each represented as one coloured dot in the image) per inch. Lower PPI values will result in a larger output image size but the ‘dot’ nature of the image will become more apparent as the PPI value is lowered and the final image will have a ‘grainy’ appearance. For professional printing (such as a book or magazine) 300 ppi is the required quality; printing of photographs on a domestic printer will generally be at 180 to 200 ppi and will be of acceptable quality; graininess will start to become apparent below this value. Computer monitors (PC) generally work up to 96 ppi. Table 1 summarises maximum output image size for various uses of the image.
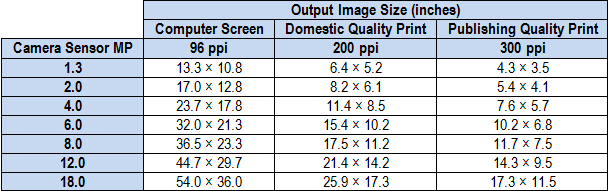 Table 1: Maximum image size for various image outputs
DPI (dots per inch) relates to dot density and is a measure of the output device (computer screen or printer) resolution; either the number of dots of ink that can be applied to paper, or can be displayed on screen. The DPI value will affect the quality of the displayed image but not its size; lower DPI will result in a grainier image. DPI is usually controlled by the printer software and is usually adjusted under Print Quality. Draft, Normal, Fine and Best settings affect the DPI and control image quality, not size. Size is usually set by photo editing software and may be set directly as PPI or, more usually with current software, directly as Image Size in inches or centimetres.
Choice of digital camera
Often digital photomicrography is attempted with a pre-existing camera, and almost any digital camera can be utilised to record images from the microscope; several ingenious arrangements to couple less-suitable cameras to microscopes have been published. However, if selecting a new camera there are several important considerations.
The most fundamental decisions relate to how the camera is to be used, and how the images are to be used. If the camera is to be used for general photography as well as photomicrography, a conventional consumer level compact camera or digital single lens reflex (DSLR) is necessary to provide a lens function. Alternatively if the camera can be wholly dedicated to the microscope, a specialised microscope camera system may be appropriate. However, it is the balance between sensor resolution (number of pixels) and cost that is probably most important. Digital cameras have evolved rapidly in their short existence; a ten-fold increase in sensor resolution of consumer-level cameras has been achieved in as many years whilst prices have dropped in real terms. In the early days of transition from conventional film to digital recording, a number of articles asked ‘how many pixels are required to equal (35 mm) film quality?’ The relevance of this question is now much less significant because how we use our photographic images has also fundamentally changed. Probably the majority of digital photographs will never be printed but may be displayed on a computer or television screen, or in a digital ‘photo-frame’. Transparencies and slide projectors have disappeared and been replaced by the laptop computer and LCD projector. Printing of photographs can now be achieved much more simply at home (or professionally) and the ‘darkroom’ has been replaced by the ‘digital darkroom’. The quality of the displayed image is dependant on the display device (or inkjet printer) as much as the camera sensor. The most important question therefore in purchasing a digital camera (whether for conventional or photomicrographic use) is therefore ‘how will I use or display the digital image’?
The next question relates to overall sensor size. The physical dimensions of the sensor will have an impact on how much of the field of view of the microscope can be projected onto the sensor and therefore recorded. Larger sensors will record more of the visual field of view, assuming no change in projection optics. The situation is however, complicated by compact cameras that have a built-in zoom lens, and several images with smaller fields of view can now be ‘stitched’ together by software to make a larger overall image.
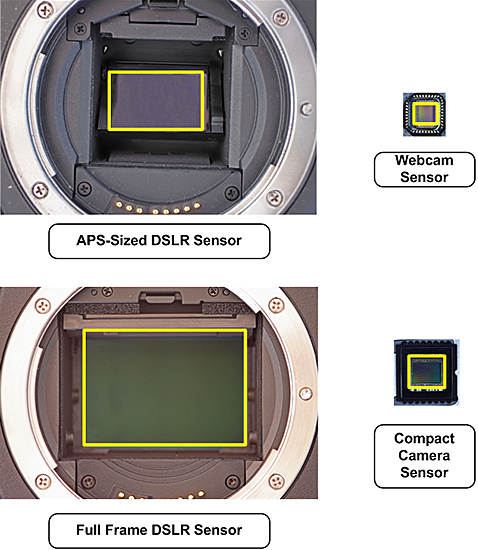 Figure 2: Variation in camera sensor sizes (to the same scale) from a 1.3 MP webcam to a 21 MP full-frame sensor DSLR
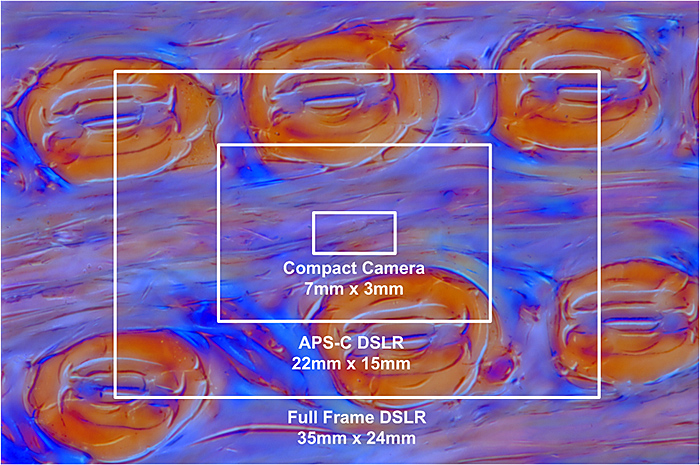 Figure 3: Field of view recorded for different sensor sizes (assuming equivalent relay optics)
Both sensor resolution and sensor size have a major impact on cost of the camera; the third (and often over-riding question) in selecting a camera is ‘how much do I want to spend?’
The cheapest starting-point for digital photomicrography is a dedicated webcam (Figure 4).
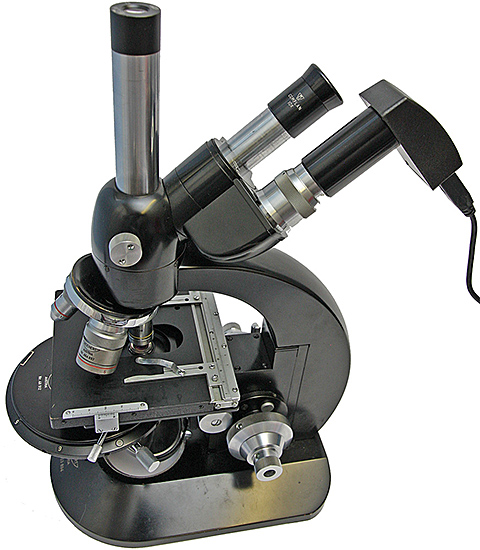 Figure 4: Photomicrographic webcam fitted to eyepiece tube
These are supplied with optics to replace the microscope eyepiece and simply drop into place in the microscope tube. Connection to a computer via a USB link provides power to the camera, and software included with the camera provides the control. Both still and video images can be recorded to the computer. The great advantage of webcams is their low cost and ease of use. Against this, sensor resolution is very low and the camera can only be used in combination with a computer. A typical webcam of 1.3 MP will produce prints of tolerable quality up to 6″×4″.
When conventional film cameras were used for photomicrography, the camera would always be used with no lens attached; it was unheard of to use a fixed lens (e.g. rangefinder) camera with the microscope. However, compact digital cameras (with a fixed zoom lens) have been very successfully used for photomicrography. For some years, the Nikon Coolpix 950 (and subsequently 990 / 995 / 4500 models) were the most popular compact camera because of their ease of coupling to the microscope using an eyepiece with male screw thread corresponding to the female filter screw thread at the front of the camera lens (Figure 5) and because of the tilting view screen which makes focusing easy.
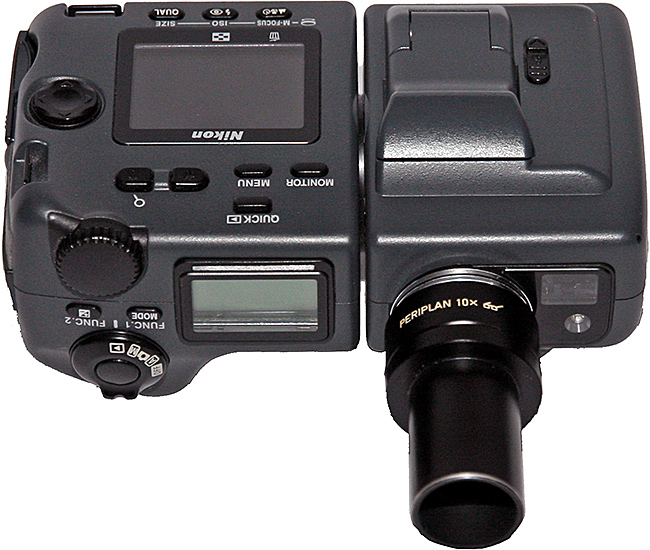 Figure 5: Nikon Coolpix camera with Leitz Periplan eyepiece fitted to the lens filter thread
However, these models have been out of production for several years and are now only available secondhand. Older models are now prone to terminal failure without warning.
A wide range of compact digital camera is now available and some are more suitable for photomicrography than others. In looking for a model suitable for use with a microscope, the following features are important:
- A female screw thread on the front of the lens designed to allow filters or lens adapters to be fitted. This thread can be used via an adapter, to connect the camera to the microscope.
- Zooming of the lens is achieved through internal movement, and the front lens element does not protrude in front of the lens barrel beyond the filter screw thread.
- Availability of a remote control to trigger the shutter without physical contact with the shutter button (which would cause vibration to occur)
or - Remote control of the camera functions directly from a computer via a USB link.
For photomicrography, compact digital cameras have many advantages; low cost, high sensor resolution (especially in ‘top end’ cameras that match the resolution of digital SLRs), and relative ease of use. The main disadvantage comes from the fixed camera lens which is less flexible than a removable-lens DSLR and can introduce optical artefacts (such as ‘hot spots’ or ghosting) in the recorded image. These can often be eliminated in many instances by trial and error if a range of projection optics is available; there seems to be no way of determining if a particular camera and projection lens is compatible other than trying it. Undoubtedly the best approach is to follow a recommendation on model of compact digital camera from an existing microscope user, either through personal contact or via an Internet forum.
Arguably the best ‘all-round’ camera for photomicrography is the DSLR. The removable lens allows for easy coupling using a T-mount adapter and photomicrographic systems designed for use with 35 mm film cameras (and now available at very low cost second-hand) can be used, providing advantages such as a focusing telescopes (still more accurate than using the camera or computer screen) and vibration-free shutter mechanisms. Most currently-available DSLRs have CMOS sensors with resolution of at least 12 MP; sensor size is usually smaller than 35 mm film and is often based on the APS-C film format of approximately 22×15 mm (the exact dimensions vary between manufacturers). So-called full-frame sensor DSLRs are becoming more available (especially those by Canon) and have a sensor the same size as 35 mm film. This provides a wider field of view and can be advantageous if using optical relay systems originally designed for 35 mm film. However, the wider field of view can be prone to vignetting at the edges if sub-optimal relay optics are used. The main disadvantage of DSLRs is the vibration that can occur from movement of the camera mirror when the shutter is released. For low magnifications or with long (>3 seconds) exposures this has little practical impact, but for shorter exposures or higher magnifications the vibration can cause blurring of the recorded image.
 Canon digital SLR with adapter, replacing an Olympus OM 35mm SLR
In selecting a DSLR for use with the microscope, the following features are desirable:
- Live View. This function is available on a growing number of DSLRs available on the market and allows a real-time image to be displayed on the camera screen or, if coupled to a computer with appropriate software, on the computer screen. Live View makes focusing much more reliable than viewing through the camera eyepiece; most DSLRs do not have interchangeable focus screens designed for finding accurate focus at high magnifications. The ‘refresh’ rate of Live View is much lower than for video and therefore it is less useful for tracking and focussing rapidly-moving objects under the microscope; in these instances coupling the camera to a relay lens system with focusing telescope is to be preferred.
- Remote control of the camera from a computer via a USB link. Some manufacturers include this software free with the camera but others do not, and the software can be an expensive addition. There are also excellent ‘third party’ remote control software programmes (see Resources below) but it is wise to check compatibility before buying a camera.
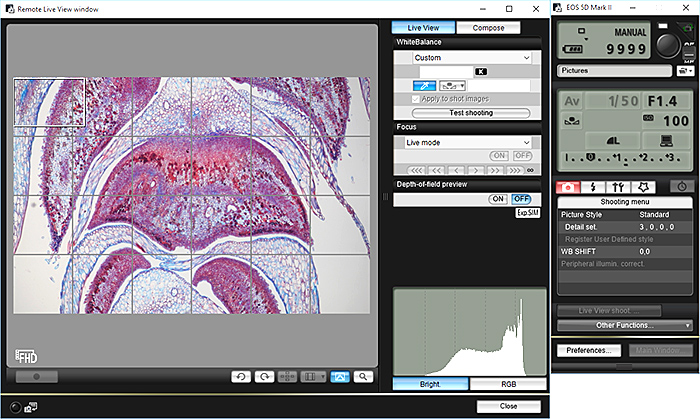 Canon EOS Utility remote control software
- Some cameras (e.g. Canon) have a ‘silent’ Live View option (usually buried in the ‘Special Settings’ menus). In conventional Live View mode, the camera mirror flips into the ‘up’ position and the mechanical shutter opens allowing the image to be ‘seen’ by the digital sensor and displayed. When the shutter button is triggered, mechanical shutter closes and then re-opens to provide the correct exposure; in some systems the mirror also flips down to allow exposure sensors located in the reflex housing pentaprism to determine the correct exposure. These actions induce some vibration which can cause slight blurring of high-magnification images. Designed to prevent camera shutter noise from scaring wildlife, silent Live View mode utilises an electronic shutter that does not require the mechanical shutter to first close (or the mirror to flip down) to make an exposure. For the microscopist, silent Live View mode is desirable for higher magnification photomicrography. More information and results of trials on Silent Live View can be found on Charles Krebs’ website.
- The ability to record video. Several DSLRs released in the last year now have the ability to digitally record high-quality video. This can be of great use to the microscopist working with live specimens or dynamic processes such as crystallisation.
A potentially interesting and very recent development is the availability of digital cameras with removable (interchangeable) lenses that have eliminated the DSLR mirror. Whilst the author has no practical experience of these systems, the absence of a mirror would appear to significantly reduce shutter vibration. Both Olympus and Panasonic have released a number of models; whilst there is as yet no accepted terminology for this design of camera, both manufacturers’ cameras are marketed as ‘Micro Four Thirds’ system, which relates to a sensor size of 18.0×13.5 mm; field of view will therefore be smaller than with an APS-C DSLR of similar cost.
Dedicated digital cameras are made by the major microscope manufacturers as well as dedicated specialist imaging companies. These systems tend to be of lower resolution and higher price than consumer-level cameras but are of very high sensitivity to cope with the low levels of fluorescence and confocal microscopy. Such systems (by virtue of their price) are generally not used outside of specialist laboratories but are slowly becoming available on the second-hand market. Potential buyers should be very cautious of the risks involved with these electronic systems, sold outside of the manufacturer’s support or warranty. Lower cost dedicated microscope cameras are available via Internet auction websites but reports of image quality from some systems have been disappointing. Table 2 summarises the relative merits of each class of digital camera.
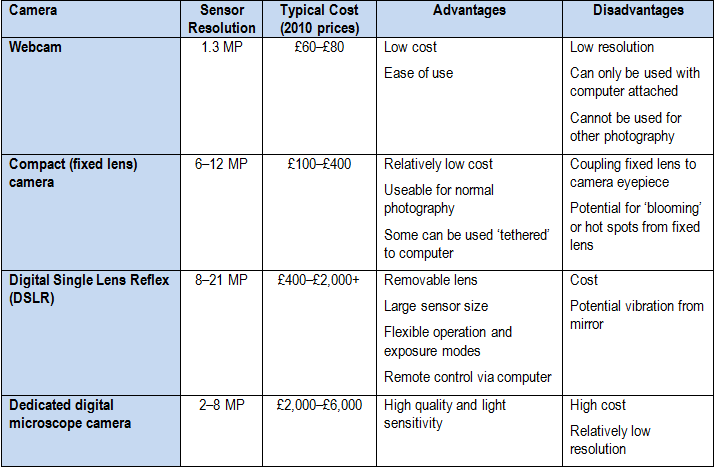 Table 2 – Cameras for photomicrography compared
Connecting camera to microscope
The simplest solution to bring camera and microscope together is the dedicated microscope webcam. These directly replace the microscope eyepiece and drop into the microscope tube; adapters are usually provided for wider diameter stereomicroscope tubes.
DSLR cameras have a removable lens and usually require a T2-mount adaptor which connects to the camera lens bayonet and provides a universal female M42 thread. This can then be coupled to a conventional microscope camera adapter with relay or projection optics (Figure 6).
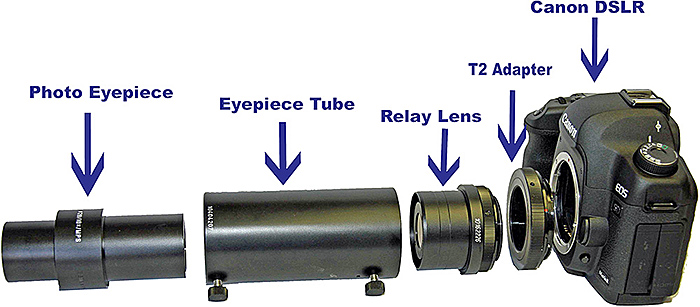 Figure 6: Camera attachment system with relay optics
Many microscope adapters consist of a simple tube without relay optics; it is inappropriate to use an eyepiece designed for visual use with these adapters as these are designed to project an image at infinity (and brought to a focus by the lens of the eye). To project a real image onto the camera sensor, refocusing will be necessary which introduces spherical aberration, and degrades the image. The correct solution with these simple tube adapters is to use a specially designed projection eyepiece.
In many ways, the ideal solution for coupling a DSLR to the microscope is to use a second-hand photomicrographic system; these can often be bought on Internet auction sites at very low cost. They were provided by the main microscope manufacturers and are often specific to fit microscopes from the same manufacturer. They generally consist of a shutter body with prism for diverting light to a graticule eyepiece for focusing, or vertically to a 35 mm film camera body (Figure 7). Some manufacturers, including Leica / Wild (as shown below) and Olympus, sold adapters for using 35 mm SLR camera bodies; sadly these adapters are now very hard to find.
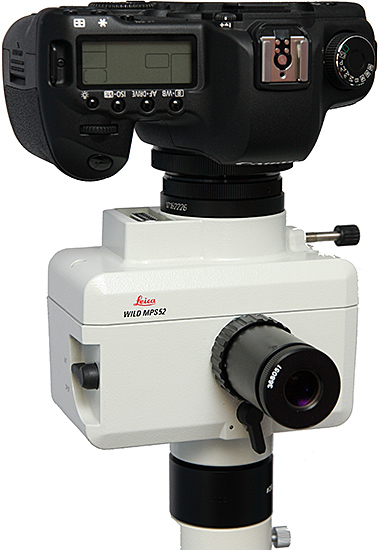 Figure 7: DSLR mounted in place of 35 mm film body on a photomicrographic camera system
Replacing the film body with the DSLR provides the benefit of much greater precision of focus (using the eyepiece rather than the camera or computer screen) and can effectively eliminate the vibration problem with DSLR cameras. This is achieved by first triggering the DSLR shutter, with a shutter speed of several seconds, waiting two or thee seconds for vibration from the mirror to subside, then triggering the photomicrographic system shutter, timed for correct exposure.
The lens on compact digital cameras however, cannot be removed and some ingenuity is required to connect these to a microscope. With fixed lens camera, it is appropriate to use a visual eyepiece on the microscope; the camera lens performs the same function as the eye’s lens in focusing the image onto the photosensitive receptor (the eye’s retina or the camera sensor). The eyepoint of the eyepiece should be at least 15 mm above the upper surface of the eyepiece in order to avoid vignetting in the image. Often these ‘high eyepoint’ eyepieces are designed for use by spectacle wearers and are marked with an icon of a pair of glasses. The most widely-adopted solution is to use a microscope eyepiece that has a screw thread, allowing eyepiece and camera to be directly connected (in most instances) via a screw thread adaptor. The Leitz Periplan ×10/20 GF eyepiece (marked with model number 519 815) serve this purpose well, having a plastic eyecap which is screwed to the top of the eyepiece. Removal of this reveals a 28 mm male screw thread which can mate directly to a female lens filter mount on the camera of the same thread, or to an interconnecting ‘stepping’ adapter. Other models of Periplan eyepiece are also suitable, but may have a different screw thread and the upper surface of the lens projects above the screw thread, requiring a short spacing tube between the eyepiece and camera lens to prevent the two optical surfaces coming into contact. Periplan eyepieces are no longer available new but can be obtained from Internet auction sites (although prices are rising dramatically). Adapter rings can also be purchased from Internet auction sites or from specialist companies such as SRB-Griturn. Other suitable eyepiece systems are also available secondhand and it can often be a matter of trial and error to establish a workable system. Care should be taken with any system to evaluate images carefully for flare, ghosting or hotspots in the final picture.
Software for digital photomicrography
The digital photomicrographer need not have any software (or indeed a computer) to record digital images; files can be printed out directly from camera storage media on many domestic printers or at high street processors. However, to achieve the full benefits and potential that the digital image offers, a range of software tools is essential.
Basic software
The most basic software requirement is the driver file for the camera. This enables the camera and computer to communicate when linked by cable (or wireless transmission) and enables basic functions such as image download. This software is supplied with the camera from new and is often available as a free download from the manufacturer’s website. Although it can be possible to download images without the relevant camera driver, other camera functions will not be controllable from the computer without it. Those buying secondhand digital cameras should ensure that the driver software is included, or at least downloadable from the Internet.
The most beneficial software is the image editing programme. It is not the intent of this article to review the many packages that are available, varying in cost from free shareware to advanced and complex systems costing several hundred pounds; general books and magazines on photography should be consulted to review the market. However, the author uses Adobe’s Photoshop Elements and, like many other users, has found this package to be relatively simple to use, reliable and more than adequate in functionality. The image editing programme provides a wide range of functions; those important to the photomicrographer include image cropping, exposure management, colour management, cloning to remove dust marks and sharpening. Many editing programmes also include photo album organisers – electronic management of digital images into album-like folder structures. Unless many thousand photographs are to be stored, the author has found these to be unnecessary as the required level of management and backup can be achieved with a simple folder structure, rigorously maintained. A further advantage of image processing software is the ‘Panorama-Merge’ function. Designed to blend a number of adjoining pictures of (typically) a landscape into a single panorama, this can be used to great benefit in photomicrography where the field of view is insufficient to record the whole specimen, or where it is desirable to use a higher numerical aperture objective to achieve high resolution. Systematic imaging of the specimen according to a grid pattern (using the X and Y controls of a mechanical stage), ensuring overlaps of each image, allows large specimens to be recorded at high resolution.
Many digital cameras can be controlled directly from a computer via a USB link and this offers many benefits to the photomicrographer; preview of the image on the computer screen, control of basic camera functions such as ISO setting, colour temperature setting, metering mode, exposure control, remote triggering of the camera shutter and near-instantaneous download of the image for immediate viewing. Some manufacturers (e.g. Canon) include this software ‘bundled’ with the camera; others provide this as an accessory, often at high additional cost. Third-party ‘remote capture’ software is also available for purchase via the Internet, of which the best-known system is Breeze Systems’ DSLR Remote Pro software. In the author’s experience third-party software can provide much better functionality and interface than the camera manufacturer’s own software.
Advanced software
The possibilities that current software provides to the amateur digital photomicrographer could not have been imagined 10 years ago. Advanced software is now available, either at low cost or sometimes for free download, that can manipulate digital image files to achieve amazing results. This includes image stacking software that combines multiple exposures taken at different focal depths into a single combined, in focus image. Other software will combine single image files taken at timed intervals into a video sequence; time lapse sequences that were once the province of professional television can now be achieved by the amateur with software costing only a few pounds. Further, the compromise between exposing for ‘shadows’ or ‘highlights’ can now be solved by different software that combines several exposures into one ‘blend’.
For the photomicrographer, and especially for high magnification photomacrography, image stacking software has to be one of the most significant advances in recent years, enabling stunning images with high depth of field to be easily produced. Professional, and expensive, systems that process multiple images have been available for some years; the functionality of these systems is now available in free or low cost software for the amateur. Systems currently available include Combine-Z, Helicon Focus and Zerene Stacker. The author uses Helicon Focus which provides a very easy to use interface, with effective results. Other Zerene Stacker as providing images greater flexibility in use.
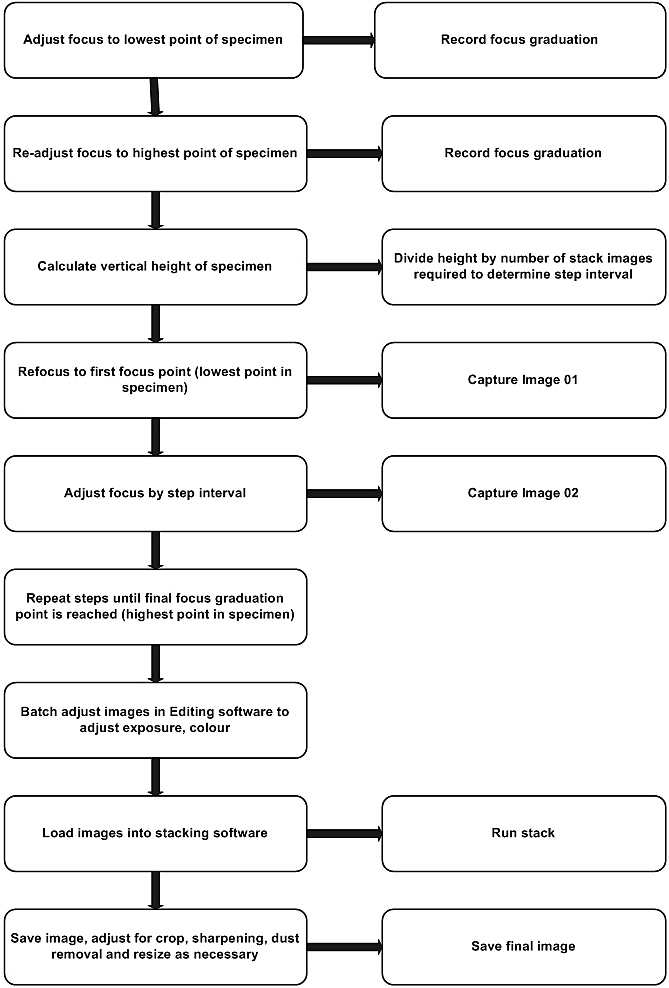 Figure 8: Workflow for using image stacking software
Time lapse sequences can also be achieved with conventional digital cameras and very simple software. Most remote capture software (e.g. Breeze Systems) includes a time lapse function which allows the camera shutter to be programmed to record a series of images, with user settings for the time interval between each and either ‘start and end of sequence’ times or ‘maximum number of frames’ to be recorded. Apple’s QuickTime Pro software (working on both Windows and Mac computers) can then be used to combine the multiple images into a video sequence, with variable settings for the playback frame-rate (playback rates of 15–20 frames / second work well). The resulting file is then exported as a digital movie.
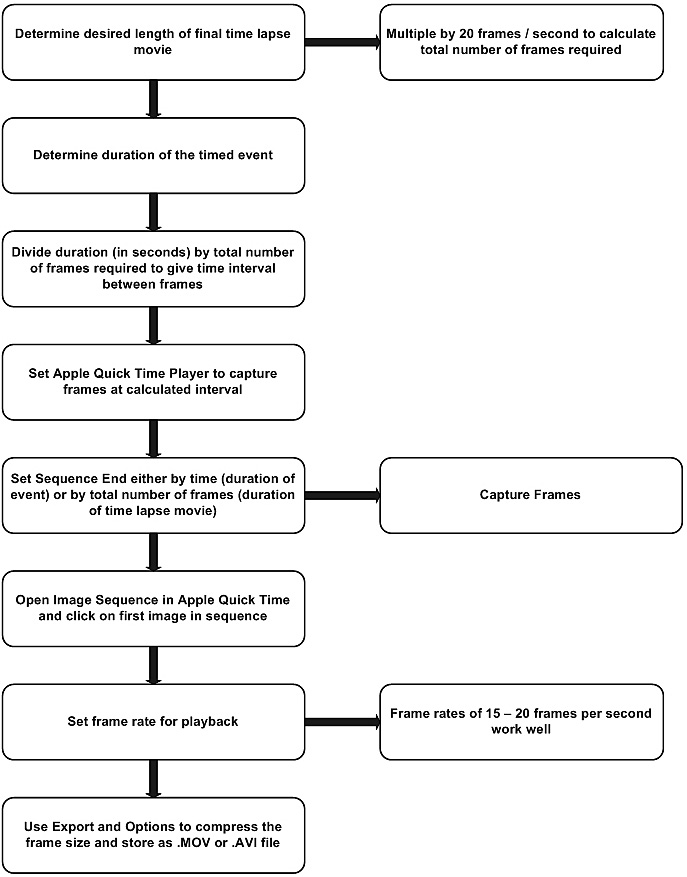 Figure 9: Workflow for producing time-lapse movie sequences
One of the disadvantages of current generation digital cameras is the relatively limited dynamic range of light intensity that the sensor can capture. Whilst improvements are continuous, current sensors can typically capture a dynamic range (the range of image luminance) of 10–14 exposure values (EV), compared to the human eye that is sensitive to a dynamic range equivalent to 30 EV. Computer displays (where most digital images will be displayed) only have a dynamic range of 7 EV. High Dynamic Range (HDR) photography utilises software that combines a range of images taken at different exposure levels that together record the full dynamic range of the subject, and then compressing that dynamic range for display. Whilst HDR processing is increasingly being used in digital photography, to date it has not been applied widely to photomicrography. Most microscopic subjects have a limited dynamic range and will not benefit from HDR processing; however many darkground images do have a high dynamic range and HDR software can improve the aesthetics of such images (e.g. Figure 10).
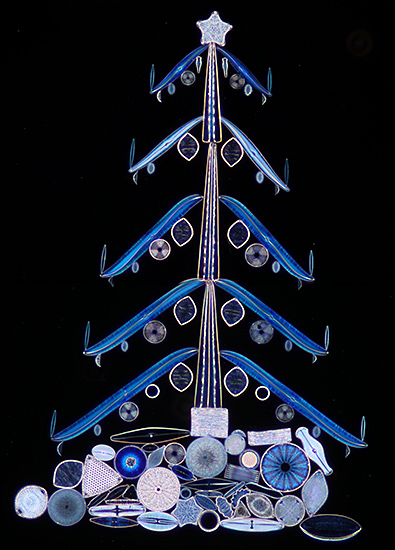 Figure 10: Darkground image of arranged diatom slide by Klaus Kemp, processed using High Dynamic Range (HDR) software
A number of software options are available, including Photomatix, FDRTools, and easyHDR. The professional level Photoshop (e.g. CS4) software also includes HDR functionality. As with many areas of digital photography, the software is continuously evolving and the reader should consult current specialist books and photography magazines for the latest developments.
Conclusions
Digital imaging has made the recording of high-quality photomicrographs accessible to all at low cost. Cameras have now evolved to a stage where virtually any digital camera will produce an image suitable for printing at A3 size or greater, and at high resolution. A range of software is now available to the amateur that enables images to be generated that previously were not possible, and all at relatively low cost. Whilst the field continues to develop rapidly, the ‘pixel-war’ of ever-increasing sensor resolution has probably reached its peak. However, new software will continue to be developed that further increases the possibilities for digital imaging with the microscope.
Further reading
Digital Photo-Microscopy by D. J. Jackson. Volume III of Better Microscopy: A Series of Practical User’s Guides, 2008. Obtainable from www.lulu.com.
Practical Digital Photomicrography by B. Matsumoto, 2010. Published by Rocky Nook Inc. ISBN 978-1-933952-07-09. Obtainable from www.amazon.co.uk.
Color Balance in Digital Imaging by Thomas J. Fellers & Michael W. Davidson (on the Nikon MicroscopyU website)
For more information on DSLR Silent Live View, refer to www.krebsmicro.com
Resources
Camera adapters
SRB-Griturn Ltd, Unit 21D, Icknield Way Farm, Tring Road, Dunstable, Beds, LU6 2JX, United Kingdom (Telephone 01582 661878).
Remote capture software
- DSLR Remote Pro
- EOS Utility (supplied with Canon digital SLRs)