

Compound microscopes
 High power microscopes – also called compound microscopes because of their two-stage magnification – are the ‘typical’ microscope that is seen in laboratories and on television. High power microscopes typically magnify in the range ×40 to ×1000; much greater than this will only produce fuzzy images with no more detail. Unlike a stereomicroscope which has two optical paths set at a slight angle to each other, producing stereoscopic images, compound microscopes have one optical path and produce a flat, 2-dimensional image. These microscopes are designed to work with flat objects mounted on glass microscope slides; at lower magnifications specimens with some depth can be examined but this form of microscope is not suitable for directly examining a flower or insect from the garden (for this a stereomicroscope is more suitable).
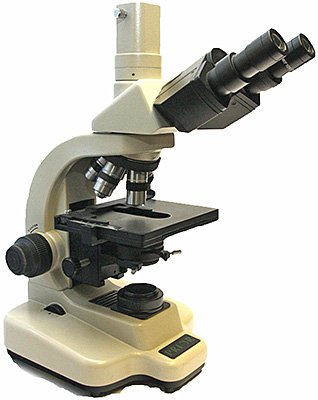
Compound microscopes consist of two lens systems; an objective lens directly magnifies the specimen (and is closest to it) and the eyepiece lens then further magnifies this first image. The overall magnification of the system is the objective magnification multiplied by the eyepiece magnification. Objectives usually come in magnifications from ×4 to ×100 and eyepieces typically magnify ×10. The specimen is supported on the stage, which may either have clips to hold it in place, or a mechanical adjustment (a mechanical stage) which allows for much more controlled movement of the specimen. In good compound microscopes, a further lens system below the stage, the condenser, ensures correct focus of the light from the in-built lamp, onto the specimen. In most compound microscopes light is transmitted through the specimen which must therefore be transparent or reduced in thickness (a section) to make it transparent. Even rocks can be made transparent for examination under the microscope by grinding down to a very thin slice.
Compound microscopes do require a little experience and understanding to get the best results, but most microscopes made since the 1960’s will have in-built illumination which makes setting up significantly easier than the older models with a mirror and separate lamp. There are many different forms of compound microscope; most work in transmitted light with transparent objects, but some have light directed from the top (incident illumination) for examining solid objects such as metals, or seeds. Other forms of microscope are inverted, with the lens system below the specimen stage, to prevent the subject from being disturbed during examination. However, for most uses a ‘biological’ form of microscope is recommended, or a ‘polarising’ microscope for work with geological materials or fibres.
Choosing a high power microscope
There are several considerations if looking to buy a compound microscope. The first is budget; microscopes in this class can cost from a few tens of pounds, up to several thousand pounds. Both are likely to magnify the same, but the more expensive instruments will have better quality optics (clearer images) and be more versatile for different microscopical techniques. Ideally, look for a microscope with in-built illumination, with a condenser and mechanical stage, and a model of microscope that can be expanded with accessories as your interest and skills grow. Choice of magnification is important; many microscopes come as standard with ×4, ×10, ×40 and ×100 objectives giving a magnification range of ×40 to ×1000 but in reality the ×100 lens will be used very occasionally (if at all), unless your interest is diatoms or spores. A much more useful range of objectives is ×4, ×10, ×20 and ×40. Be careful to buy a microscope with ‘RMS’ standard objectives; these have a standardised screw thread which enables additional objectives, including from different manufacturers, to be fitted in the future. Many microscopes made over the last 10–15 years are fitted with ‘infinity corrected’ objectives which give superb images, but are usually manufacturer-specific and have deviated from the interchangeable RMS standard, restricting future upgrades to the same make of microscope.
A final consideration is to buy new or second-hand. Purchasing new should provide the backup and support of the supplier or manufacturer, and accessories should be currently available. However, second-hand often will provide a better quality, more solid instrument, if the microscope was made by one of the bigger manufacturers such as Zeiss, Nikon, Leitz / Leica or Olympus. Older suitable makes include Reichert, Vickers and Wild. Some caution is needed in buying second-hand, but good value for money can be had! Don’t hesitate to contact the Quekett Microscopical Club for advice, or come to Microscopium, our annual sales meeting held in St Albans, Hertfordshire, each October.
Setting up a high power microscope
Compound microscopes can also come with a range of illumination techniques. The standard technique is brightfield (the image appears against a white background) but there are also darkfield (image appears self-luminous against a black background), Rheinberg illumination (colourless objects shown as coloured against a contrasting background), phase contrast and differential interference contrast systems (which make very transparent specimens visible) and polarising light (which produces spectacular colour in suitable subjects such as crystals and minerals).
All of these techniques work best when your microscope is first set up properly to provide Köhler illumination, so that the field of view is uniformly illuminated. This is especially important if you want to use a camera to record what you see, because the camera is much more sensitive to uneven illumination than our eyes.
Recording what you see – digital photomicrography
Only a few people have the skill to produce accurate drawings of what they see down the microscope, and so many microscopists use a camera to record what they see. Digital cameras have made it easy to take good photomicrographs (photographs through a microscope), and we have some pages to help you get started: