

Wax cells for fluid mounts
By Stephen Livermore
Introduction
Marson (1983) describes a good method for making deep fluid mounts using aluminium rings to make the cells. This article describes the use of wax to make the cells instead of aluminium rings, allowing a greater range of cell diameter and depth.
The method was described to me in 2004 by Vaughan Dodge during a microscopy weekend run by Ernie Ives at Belstead House. This is a good example of the value of such meetings. He said it was a method the Victorian microscope slide makers used. I have not been able to trace any articles from that period but my attention has been drawn recently to the method proposed by E. D. Evens via the excellent article by Jacky McPherson in a recent Balsam Post. This is a good example of the value of such publications! No doubt a comparison of the methods will lead to improvements.
 Equipment
The basic materials, which I will go into more detail about later, are these:
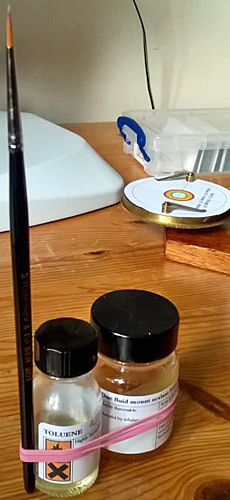
- Dust-free, well ventilated work area
- Hotplate with temperature control
- Cell wax (a mixture of beeswax and paraffin wax)
- Brush for the wax
- Coverslip cement (a mixture of rosin, beeswax and Vaseline® dissolved in toluene)
- Brush and toluene for the coverslip cement
- Ringing table with 16, 19 and 22 mm guide rings
- Standard glass slide
- No. 1.5 or thicker circular coverslip (16, 19 or 22 mm diameter depending on cell size)
Making the cell
- Have the coverslip cement ready to apply.
- Melt the cell wax on the hotplate.
- Place the wax brush in the melted wax to warm.
- Decide on a depth and diameter for the cell needed to accommodate the specimen with a little room to spare.
- Take two clean slides, one on which to make the cell, one for flattening the top of the cell (see later).
- Warm the cell slide on the hotplate. Transfer the warm slide to the ringing table and centre it. Holding the slide by its edges helps to avoid burned fingers.
- Spin the ringing table at a moderate pace and apply a first ring of wax. Use very little wax to ensure a neat ring on the slide rather than a flood. The wax should remain liquid for a few seconds then begin to solidify. This will ensure a good bond between slide and cell.
- Apply a second ring just as the first begins to solidify.
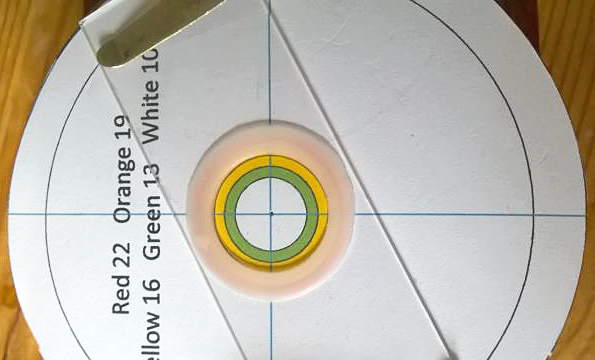 Wax ring after three applications of wax centred on the 19 mm guide ring
 - Apply further rings to build the wax cell up to the required depth, and a little beyond to allow for flattening (see next). A deep cell may require tens of layers to be applied, but with practice it does not take long. The amount of wax on the brush can be increased as the cell builds, but unwanted wax may splash onto the slide if the brush is overloaded.
- A few seconds after the final application of wax, while the wax is still warm, place the second slide on top of the wax and press down gently and evenly to make the top of the cell flat and horizontal. You may be tempted to warm the second slide but if you do it will bond to the wax and not come off without breaking the cell.
 Second glass slide applied to flatten the top of the cell
 - Allow a minute or two for the wax to cool down and set solid, then remove the second slide. Inspect the top of the cell under a stereo microscope and discard if there is not a flattened area at least 1 mm wide round the full circumference of the cell.
- With the slide centred on the ringing table, apply a ring of the coverslip cement.
- Leave the slide for a day, protected from dust, for the cement to dry before filling the cell.
- Seal the filled cell with a second ring of coverslip cement. Label the slide, at least temporarily until a permanent label is applied.
- Leave the slide at least another day for the cement to dry.
There now comes the application of asphalt and shellac rings over a period of weeks to waterproof and protect the cell, but that is another story.
Making the wax for the cell
As a container for the wax I use an old 35 mm photographic film canister. The canister is metal and flat bottomed so that it conducts heat well and makes good contact with the hotplate. In this way the hotplate can melt the wax and warm the slide at a temperature that will not burn the fingers that handle the slide, or burn any wax that falls on the hotplate.
The cell wax is a 50:50 mixture of paraffin wax and beeswax. The exact consistency of the wax and the exact ratio used is not critical so long as the wax does not solidify too soon during the making of the cell, and does not become too soft in hot weather. Beeswax alone solidifies too quickly at safe working temperatures and paraffin wax alone is too soft.
To mix the wax I weigh equal weights of beeswax and paraffin wax into the canister and allow the wax to melt on the hotplate at a temperature just above the melting point and no higher.
Cell size
The cell diameter must suit the coverslip, which will usually be 16, 19 or 22 mm in diameter.
In theory, all that should be required is to centre the cell wall on a guide circle on the ringing table that is the same diameter as the coverslip. The coverslip will then sit half way across the top of the cell.
The depth of the wax cell can be between 1 and 6 mm. It is difficult to flatten the top of shallower cells because the wax hardens too fast, and deeper cells pose viewing and storage problems.
In practice a handmade wax cell will rarely conform to theory. The aim should be to keep the cell wall vertical and thick so that the flattened top of the cell ends up being about 2 mm wide. Ideally the contact between cell and coverslip should be at least 1 mm all round, and without the coverslip overhanging the cell, to ensure a good seal that will stand the test of time.
Making the brush for the wax
A craft brush with nylon bristles will work, or a brush can be made from wood dowel and nylon fishing line.
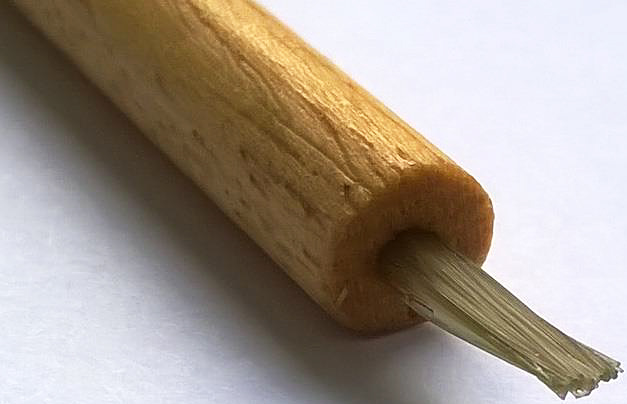 Brush tip with flattened profile
Cut a 14 cm length of 8 mm diameter dowel and a 2 metre length of 2 lb breaking strain nylon fishing line. Drill a hole 1 cm deep into one end of the dowel using a 3 mm drill. Double up the fishing line until it forms a bundle about 2 cm long, push the bundle into the hole, and trim the protruding nylon threads to 1 cm. I have not found any glue necessary. This gives a brush that will make the wax cell wall about 3 mm thick.
Applying the wax
Stand the brush in the melted wax to warm up before use.
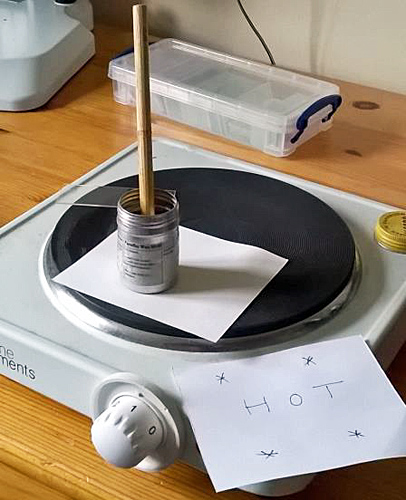 Wax container and brush warming on the hotplate
Dip the brush into the wax and touch against the edge of the wax container to remove excess wax.
Apply the brush to build the wax cell, not with a painting action, but allowing the slide to pull to the wax off the brush. A brush with a flattened profile works best, applying the wax with the flat of the brush parallel to the slide.
The wax should be warm enough to remain liquid for a second or two before beginning to solidify. The next layer of wax has to be applied just as the previous layer of wax is beginning to solidify to ensure a good bond between the layers.
If the wax is not warm enough increase the temperature of the hotplate, or the room temperature, or the slide before placing on the ringing table, or reduce the distance between hotplate and ringing table, or take less time between applications of wax!
Making the coverslip cement
If we are making a aqueous fluid mount the cement must seal the water in, and the seal must be flexible so as not to stress the coverslip and cause the seal to break as temperatures fluctuate during the lifetime of the slide.
The Marson method for fluid mounts used a proprietary cement called “Clearseal”. This cement is no longer available and its exact formulation is not known. However, Richardson (2007) revealed it to be a rosin/wax type mixture with a composition approximating to rosin (colophony resin) 56 : paraffin wax 14 : toluene 30 (by weight).
I tried this formulation but found it was not as satisfactory as the original Clearseal.
I then discovered the formula given by Underhill (1989) for a thermal rosin cement – best pale rosin 8 parts, white beeswax 1 part, white petroleum jelly BP Vaseline® 2 parts.
I wondered if Clearseal might have been Underhill’s formula dissolved in toluene. I took his formula and added toluene in the proportion indicated by Richardson. The cement that results appears to behave very much like the original Clearseal.
The procedure I follow is:
- Take a clean wide-mouthed screw-top 30 ml glass jar to contain the coverslip cement.
- Using a digital precision scale, weigh into the jar 8 g rosin, 1 g beeswax and 2 g Vaseline.
- Let the whole melt on a hotplate at a temperature just hot enough to melt the mixture and no higher. Remove from the hotplate and allow to cool a little.
- Make sure there are no naked flames in the vicinity (toluene is highly flammable) and weigh 4.7 g of toluene into the jar.
- Mix thoroughly (I use a cocktail stick) and leave to return to room temperature ready for use.
In time the cement hardens as toluene evaporates. It can be reconstituted by the addition of a little toluene, warming slightly and remixing.
Applying the coverslip cement
The method is the same as the application of Clearseal as described in the Marson method, except that the wax cells are larger and require a larger brush. I use a No. 2 brush, series 301, from Rosemary and Co Artists Brushes.
The cement should be applied to the top of the cell, except the inner edge, and down the sides of the cell onto the glass slide. If cement is applied too near the inner edge it may subsequently seeps into cell and contaminates the fluid mount.
Glass slides
The standard 3 × 1 inch glass slide must be thoroughly clean to ensure a good bond with the wax cell.
I soak the slides in 5% Decon® 90 for 24 hours, use a toothbrush to scrub the slides with CIF® micro particle cleaner and Ives cleaning fluid (1/3 methylated spirits, 2/3 water, a dash of Decon 90), rinse in tap water, dry with a clean cloth, and polish with a clean cotton handkerchief.
Coverslips
The No. 1 coverslips commonly used in high power microscopy are too fragile for these wax cells. The wax cell however are intended for low power microscopy where coverslip thickness will not be as critical. I have been using No. 1.5 coverslips, though No. 2 or 3 would give a more robust cell if they can be obtained. One coverslip on top of another may be a solution but I have not tried it.
The coverslips should be thoroughly cleaned, with the same method used for the glass slides if necessary.
Slide recycling
Inevitably some attempts to make the wax cells will fail. Both the slide and the wax can be reused. Heat the slide on the hotplate just enough to release the wax from the slide. Wash remaining wax off the slide using cellulose thinners and clean the slides again in the usual way.
The same applies to the cold slides used to flatten the top of the cell.
Storing deep cell slides
These deep fluid mounts pose a problem with storage. The slides need to be stored horizontally and with sufficient clearance to avoid damage to the cell.
Conventional slide storage boxes and cabinets are too shallow to accommodate cells more than 2 mm deep.
To begin with I made spacers to separate the trays in a conventional slide box and am in the process of developing a slide cabinet with trays spaced to accommodate cells up to 6 mm in depth. I am using the same cabinet to store the slides during manufacture.
References
Marson, J. E. (1983). Practical Microscopy. Northern Biological Supplies, Booklet 6
Richardson, D. T. (2007). NBS (Northern Biological Supplies) Reagents. Balsam Post, 75, Page 34
Underhill, D. (1989). Preparation and Mounting of Thin Sections and Small Whole Mounts of Rocks and Minerals for Microscopical Examination, Page 32
McPherson, J. (2016). More from the Notebooks of the Late E. D. Evens. Balsam Post, 110, Page 28